OSX Wi-fi and Ethernet network simultaneously connected and static routing

So recently I had a situation where I had my Ethernet and Wifi connected to 2 different networks in my MAC OS X, and I had a very specific use case for this

I needed to use the Ethernet connection to access 1 specific host (an internal web service), the connection through the ethernet cable allowed this but did not allow internet access, the Wifi connection allowed internet access but will not allow access to the internal web service, so basically what I needed was :

  • Have both connections active
  • Access the internal web service through the Ethernet connection
  • Access all the other hosts through the Wi-fi connection

Just connecting both interfaces does not work I was either getting access to the internet or either access to the internal WebService; if you check this article over at apple OS X network interfaces priority you can see that you can change the priority used by the system to route the requests; so if you change the priority of the Wi-fi to be on top you get internet access but not access to the internal network, and vice-versa

Sure you can make it work this way but it's really painful to have to manually change the interfaces priority to accommodate what you are trying to do at that moment

The solution that I found is to add a static route to that host; this can be easily done in a few steps (you will need for this the IP of the internal host you are trying to access)

  1. Give your Wi-fi interface the highest priority (put it on top), for this you can refer to the apple link cited above
  2. Identify the interface names, for that execute the following command on the terminal netstat -nr (in my case en0 is the ethernet interface whereas the Wi-fi is the en1)
Add a static route for the specific host (10.120.136.57) telling it to use the gateway of the Ethernet interface by running the following command in the terminal
sudo route add -host 10.120.136.57 10.247.131.1

And that should be it, please note that restarting the PC will probably remove the static route from the routing table so you will have to re-add it

Debug Java SSL/HTTPS WebService with man in the middle proxy

In this article I will be showing how to debug WebServices HTTPS/SSL requests by using a Man in the Middle proxy, this can especially be useful when dealing with WebServices errors since all request will go through the proxy we will be able to see all the content that is sent back and forward

There are several proxies out there that support HTTPS/SSL queries but my favorite by far is mitmproxy and this is the one I will be showing in this post.

The installation instructions detailed here for mitmproxy are for MacOSX but can easily be adapted to Linux distributions; please note that a lot of the instructions detailed here apply to Java applications

1. Install mitmproxy

Personally I use home-brew for my package management; so I assume you have it installed (otherwise you'll have to install mitmproxy manually)

Run the following command to install mitmproxy :

brew install mitmproxy

Your output should look something similar to this

==> Installing dependencies for mitmproxy: libpng, freetype, jpeg
==> Installing mitmproxy dependency: libpng
==> Downloading https://homebrew.bintray.com/bottles/libpng-1.6.21.el_capitan.bottle.tar.gz
######################################################################## 100,0%
==> Pouring libpng-1.6.21.el_capitan.bottle.tar.gz
🍺  /usr/local/Cellar/libpng/1.6.21: 25 files, 1.2M
==> Installing mitmproxy dependency: freetype
==> Downloading https://homebrew.bintray.com/bottles/freetype-2.6.3.el_capitan.bottle.tar.gz
######################################################################## 100,0%
==> Pouring freetype-2.6.3.el_capitan.bottle.tar.gz
🍺  /usr/local/Cellar/freetype/2.6.3: 61 files, 2.5M
==> Installing mitmproxy dependency: jpeg
==> Downloading https://homebrew.bintray.com/bottles/jpeg-8d.el_capitan.bottle.2.tar.gz
######################################################################## 100,0%
==> Pouring jpeg-8d.el_capitan.bottle.2.tar.gz
🍺  /usr/local/Cellar/jpeg/8d: 19 files, 713.7K
==> Installing mitmproxy
==> Downloading https://homebrew.bintray.com/bottles/mitmproxy-0.16.el_capitan.bottle.1.tar.gz
######################################################################## 100,0%
==> Pouring mitmproxy-0.16.el_capitan.bottle.1.tar.gz
🍺  /usr/local/Cellar/mitmproxy/0.16: 1,317 files, 19.8M

2. Add the appropriate SSL certificates to the keystore and truststore

Before anything you will need to add at least the 2 following certificates to your truststore and keystore :

  • The SSL certificate of the site your invoking through your web service
  • The mitmproxy certificate

Please note that I assume you already have a truststore and keystore already configured on your environment

Add the website certificate

   keytool -import -file mywebsite.com -alias mtimproxy -keystore truststore
   keytool -import -file mywebsite.com -alias mtimproxy -keystore keystore

When prompted provide the appropriate password

The mitmproxy certificate can be found under ~/.mitmproxy/ (if the folder does not exist yet it might be necessary to run once the mitmproxy so it will be created)

   keytool -import -file ~/.mitmproxy/mitmproxy-ca-cert.pem -alias mtimproxy -keystore truststore
   keytool -import -file ~/.mitmproxy/mitmproxy-ca-cert.pem -alias mtimproxy -keystore keystore

3. Start mitmproxy

Here I'm starting the proxy and making it listen on port 8080

   mitmproxy --app-port 8080

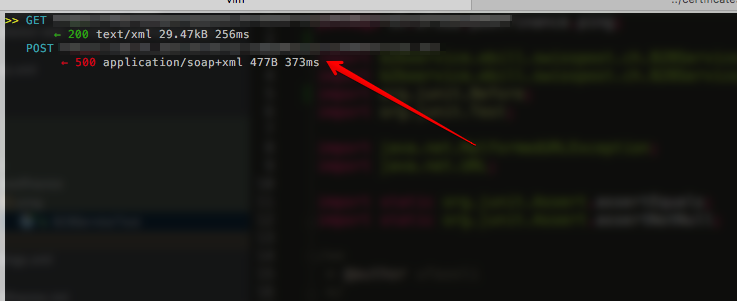
Once the command executed you should see the console open on your terminal and you will start seeing the request going through the proxy

4. Configure Java proxy and keystore / truststore paths

        System.setProperty("javax.net.ssl.trustStore", "./truststore");
        System.setProperty("javax.net.ssl.trustStorePassword", "password");
        System.setProperty("javax.net.ssl.keystore", "./keystore");
        System.setProperty("javax.net.ssl.keyStorePassword", "password");
        System.getProperties().put("http.proxyHost", "localhost");
        System.getProperties().put("http.proxyPort", "8080");
        System.getProperties().put("https.proxyHost", "localhost");
        System.getProperties().put("https.proxyPort", "8080");

5. Check mitmproxy output

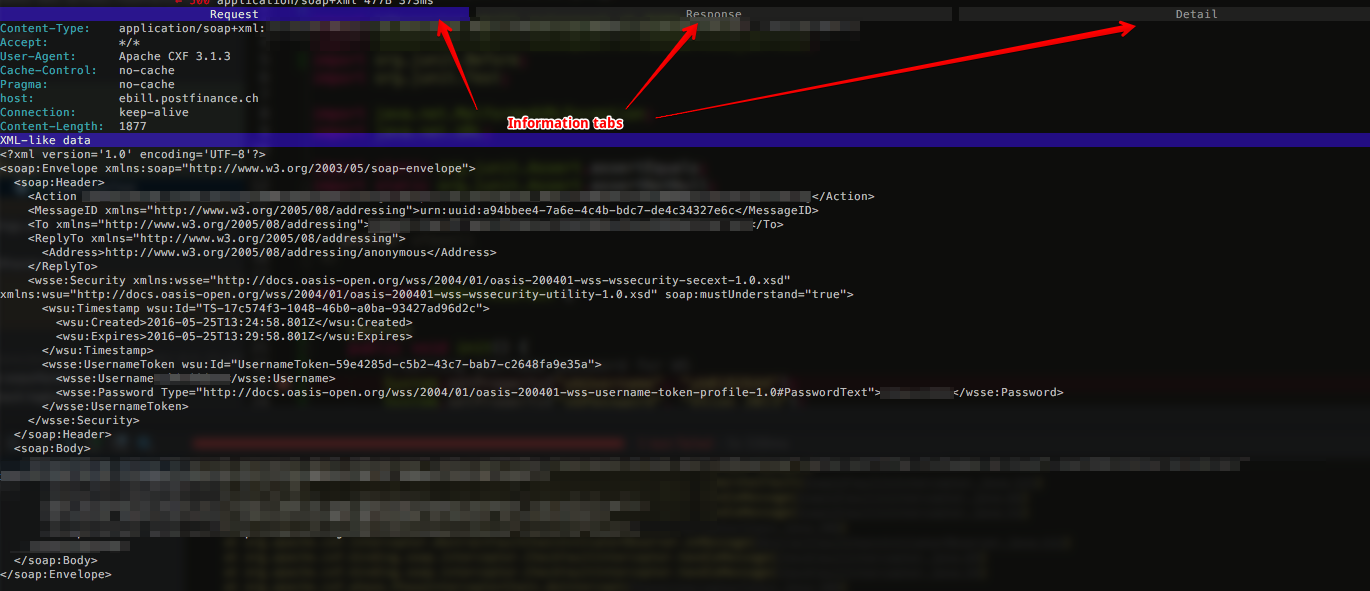
Once the request start going through the proxy you should be able to see them on the console and click on the ones you would like more detail

As you can see from the screenshots you have multiple tabs containing a lot of info

Linux change timezone and force ntpd synchronization

This short article shows how to change the timezone of the Linux distribution as well as forcing the synchronisation of date/time with the ntpd servers

This applies specifically applies to CentOS so some changes might be possible depending on the distribution
1.Change timezone
cp /etc/localtime /root/old.timezone
rm /etc/localtime
ln –s /usr/share/zoneinfo/Europe/Zurich /etc/localtime
2.Add ntpd servers to you configuration file (optional)

Edit (or create) the /etc/ntpd.conf and add the appropriate ntpd servers :

server xxx.xxx.xxx.xxx
note: xxx.xxx.xxx.xxx is the ip or domain name of the server
3.Stop the ntpd daemon

/etc/init.d/ntpd stop

4.Force the date update

Force the update of the date with the new timezone and eventually the ntpd servers


ntpdate xxx.xxx.xxx.xxx

5.Stop the ntpd daemon

/etc/init.d/ntpd start

6.Stop the ntpd daemon

date

Install / build docker squash on OS X to reduce docker image size

Recently while I was trying to install a Docker related app called docker-squash on OSX El Capitan.

For those who are not familiar with the utility; docker squash is a nice utility that reduces the size of docker images by removing the layers

However when running the command

go get github.com/docker/docker/pkg/units

I was getting the following error message :


Building docker-squash
export.go:19:2: cannot find package "github.com/docker/docker/pkg/units" in any of:
        /usr/lib/go/src/pkg/github.com/docker/docker/pkg/units (from $GOROOT)
        /root/t/docker-squash/src/github.com/docker/docker/p

Below I will show you how to build docker squash step by step (some steps can be omitted i.e. installing go if you already have installed)

Install go and set-up variables

brew install go
mkdir $HOME/.go
export GOPATH=$HOME/.go
export PATH=$PATH:$GOPATH/bin

Clone the docker squash repo

I'm not sure this is required but clone the repo under ~/.go/src/github.com/jwilder/docker-squash/

git clone https://github.com/jwilder/docker-squash.git

Install glock and sync your repo

under the folder ~/.go/src/github.com/jwilder/docker-squash/ run the following command

go get github.com/robfig/glock

Once the command finished sync your local repo with glock

glock sync github.com/jwilder/docker-squash

Install the units package

go get github.com/docker/docker/pkg/units

Build docker squash

GOBIN=$(pwd) make

Install gnu-tar and added to the path

brew install gnu-tar
PATH="/usr/local/opt/gnu-tar/libexec/gnubin:$PATH"

Move the executable to a bin folder

You should now have a docker-squash executable in your local repository; move the executable to a bin folder of your choice for example /usr/local/bin/

You should now be able to run docker-squash from your mac

Final thoughts and remarks

If you use docker-squash frequently you should change your .bashrc to do this automatically

Jaspersoft Studio OSX jdk 8/7 not starting

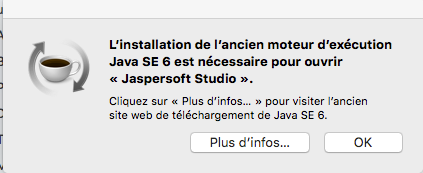
Recently I downloaded Jaspersoft studio on my Mac OSX but I was having trouble laughing the app as the system kept telling me I needed the older runtime version of Java, as you can see from the screenshot below (sorry in french)

Luckily this is solved pretty easy head up to your Applications folder and right click on Jaspersoft Studio.app then on the pop-up menu show package contents then inside the Contents folder you should find an info.plist file; edit the file and add the following line (or change the Current in the path with the JDK version you want) :

-vm/System/Library/Frameworks/JavaVM.framework/Versions/Current/Commands/java

Save the edited file; you should now be able to launch the software without problems

HSQLDB Query log - Output SQL statements to log file

It's sometimes useful (especially for debbuging) to be able to see all the SQL statements that the database runs

Lots of RDBMS have this very useful feature (MySQL for example calls it query log)

The HSQLDB is one of those and it can be accomplished in several ways, here I will show you how to do it within the db url and using a SQL statement :

1.- In the DB url

Just add the following parameter to your db url :


hsqldb.sqllog=3

For example :


jdbc:hsqldb:file:c:/dev/db/my_db;shutdown=true;hsqldb.sqllog=3

2.- Through a SQL statement

SET DATABASE EVENT LOG SQL LEVEL 3

Once this is done you will find a log file in the same folder as your database with the naming convention like ${dbname}.sql.log like so :


my_db.sql.log

More info here : hsqldb monitoring documentation

Content disposition duplicate headers solution for google chrome

Recently I had a problem while serving dynamic content in a Spring MVC application; (more details here) when attempting to open some of the dynamic content with Chrome I was having a weird error message :

Duplicate headers received from server The response from the server contained duplicate headers. This problem is generally the result of a misconfigured website or proxy. Only the website or proxy administrator can fix this issue. Error 349 (net::ERR_RESPONSE_HEADERS_MULTIPLE_CONTENT_DISPOSITION): Multiple distinct Content-Disposition headers received. This is disallowed to protect against HTTP response splitting attacks.

I wasn't sure why I was having this problem, since some dynamic content was working properly and I was setting only once the Content-Disposition header on my code

So after searching around a bit I stumbled upon the HTTP specs it turns out the Content-Disposition header should not contain a coma since it will be treated as a header separator

Multiple message-header fields with the same field-name MAY be present in a message if and only if the entire field-value for that header field is defined as a comma-separated list [i.e., #(values)]. It MUST be possible to combine the multiple header fields into one "field-name: field-value" pair, without changing the semantics of the message, by appending each subsequent field-value to the first, each separated by a comma.

Personally I decided to create slugs for all my file names using the Slugify library :


    com.github.slugify
    slugify
    2.1.3


  public String slugify(String originalFileName){

      String extension = FilenameUtils.getExtension(originalFileName);
      return new Slugify(true).slugify(FilenameUtils.removeExtension(originalFileName)) +"."+extension;;

  }

OSX show used ports or listening applications with their PID

On OSX you can display applications listening on a given port using the lsof the commands described below will show listening application...