Showing posts with label ssh. Show all posts

SSH linux how to kill an idle or innactive connection

Sometimes when you're disconnected abruptly from a remote server like if your network connection gets dropped, you can be left with a ghost or inactive SSH session.

This can become pretty annoying when you're doing some SSH port redirection since you will not be able to bind to a given port since the ghost connection is still using that port, and you might end up with error messages such as the following :

debug1: Local connections to LOCALHOST:21521 forwarded to remote address localhost:21521
debug1: Local forwarding listening on 127.0.0.1 port 21521.
bind: Address already in use
debug1: Local forwarding listen

Now there are a few ways of dealing with this issue, the one I prefer is a 3 step operation :

1.Check who is connected to the server

This step is actually optional but it allows you to check which user is currently connected to the server and prevent accidentally destroying another user's session (or at least warning him that you will do it ;) )

To check who's connected to the server you can run the w command. the w command shows who is logged in to the system and what they are doing.

So go ahead and run the following command on your prompt :

   [ufasoli]> w

You should see an output similar to this one

 20:16:14 up 132 days,  3:38,  2 users,  load average: 0.04, 0.03, 0.00
USER     TTY        LOGIN@   IDLE   JCPU   PCPU WHAT
root     pts/0     20:07    0.00s  0.02s  0.00s w
root     pts/1     20:09    6:17   0.02s  0.02s -bash

Here you can identify your user with the WHAT column as it indicates what the user is doing (invoking the command w in our case) /

2.Display the running processes

By using the pstree command with the -p to show process identification numbers (PIDs)

Go ahead and run the following command :

[ufasoli]> pstree -p

pstree displays the processes (i.e., executing instances of programs) on the system in the form of a tree diagram so when running the above command you should have an output similar to the one below :

init(1)─┬─cron(8865)
        ├─cupsd(2385)
        ├─oracle(2063)
        ├─oracle(2065)
        ├─oracle(2067)
        ├─oracle(2069)
        ├─oracle(2176)
        ├─oracle(2180)
        ├─oracle(12830)
        ├─scsi_eh_1(226)
        ├─scsi_eh_2(232)
        ├─scsi_eh_3(236)
        ├─slpd(2136)
        ├─sshd(2411)─┬─sshd(12840)───bash(12842)───pstree(12908)
        │            └─sshd(12887)───bash(12889)
        ├─sshd(14276)
        ├─syslogd(2035)
        └─tnslsnr(3917)


3.Kill the unwanted process

In our case the unwanted session has the PID 12287 as it's the session without the pstree command that we've just issued.

You can now kill the unwanted PID (just be careful not to kill a colleagues session ;) ):

   [ufasoli]> kill -1 12887

Once the session is killed you should be able to bind to the previously occupied port

Keeping alive a SSH connection or in my case a multi-hop ssh tunnel to prevent timeout

A few months ago I wrote an article on how to create a multi-hop SSH tunnel between 3 machines

Since then I have been using this a lot for one of the projects I'm working on but I was annoyed that whenever the connection went idle for more than 2 minutes (like if I was reading an article or answering an email) the connection will be dropped abruptly and I will have to start it all over again...

After playing a bit with SSH options and reading ssh man I finally found my salvation, that is the -o flag with 2 options :

TCPKeepAlive
Specifies whether the system should send TCP keepalive messages to the other side. If they are sent, death of the connection or crash of one of the machines will be properly noticed. However, this means that connections will die if the route is down temporarily, and some people find it annoying. On the other hand,if TCP keepalives are not sent, sessions may hang indefinitely on he server, leaving host users and consuming server resources. The default is "yes" (to send TCP keepalive messages), and the server will notice if the network goes down or the client host crashes. This avoids infinitely hanging sessions. To disable TCP keepalive messages, the value should be set to "no".
ServerAliveInterval
Sets a timeout interval in seconds after which if no data has been received from the server, ssh will send a message through the encrypted channel to request a response from the server. The default is 0, indicating that these messages will not be sent to the server. This option applies to protocol version 2 only.

Below is the line of code that I use to create my multi-hop SSH tunnel and to prevent it from getting disconnected when idle :

ssh -o TCPKeepAlive=no -o ServerAliveInterval=15 -v -L38080:localhost:38080 ufasoli@host1 -t ssh -o TCPKeepAlive=no -o ServerAliveInterval=15 -v -L38080:localhost:38080 ufasoli@host2 -t ssh -o TCPKeepAlive=no -o ServerAliveInterval=15 -v -L38080:localhost:8080 ufasoli@host3

Here I'm disabling the TCPKeepAlive option on all the SSH chained connections and sending a message through the tunnel every 15 seconds to keep the data flowing

Please note that disabling the TCPKeepAlive option might be frowned upon by your IT Linux Guru / System administrator since as stated in the manual can keep alive dead connections (like if you forget to close your connection) so be careful when using these options and do not forget to properly close your SSH connection / tunnel. Also as I always say, I'm no Linux Guru so I'm not aware of the possible side-effects of this options so use them at your own risk !

Multi-hop ssh tunnel - howto : Creating a SSH tunnel with port forwarding between multiple hosts

How to create a multi-hop ssh tunnel or how to chain multiple ssh tunnels. (or SSH inception)

For security reasons sometimes you need to jump through hoops in order to connect to a server in SSH and from that server SSH to another server and so on

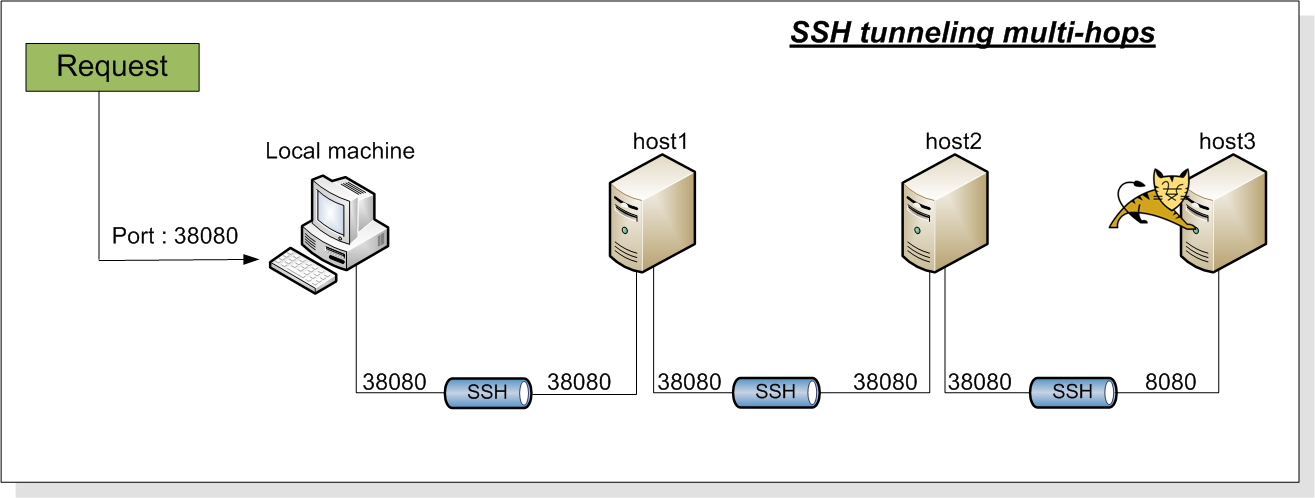
Consider the following scenario :

  • An application is deployed on a tomcat server on the host3 and listens on the port 8080
  • From my local machine I need to access the tomcat server on the machine host3 but it's not reachable from my machine
  • I need to carry out some tests that need a graphical browser (Firefox, Chrome, etc.)
  • host3 is only accessible from host2which is only accessible from host1

SSH tunneling can help you in this scenario; you can find more information regarding here by forwarding requests on a given port to another port on another machine all through a (or in our case multiple)SSH connection(s)

Below is a graphical representation of what I'm trying to accomplish :

So without anymore delay let's get to it :

All of the following commands are issued from a single terminal, prompt, shell or whatever you want to call it, that needs to remain open to keep alive the tunnels.

1.Connect the local machine to host1 (create the first tunnel)

[ufasoli@local]> ssh -L38080:localhost:38080 ufasoli@host1

2.Connect to host2 from host1 (create the second tunnel)

[ufasoli@host1]>ssh -L38080:localhost:38080 ufasoli@host2

3.Connect to host3 from host2 (create the third and last tunnel)

[ufasoli@host2]>ssh -L38080:localhost:8080 ufasoli@host3

4.Checking the result

Now if everything went as expected you should be able to see your tomcat application by firing your favorite browser with the and entering the target remote URL as a localhost URL with the 38080 port, like for example http://localhost:38080/mywebapp

5.Bonus points

If you prefer you can do all of the above steps in one giant SSH command using the -t flag to chain commands( I also added the -v flag for a more verbose output)

[ufasoli@local]> ssh -v -L38080:localhost:38080 ufasoli@host1  -t ssh -v -L38080:localhost:38080 ufasoli@host2 -t ssh -v -L38080:localhost:8080 ufasoli@host3

Glassfish Cluster SSH - Tutorial : How to create and configure a glassfish cluster with SSH (Part 2)

3. Glassfish cluster configuration

With our pre-requirements covered it's time to start configuring our cluster

A. Enabling remote access on the glassfish servers

By default the remote administration feature is disabled on the GlassFishServer This is to reduce your exposure to an attack from elsewhere in the network.

So if you attempt to administer the server remotely you will get a 403 - Forbidden HTTP status as the response. This is true regardless of whether you use the asadmin command, an IDE, or the REST interface.

You will need to start up the glassfish server on each one of your servers by executing the following command

$GFISH_HOME/bin/asadmin start-domain domain1

Once the servers are up you can turn remote administration on running the following command locally in each one of the servers (please ensure the glassfish instance is running when you execute the command) and when prompted enter the appropriate user/password :

$GFISH_HOME/bin/asadmin enable-secure-admin

This commands actually accomplishes 2 things it enables remote administration and encrypts all admin traffic.

In order for your modifications to be taken into account you will need to restart the glassfish server by running the following commands :

$GFISH_HOME/bin/asadmin stop-domain domain1

Once the sever is stopped you need to start it again so it can pick-up the remote admin parameter

You can now stop the running servers on all the nodes (except server1) by executing the above stop-domaincommand

Note : From this point forward all the operations should be executed on the server hosting the DAS(Domain Admin Server) in our case server1 so make sure it's running.


Tip : To avoid having to type your glassfish user/password when you run each command you can check my other post regarding the asadmin login command here that will prompt you once your your credentials and store them in an encrypted file under /home/gfish/.asadminpass


B. Creating the cluster nodes

A node represents a host on which the GlassFish Server software is installed.

A node must exist for every host on which GlassFish Server instances reside. A node's configuration contains information about the host such as the name of the host and the location where the GlassFish Server is installed on the host. For more info regarding glassfish nodes click here

The node for server1 is automatically created when you create your domain so we will create a node for each of the remaining servers (server2 & server3).

Creating the node2 on server2

[server1]$ $GFISH_HOME/bin/asadmin create-node-ssh --nodehost=server2 node2
Enter admin user name>  admin
Enter admin password for user "admin">
Command create-node-ssh executed successfully.

Creating the node3 on server3

[server1] $GFISH_HOME/bin/asadmin create-node-ssh --nodehost=server3 node3
Enter admin user name>  admin
Enter admin password for user "admin">
Command create-node-ssh executed successfully.

Note : If you followed my tip regarding the credentials storage your output might be slightly different (no user/password prompt)

C. Creating the cluster

Once the nodes created it's time for us to create our cluster


[server1]$ $GFISH_HOME/bin/asadmin create-cluster myCluster
Enter admin user name>  admin
Enter admin password for user "admin">
Command create-cluster executed successfully.

D. Creating the cluster instances

Now that we have the nodes and the cluster configured, we need to create the instances that will be part of the cluster.

a. Creating the local instance (instance that will be running on the same server as the DAS)

[server1]$ $GFISH_HOME/bin/asadmin create-local-instance --cluster myCluster --node localhost i_1
Command _create-instance-filesystem executed successfully.
Port Assignments for server instance i_1:
JMX_SYSTEM_CONNECTOR_PORT=28686
JMS_PROVIDER_PORT=27676
HTTP_LISTENER_PORT=28081
ASADMIN_LISTENER_PORT=24848
JAVA_DEBUGGER_PORT=29009
IIOP_SSL_LISTENER_PORT=23820
IIOP_LISTENER_PORT=23700
OSGI_SHELL_TELNET_PORT=26666
HTTP_SSL_LISTENER_PORT=28181
IIOP_SSL_MUTUALAUTH_PORT=23920
The instance, i_1, was created on host localhost
Command create-instance executed successfully.
b. Creating the remote instances

node2 --> i_2

[server1]$GFISH_HOME/bin/asadmin create-instance --cluster myCluster --node node2 i_2

node3 --> i_3

[server1]$GFISH_HOME/bin/asadmin create-instance --cluster myCluster --node node3 i_3
The message output should be similar to the one shown in the first code snippet (omitted for readability).

E. Working with the cluster

This section show a few useful commands when managing clusters

a. Showing clusters status
[server1]$GFISH_HOME/bin/asadmin list-clusters
myCluster running
b. Instance status

[server1]$ $GFISH_HOME/bin/asadmin list-instances
i_1   running
i_2   running
i_3   running
Command list-instances executed successfully.
c. Starting the cluster
/data/glassfish/bin/asadmin start-cluster myCluster
d. Stopping the cluster
$GFISH_HOME/bin/asadmin stop-cluster myCluster
d. Starting an instance
$GFISH_HOME/bin/asadmin start-instance i_1
d. Stopping an instance
$GFISH_HOME/bin/asadmin stop-instance i_1
e. Deploying a war to the cluster
$GFISH_HOME/bin/asadmin deploy --enabled=true --name=myApp:1.0 --target myCluster myApp.war

4. Configuring the glassfish as a daemon/service

In a production environment you will probably want your cluster to startup automatically (as a daemon/service) when your operating system boots

In this section I will show you how to create 2 possible scripts for starting/stopping a glassfish server under a Linux CentOS distribution (please note that depending on your Linux distribution this might not be the same)

In our cluster configuration there are mainly 2 types of instances :

  • DAS(Domain Admin Server) instance : This is our main instance it will handle the cluster configuration and propagate it to the cluster instances
  • Clustered instance : A clustered instance inherits its configuration from the cluster to which the instance belongs and shares its configuration with other instances in the cluster.

Please note that due to this difference the startup scripts for each instance type will be slightly different.

Whether we are configuring a clustered instance or DAS instance the script will be under :

/etc/init.d/glassfish
A. Creating the service script for the DAS (server1)

The following is an example start-up script for managing a glassfish DAS instance. It assumes the glassfish password is already stored in the .asadminpass file as show before.

#!/bin/bash
#
# chkconfig: 3 80 05
# description: Startup script for Glassfish
GLASSFISH_HOME=/opt/glassfish/bin;
GLASSFISH_OWNER=gfish;
GLASSFISH_DOMAIN=gfish;
CLUSTER_NAME=mycluster
export GLASSFISH_HOME GLASSFISH_OWNER GLASSFISH_DOMAIN CLUSTER_NAME
start() {
        echo -n "Starting Glassfish: "
        su $GLASSFISH_OWNER -c "$GLASSFISH_HOME/asadmin start-domain $GLASSFISH_DOMAIN"
        su $GLASSFISH_OWNER -c "$GLASSFISH_HOME/asadmin start-cluster $CLUSTER_NAME"
        echo "done"
}
stop() {
        echo -n "Stopping Glassfish: "
        su $GLASSFISH_OWNER -c "$GLASSFISH_HOME/asadmin stop-cluster $CLUSTER_NAME"
        su $GLASSFISH_OWNER -c "$GLASSFISH_HOME/asadmin stop-domain $GLASSFISH_DOMAIN"
        echo "done"
}
stop_cluster(){
     echo -n "Stopping glassfish cluster $CLUSTER_NAME"
     su $GLASSFISH_OWNER -c "$GLASSFISH_HOME/asadmin stop-cluster $CLUSTER_NAME"
     echo "glassfish cluster stopped"

}

start_cluster(){
     echo -n "Starting glassfish cluster $CLUSTER_NAME"
     su $GLASSFISH_OWNER -c "$GLASSFISH_HOME/asadmin start-cluster $CLUSTER_NAME"
     echo "Glassfish cluster started"
}
case "$1" in
        start)
                start
                ;;
        stop)
                stop
                ;;
        stop-cluster)
               stop_cluster
                ;;
       start-cluster)
              start_cluster
              ;;
        restart)
                stop
                start
                ;;
        *)
                echo $"Usage: Glassfish {start|stop|restart|start-cluster|stop-cluster}"
                exit
esac
B. Creating the service script for the cluster instances (server2,server3)

Below is an exemple script for configuring a glassfish cluster instance

#!/bin/bash
#
# chkconfig: 3 80 05
# description: Startup script for Glassfish
GLASSFISH_HOME=/opt/glassfish/bin;
GLASSFISH_OWNER=gfish;
NODE=n2
INSTANCE=i2

export GLASSFISH_HOME GLASSFISH_OWNER NODE INSTANCE
start() {
        echo -n "Starting Glassfish: "
        su $GLASSFISH_OWNER -c "$GLASSFISH_HOME/asadmin --user $GLASSFISH_ADMIN --passwordfile $GLASSFISH_PASSWORD  start-local-instance --node $NODE --sync normal $INSTANCE"
        echo "done"
}
stop() {
        echo -n "Stopping Glassfish: "
        su $GLASSFISH_OWNER -c "$GLASSFISH_HOME/asadmin stop-local-instance --node $NODE $INSTANCE"
        echo "done"
}
case "$1" in
        start)
                start
                ;;
        stop)
                stop
                ;;
        restart)
                stop
                start
                ;;
        *)
                echo $"Usage: Glassfish {start|stop|restart}"
                exit
esac

Warning : Since clustered instances cannot exist outside a cluster it's important that the local glassfish server is not started using the asadmin start-domain.If you do so you will probably loose all your cluster configuration for that instance.

You should always start the clustered instances with the command shown above

7. Troubleshooting & additional resources

I'm getting the message 'remote failure ...'


remote failure: Warning: some parameters appear to be invalid.
SSH node not created. To force creation of the node with these parameters rerun the command using the --force option.
Could not connect to host arte-epg-api1.sdv.fr using SSH.
The subsystem request failed.
The server denied the request.
Command create-node-ssh failed.

This is probably because the SFTP subsystem is not enabled on the target node. Please ensure that the following line is uncommented in the sshd_config file

Subsystem       sftp    /usr/libexec/openssh/sftp-server

Where can I find the glassfish startup/shutdown scripts ?

You can find these scripts over at my github account

Glassfish Cluster SSH - Tutorial : How to create and configure a glassfish cluster with SSH (Part 1)

0. Presentation

A cluster is a named collection of GlassFish Server instances that share the same applications, resources, and configuration information.

GlassFish Server enables you to administer all the instances in a cluster as a single unit from a single host, regardless of whether the instances reside on the same host or different hosts. You can perform the same operations on a cluster that you can perform on an unclustered instance, for example, deploying applications and creating resources.

In this we will configure a 3 node Glassfish cluster using SSH and using only the command-line util asadmin.

Below is a global picture of the target cluster structure :

The following are the conventions/assumptions that will be used throughout this tutorial

  • linux user : gfish
  • glassfish domain : domain1
  • glassfish cluster name : myCluster

1. Pre-requirements

A. SSH key configuration (Optional but used in this tutorial)

In order for the different instances of glassfish to communicate easily with each other it's a good idea to generate ssh keys for each of the users running the glassfish process (ideally the same user/password combination in each machine).

We will be generating the keys for the same user that runs the glassfish process. For this tutorial it will be assumed the user is gfish

a. Generating the ssh keys

On each of the machines (sever1, sever2, sever3) execute the following command, and leave the default options

[server] ssh-keygen -t rsa

Your output should be similar to the one below :

generating public/private rsa key pair.
Enter file in which to save the key (/home/gfish/.ssh/id_rsa):
Enter passphrase (empty for no passphrase):
Enter same passphrase again:
Your identification has been saved in /home/gfish/.ssh/id_rsa.
Your public key has been saved in /home/gfish/.ssh/id_rsa.pub.
The key fingerprint is:
00:6a:ef:30:65:45:7a:15:1f:f0:65:6d:81:03:cd:1d gfish@server1
The key's randomart image is:
+--[ RSA 2048]----+
|    ..o +oo+o+Eo |
|   . + . o += +  |
|  o + o   o  o   |
| . + . .         |
|  o .   S        |
|   +             |
|    .            |
|                 |
|                 |
+-----------------+
b. Copying the ssh keys to the servers

Once your key is generated you will need to copy your each one of the generated server keys between the different servers allowing you to connect without entering a password.

For that you will need to execute the following command on each one of the servers by slightly modifying it to reflect the target server


[server1] cat /home/gfish/.ssh/id_rsa.pub | ssh gfish@server2 'cat >> .ssh/authorized_keys'

In this example we are copying the ssh key belonging to the server1 to the server2 authorized_keys file this will allow the user gfish to connect to the api1 server without using a password.

As stated before this operation needs to be repeated for each one of the servers by by adapting the syntax to your case

In the end your key distribution should be similar to :

server1 key
server2
server3
server2 key
server1
server3(optional)
server3 key
server1
server2(optional)
c. Authorized_keys2 (optional)

Depending on the ssh version you are using you will probably make a copy of the authorized_keys file and name it authorized_keys2.

This can be done by executing the following command (again on each one of your servers :

cp authorized_keys authorized_keys2

Once the previous steps are completed you should be able to log from one server to another through SSH without the need for a password.

Execute the following command to confirm it:

[server1]ssh gfish@server2

If you are prompted to enter a password when executing the previous command then something went wrong so you should recheck your config.

B. SSH Subsytem

When deploying applications on a cluster they are deployed to the cluster nodes using SFTP. You will need to ensure that the SFTP SSH subsytem is enabled in all of the machines that will be hosting the glassfish instances

To do this please ensure that your sshd_config file (probably under /etc/ssh/sshd_config) has the following line and that it's not commented :

Subsystem       sftp    /usr/libexec/openssh/sftp-server

Otherwise you may run into this kind of message errors when creating the ssh nodes (see troubleshooting)

Glassfish cluster ssh node. Subsystem request failed error when creating a ssh node

Recently I stumbled upon a nasty and obscure error while configuring a glassfish 3.x cluster

I had all my ssh configuration properly in place with all my ssh keys between my nodes I could connect with no issues between the different machines by executing the ssh command :

[user@das~]$ssh machine1.com 

Even when I executed the asadmin command to setup the ssh configuration on the remote server everything comes up normally :

[user@das~]$ ./asadmin setup-ssh machine1.com
Successfully connected to user@achine1.com using keyfile /home/user/.ssh/id_rsa
SSH public key authentication is already configured for user@achine1.com
Command setup-ssh executed successfully.

But every-time I wanted to add a ssh node either by using the asadmin tool or the glassfish administration console I kept getting the following error message :

[user@das~]$ asadmin create-node-ssh --nodehost=machine1.com node1
remote failure: Warning: some parameters appear to be invalid.
SSH node not created. To force creation of the node with these parameters rerun the command using the --force option.
Could not connect to host machine1.com using SSH.
The subsystem request failed.
The server denied the request.
Command create-node-ssh failed.
Side-note: If you use the --force parameter as suggested by the asadmin tool, the create-ssh-node command will end successfully but problems will arise later

After searching for a bit I realized that the problem was with SSH configuration and not a really a glassfish error

As it turns out my hosting provider had disabled SFTP on the target machine's ssh configuration. Once found the solution was pretty simple, just un-comment or add the following line to your ssh_config file


Subsystem       sftp    /usr/libexec/openssh/sftp-server

You will probably need to restart sshd on the target machine

Once the sshd restarted head back to the DAS machine and try to create the ssh node again, if everything goes as planned you should get a similar output to this :

[das]asadmin create-node-ssh --nodehost=machine1.com node1
Command create-node-ssh executed successfully.

OSX show used ports or listening applications with their PID

On OSX you can display applications listening on a given port using the lsof the commands described below will show listening application...