Showing posts with label tutorial. Show all posts

Asciidoctor maven integration : introduction to asciidoctor and maven asciidoctor plugin part 2/2

This is the second part of the Asciidoctor maven integration tutorial part 1/2 where we explore some of Asciidoctor cool features

4. Additional cool formatting elements and content

There are plenty of nice cheat-sheets out there that resume much better all the cool stuff you can do with (see 5. Some useful links) so I will just list here a few tips to get you started

4a. Asciidoc files inclusion or composition

Personally when writing documentation I like to create a separate file for each topic and then include them in an a big index file (you can do this otherwise if you prefer) this can easily be done using the include macro

Let's create a new Asciidoc page named topic1 and add some content to it

= Topic 1

== Intro

This page describes some information related to topic1

and now include the newly created page using the include macro

= Asciidoctor hello world


include::topic1.ad[]

After re-compiling the code you should end up with the content of the file topic1.ad inside the index.html file

4b. Table of contents (TOC)

Asciidoctor has a lot of macros and attributes that help you when writing documentation, the full list of attributes can be found here

Attributes are configured as child tags of the attributes XML tag under the maven asciidoctor plugin. To enable the table of contents while providing a TOC level we will use the toclevels attribute, since once you start writing a lot of documentation you could end up with a pretty big HTML document it's a good idea to enable the creation of anchors using the setanchors attribute


          org.asciidoctor
          asciidoctor-maven-plugin
          ${version.asciidoctor}
          
              
                 output-html
                 generate-resources
                 
                     process-asciidoc
                 
                 
                     html
                     book                    
                     
                          
                          true
                          
                          3


Once you configured the maven plugin it's time to add the :toc: attribute to the index.ad header

Please be aware within the the first lines of a document known as document header spacing and markup are important as they have special meaning and are handled differently by the asciidoc parsing engine

, for more information on the document header please check the documentation here

= Asciidoctor hello world
:toc:


include::topic1.ad[]

Once the documentation files generated the result should be pretty close to the one in the picture below :

Please note : Not all attributes are supported through the maven asciidoctor plugin so you have to play a bit with the maven configuration to see which ones are supported.
4c. Adding images in your documentation

Everyone knows a picture is worth 1000 words so why don't add some pretty pictures to your documentation

By default when generating the documentation files containing images the asciidoctor plugin will prefix all image paths with images/ this of course can be changed but I usually leave it with the default option

We will now add an images folder to our maven project under src/main/resources/images and put an image of your choice inside of it in my case asciidoc-logo.png

Once this is done let's add our image to our document

= Topic 1

== Intro

This page describes some information related to topic1.

Asciidoc is cool

image::asciidoc-logo.png[Asciidoc logo]

Now we have included an image in our doc file but we're not done yet, you need to instruct maven to copy our images folder to the generated-docs target folder

 
...


                src/main/resources/images
                ${build.directory}/generated-docs/images
            
  .....


4d. Code syntax highlighting

Code syntax highlighting is very important when writing documentation since it helps with the readability. Asciidoc currently supports 4 frameworks to handle your code highlighting

  • coderay
  • prettify
  • highlightjs
  • pygments (not currently supported by maven asciidoctor plugin)

For this tutorial let's say we will use coderay so we first need to activate the syntax highlighting in the maven POM file :


          org.asciidoctor
          asciidoctor-maven-plugin
          ${version.asciidoctor}
          
             
                 output-html
                 generate-resources
                 
                    process-asciidoc


                      coderay
                      html
                      book


                         true
                         3


Once our maven configuration is done we can add some source code to our docs, the syntax is pretty straightforward in it's most basic form you just put [source, language] and you surround your code with ---- like so :

[source,java]
----
public class HelloWorld{

   public static void main(String[] args){
      System.out.println("Hello World");
   }
}
----

Once your docs file regenerated you should see something like this :

4e. External links (target _blank)

Whenever I'm reading an HTML documentation containing a link I prefer it when the link opens automatically in a new tab i.e.target="_blank"

This can be achieved using link attributes however by default in Asciidoc this feature is disabled; luckily you just need one small line in your pom.xml file to enable this feature with an attribute


          org.asciidoctor
          asciidoctor-maven-plugin
          ${version.asciidoctor}
          
             
                 output-html
                 generate-resources
                 
                    process-asciidoc


                      coderay
                      html
                      book


                         true
                         3
                         
                        true


Now you can go ahead an add your links withe


http://powerman.name/doc/asciidoc[Asciidoc cheatsheet, window="_blank"]


So this concludes this 2 part introductory tutorial to Asciidoctor and maven integration ; have fun writing cool documentation!

5. Some useful links

As usual you can find the code source for this tutorial over github here

Below is a list of useful links to help you with Asciidoctor such as cheatsheet or general documentation :

Asciidoctor maven integration : introduction to asciidoctor and integration with maven asciidoctor plugin part 1/2

For some time now I have been hearing a lot aboutAsciiDoc as a mean to write documentation but never had the chance to use it...

Recently I stumbled upon AsciiDoctor and since I was about to begin working on a small project with no previous documentation I thought it was the perfect time to try it out..

Documentation is an important part of a project which more often than we would like gets put aside for a great number of reasons. One of them is that we as developpers tend not to like writing documentation...

0.Intro and scope

In this tutorial I will show you how to integrate Asciidoctor class in your Java project and get you started with a small documentation example as well as some tips such as :

  • Asciidoc templating using fragments
  • Generating a TOC (table of contents) for your documentation
  • Integrating images in your asciidoc files
  • Code syntax highlighting in your asciidoc files
  • Making external links (i.e. _target blank)

Please note that I assume you have some knowledge of Asciidoc so I won't delve into much detail regarding Asciidoc

1. What is AsciiDoc ?

AsciiDoc is a text document format for writing notes, documentation, articles, books, ebooks, slideshows, web pages, man pages and blogs. AsciiDoc files can be translated to many formats including HTML, PDF, EPUB, man page. AsciiDoc is highly configurable: both the AsciiDoc source file syntax and the backend output markups (which can be almost any type of SGML/XML markup) can be customized and extended by the user.

2. What is Asciidoctor ?

Asciidoctor is a pure Ruby processor for converting AsciiDoc source files and strings into HTML 5, DocBook 4.5 and other formats. It’s published as a RubyGem and is available under the MIT open source license.

I invite you to take a look to this nice presentation by Dan Allen Discover Zen Writing with Asciidoc which gives you a good overview of AsciiDoc

3. First steps and configuration

First things first go ahead and create a simple maven module let's say a simple JAR for example using the maven archetype plugin or using you favorite IDE

mvn archetype:generate -DgroupId=com.ufasoli -DartifactId=asciidoc-helloworld -DinteractiveMode=false

Once your maven project is created go ahead and create a folder named asciidoc under src/main this is where we will be putting our Asciidoc files

Let's go ahead and create our first asciidoc file under the folder we just created let's name it index.ad and for the moment keep it simple let's just add the page title

= Asciidoctor hello world

So now with our first asciidoc file let's go ahead and configure maven to parse our documentation files and generate HTML documentation files by using the Maven Asciidoctor plugin


          org.asciidoctor
          asciidoctor-maven-plugin
          ${version.asciidoctor}
          
              
                 output-html
                 generate-resources
                 
                     process-asciidoc
                 
                 
                     html
                     book                    


Now if you run a mvn clean compile you will see an index.html that will be generated under the target/generated-docs folder with an output similar to :

So that's it for the first part of this tutorial, you can find the rest tomorrow on part 2

Spring boot and spring data jpa tutorial - A sample application using spring 4.0 spring boot and JPA (part 2/2)

This is the second part of the Spring boot and spring data jpa tutorial - A sample application using spring 4.0 spring boot and JPA

At the end of the tutorial I promised you that we will be removing one of the steps when running the application, that is merge the package and run in a maven command and make him do the work

5.- Making maven run the JAR directly

We're going to make maven run the runnable JAR for us after it has been packaged, for this purpose we're going to use one of org.codehaus.mojo maven plugins


....


                org.springframework.boot
                spring-boot-maven-plugin


                org.codehaus.mojo
                exec-maven-plugin
                1.2.1
                
                    com.ufasoli.tutorials.spring.boot.HelloWorldApp


...

So what's happening here ? :

  • By adding the exec plugin to the build section of our pom.xml and providing a mainClass when we run the appropriate maven goals the application will be packaged and run directly from maven

You can try this by running :

    mvn clean package exec:java

By running this on your console the application will be packaged and run directly using maven

Now let's add some more interesting stuff to our app

6.- Adding Spring Data and JPA support

We're now going to add some Spring Data and JPA support to our app.

The first thing you need to do is add the additional spring boot starter module (spring-boot-starter-data-jpa) to your maven dependencies and since we will be using an embedded HSQL database the dependency for the HSQL driver too:

 
 ...
        
        
            org.springframework.boot
            spring-boot-starter-data-jpa


            hsqldb
            hsqldb
            ${version.hsqldb}
        
...


The next thing you need to do is tell spring to enable Spring Data and its repository features this is done by simply adding the @EnableJpaRepositories to your Spring App class

@ComponentScan 
@EnableAutoConfiguration
@EnableJpaRepositories
public class HelloWorldApp {

    public static void main(String[] args) throws Exception {

        SpringApplication.run(HelloWorldApp.class, args);

    }
}

And that's it if you now build and run your application you will have a Spring web application with Spring Data and JPA support even though the app won't do much for the moment ;).

So what's happening here?

  • Annotating the Spring Application class with the @EnableJpaRepositories will cause a lot of "magic" to happen and a lot of things will be configured/initialized for you such as an Entity Manager, DataSource (see next item), JPA Vendor adapter ..
  • Since we haven't defined a DataSource if Spring finds an in memory JDBC driver in the Classpath it will automatically create one for us using a set of predefined conventions

Now let's add some logic to our app :

7.- Adding some Spring data and JPA logic

The first thing we're going to be doing is adding a simple JPA entity to perform some CRUD operations later on


import javax.persistence.Entity;
import javax.persistence.Id;

@Entity
public class Book {


    @Id
    protected String isbn;
    protected String title;
    protected String author;
    protected String description;
    // omitting setters/getters/constructors
}

So now that we have our entity lets use one of the great features of Spring Data : The Repositories Abstraction :

The goal of Spring Data repository abstraction is to significantly reduce the amount of boilerplate code required to implement data access layers for various persistence stores.

By annotating an interface with @Repository and making this interface extend CrudRepositoryYou will get among other things 2 pretty nifty goodies of the box:

  • Some utility CRUD methods such as findAll() or count()
  • Auto-implementation of methods based on naming convention such as findBooksByAuthor()

And the best part is you get all of this without writing any code logic for these methods (of course you can override these methods, and write some custom methods) as shown in the doc, you can even avoid yet to write some code by using for example the @Query annotation

So now lets create our CRUD repository for our entity with a custom method to find the books by their author


import com.ufasoli.tutorials.spring.boot.model.Book;
import org.springframework.data.repository.CrudRepository;
import org.springframework.data.repository.query.Param;
import org.springframework.stereotype.Repository;


@Repository
public interface BookRepository extends CrudRepository {

    public Iterable findBooksByAuthor(@Param("author") String author);
}

This interface will be picked up by Spring an instantiated accordingly.

We're almost done with our JPA/database logic, one last thing I would like to do is to have some data inserted automatically into the database when the application starts (especially since we're dealing with an in-memory database

Once again we can take advantage of another Spring convention, if you place a data.sql file in your maven resources directory the script will be automatically executed when the database will be bootstrapped and after reverse engineering your entities into the database

INSERT INTO book(isbn, title, author,description) VALUES ('1111111', 'The Spirit Thief (The Legend of Eli Monpress #1)', 'Rachel Aaron',
                         'Eli Monpress is talented. He''s charming. And he''s a thief.But not just any thief. He''s the greatest thief of the age - and he''s also a wizard. And with the help of his partners - a swordsman with the most powerful magic sword in the world but no magical ability of his own, and a demonseed who can step through shadows and punch through walls - he''s going to put his plan into effect.The first step is to increase the size of the bounty on his head, so he''ll need to steal some big things. But he''ll start small for now. He''ll just steal something that no one will miss - at least for a while. Like a king');

INSERT INTO book(isbn, title, author,description) VALUES ('2222222', 'The Spirit Rebellion (The Legend of Eli Monpress, #2)', 'Rachel Aaron',
                         'Eli Monpress is brilliant. He''s incorrigible. And he''s a thief.He''s also still at large, which drives Miranda Lyonette crazy. While she''s been kicked out of the Spirit Court, Eli''s had plenty of time to plan his next adventure. But now the tables have turned, because Miranda has a new job -- and an opportunity to capture a certain thief. Things are about to get exciting for Eli. He''s picked a winner for his newest heist. His target: the Duke of Gaol''s famous ''thief-proof'' citadel. Eli knows Gaol is a trap, but what''s life without challenges? Except the Duke is one of the wealthiest men in the world, a wizard who rules his duchy with an iron fist, and an obsessive perfectionist with only one hobby: Eli. It seems that everyone is hunting for Eli Monpress');

INSERT INTO book(isbn, title, author,description) VALUES ('3333333', 'The Spirit Eater (The Legend of Eli Monpress, #3)', 'Rachel Aaron',
                         'With the pressure on after his success in Gaol, Eli Monpress, professional thief and degenerate, decides it''s time to lie low for a bit. Taking up residence in a tiny seaside village, Eli and his companions seize the chance for some fun and relaxation. Nico, however, is finding it a bit hard. Plagued by a demon''s voice in her head and feeling powerless, she only sees herself as a burden. Everyone''s holiday comes to an untimely close, though, when Pele arrives to beg Eli''s help for finding her missing father. But there are larger plans afoot than even Eli can see, and the real danger, and the solution, may lie with one of his own and her forgotten past. If only Nico could remember whose side she''s on.');

INSERT INTO book(isbn, title, author,description) VALUES ('4444444', 'The Spirit War (The Legend of Eli Monpress, #4)', 'Rachel Aaron',
                         'Eli Monpress is vain. He''s cocky. And he''s a thief. But he''s a thief who has just seen his bounty topped and he''s not happy about it. The bounty topper, as it turns out, is his best friend, bodyguard, and master swordsman, Josef. Who has been keeping secrets from Eli. Apparently, he''s the only prince of a rather feisty country and his mother (a formidable queen who''s every bit as driven and stubborn as he is) wants him to come home and do his duty, which means throwing over personal ambitions like proving he''s the greatest swordsman who ever lived. Family drama aside, Eli and Josef have their hands full. The Spirit Court has been usurped by the Council of Thrones and someone calling herself the Immortal Empress is staging a massive invasion. But it''s not just politics --- the Immortal Empress has a specific target in mind: Eli Monpress, the greatest thief in the world.');

INSERT INTO book(isbn, title, author,description) VALUES ('5555555', 'Spirit''s End (The Legend of Eli Monpress #5)', 'Rachel Aaron',
                         'First rule of thievery: don''t be a hero. When Eli broke the rules and saved the Council Kingdoms, he thought he knew the price, but resuming his place as the Shepherdess''s favorite isn''t as simple as bowing his head. Now that she has her darling back, Benehime is setting in motion a plan that could destroy everything she was created to protect, and even Eli''s charm might not be enough to stop her. But Eli Monpress always has a plan, and with disaster rapidly approaching, he''s pulling in every favor he can think of to make it work, including the grudging help of the Spirit Court''s new Rector, Miranda Lyonette. But with the world in panic, the demon stirring, and the Lord of Storms back on the hunt, it''s going to take more than luck and charm to pull Eli through this time. He''s going to have to break a few more rules and work with some old enemies if he''s going to survive');

8.- Wrapping things up with a REST controller

To wrap things up we'll add a simple RestController that will interact with our freshly created Repository


import com.ufasoli.tutorials.spring.boot.model.Book;
import com.ufasoli.tutorials.spring.boot.repositories.BookRepository;
import org.springframework.beans.factory.annotation.Autowired;
import org.springframework.http.MediaType;
import org.springframework.web.bind.annotation.PathVariable;
import org.springframework.web.bind.annotation.RequestMapping;
import org.springframework.web.bind.annotation.RequestMethod;
import org.springframework.web.bind.annotation.RestController;

@RestController // assumes @ResponseBody annotation in methods annotated with  @RequestMapping
@RequestMapping(value = "/books", produces = MediaType.APPLICATION_JSON_VALUE)
public class BookController {

    @Autowired
    protected BookRepository bookRepository;

    @RequestMapping
    public Iterable books() {
        return bookRepository.findAll(); // uses the findAll() method inherited from CrudRepository
    }


    @RequestMapping(value = "/{isbn}")
    public Book book(@PathVariable("isbn") String isbn) {
        return bookRepository.findOne(isbn);// uses the findOne() method inherited from CrudRepository
    }


    @RequestMapping(value = "/{isbn}", method = RequestMethod.DELETE)
    public String deleteBook(@PathVariable("isbn") String isbn) {

        try {
            bookRepository.delete(isbn);
            return String.format("Book [%s] successfully deleted", isbn);// uses the delete() method inherited from CrudRepository
        } catch (Exception e) {
            return String.format("A problem occurred when deleting Book [%s]", e.getMessage());
        }
    }

    @RequestMapping("/author/{author}")
    public Iterable booksByAuthor(@PathVariable("author") String author) {

        return bookRepository.findBooksByAuthor(author);// uses the custom method defined in our BookRepository interface
    }


}

So that's it you can re-run your application now using the maven goal

     mvn clean package exec:java

You should see your application bootstrapping your database and inserting data, and once it's fully started you should be able to play with your Web Service

9.-Some final thoughts

I must say that I quite enjoyed playing with Spring boot, as long as you're using the full spring stack it helps you get things running quickly and has some very useful starter modules and conventions

I also added the actuator module which gives you some metrics and stats (as REST endpoints) on your application which is pretty cool to have when running the app in production

Check it out here

As usual you can find the code source for this application over at my github account here

Spring boot and spring data jpa tutorial - A sample application using spring 4.0 spring boot and JPA (part 1/2)

Spring boot is a strongly opinionated framework / generator based on the principle of convention over configuration, which according to the website:

Spring Boot makes it easy to create Spring-powered, production-grade applications and services with absolute minimum fuss. It takes an opinionated view of the Spring platform so that new and existing users can quickly get to the bits they need

Basically by using a few annotations and minimum boilerplate code the framework/generator will configure all the necessary beans and contexts based on a set of conventions.

Spring boot has a few modules that depending on your needs can speed-up development such as :

  • spring data jpa
  • spring data mongodb
  • spring web
  • spring actuator
  • ...

Personally I find that when using the spring stack this tool is pretty awesome!!

When using this tool you must know that there are actually 2 ways to use spring boot :

  1. Using the cli (and by extension groovy)
  2. Using good old maven and the spring-boot plugins

In this tutorial we will be building a simple Hello World tutorial as a RESTful web service

1.- Getting things started

Add the required maven dependencies to your pom.xml

        spring-boot-hello-world-ws
    spring-boot-hello-world-ws
    1.0-SNAPSHOT


        org.springframework.boot
        spring-boot-starter-parent
        1.0.0.RC1


            org.springframework.boot
            spring-boot-starter-web


                org.springframework.boot
                spring-boot-maven-plugin


            spring-snapshots
            http://repo.spring.io/snapshot
            
                true


            spring-milestones
            http://repo.spring.io/milestone
            
                true


            spring-snapshots
            http://repo.spring.io/snapshot
        
        
            spring-milestones
            http://repo.spring.io/milestone


So what's happening here :

  • Since spring-boot is not G.A. yet you will need to include the Spring milestones repositories
  • When using maven your project will have to inherit from the spring boot starter parent in order for it to work
  • We are using the web module (see dependencies)
  • The spring-boot-maven-plugin will build a runnable jar file

2.- Creating our first controller

With the basic configuration out of the way we can start building our app.

Since this is going to be a RESTful API we will create a REST controller. Spring included a new annotation in the latest version @RestController. Types that carry this annotation are treated as controllers where @RequestMapping methods assume @ResponseBody semantics by default; which in our case it's what we want.

So with that being said let's write our first controller :


package com.ufasoli.tutorials.spring.boot.web.controllers;

import org.springframework.http.MediaType;
import org.springframework.web.bind.annotation.RequestMapping;
import org.springframework.web.bind.annotation.RestController;

/**
 * Created with IntelliJ IDEA.
 * User: Ulises Fasoli
 * Date: 04.02.14
 * Time: 15:33
 */
@RestController
@RequestMapping(value = "/hello", produces = MediaType.APPLICATION_JSON_VALUE)
public class HelloWorldController {

    @RequestMapping
    public String sayHello(){
        return "Hello World";
    }
}

Nothing special here just a simple Spring MVC controller but using the new @RestController annotation

We are now 2 steps away from running our Spring app.

3.- Creating our Spring Application main class

In order for the Spring context to be bootstrapped you will need to create a class that will run the Spring application inside a main method and a few annotations.So let's go ahead and do that :

package com.ufasoli.tutorials.spring.boot;

import org.springframework.boot.SpringApplication;
import org.springframework.boot.autoconfigure.EnableAutoConfiguration;
import org.springframework.context.annotation.ComponentScan;

/**
 * Created with IntelliJ IDEA.
 * User: Ulises Fasoli
 * Date: 04.02.14
 * Time: 11:39
 *
 */
@ComponentScan // spring standard component scan
// spring boot autoconfiguration will bootstrap your Spring
//application while attempting to configure the beans you need
// it will also bootstrap an in-memory database if a driver is found
// in the classpath and no datasource is defined
@EnableAutoConfiguration
public class HelloWorldApp {

    public static void main(String[] args) throws Exception {

        SpringApplication.run(HelloWorldApp.class, args);

    }
}


What's happening here? :

  • The @Component is standard spring annotation to search for annotated beans in the classpath
  • The @EnableAutoConfiguration is spring boot specific and will be doing most of the "magic"

We are now one step away from running our spring application! Yep that's it no web.xml configuration, no XML files, nothing!!

4.- Taking it for a spin

With the application configured it's time to test our app, so fire-up your IDE or your console and execute the following maven goal :

  mvn clean package

Once your app is packaged you can run the generated runnable JAR file by simple going into the target folder and running :


  java -jar .\spring-boot-hello-world-ws-1.0-SNAPSHOT.jar
 

If everything worked as expected you should see the Spring boot / maven output in your console :


  .   ____          _            __ _ _
 /\\ / ___'_ __ _ _(_)_ __  __ _ \ \ \ \
( ( )\___ | '_ | '_| | '_ \/ _` | \ \ \ \
 \\/  ___)| |_)| | | | | || (_| |  ) ) ) )
  '  |____| .__|_| |_|_| |_\__, | / / / /
 =========|_|==============|___/=/_/_/_/
 :: Spring Boot ::            (v1.0.0.RC1)

2014-02-04 15:46:47.628  INFO 12516 --- [           main] c.u.tutorials.spring.b
oot.HelloWorldApp  : Starting HelloWorldApp on LTULF01 with PID 12516 (C:\dev\wo
rkspaces\idea\java-blog-tutorials\spring-boot-hello-world-ws\target\spring-boot-
hello-world-ws-1.0-SNAPSHOT.jar started by ULF)
....

That's it you can now test your controller by calling the url :

 curl http://localhost:8080/hello.json

You should see the Hello world message printed out in the console

Personally it kind of bugs me to have to package the app and then run it manually so on part 2 of this tutorial we will change this so Maven will do the work for us.....

Multi-hop ssh tunnel - howto : Creating a SSH tunnel with port forwarding between multiple hosts

How to create a multi-hop ssh tunnel or how to chain multiple ssh tunnels. (or SSH inception)

For security reasons sometimes you need to jump through hoops in order to connect to a server in SSH and from that server SSH to another server and so on

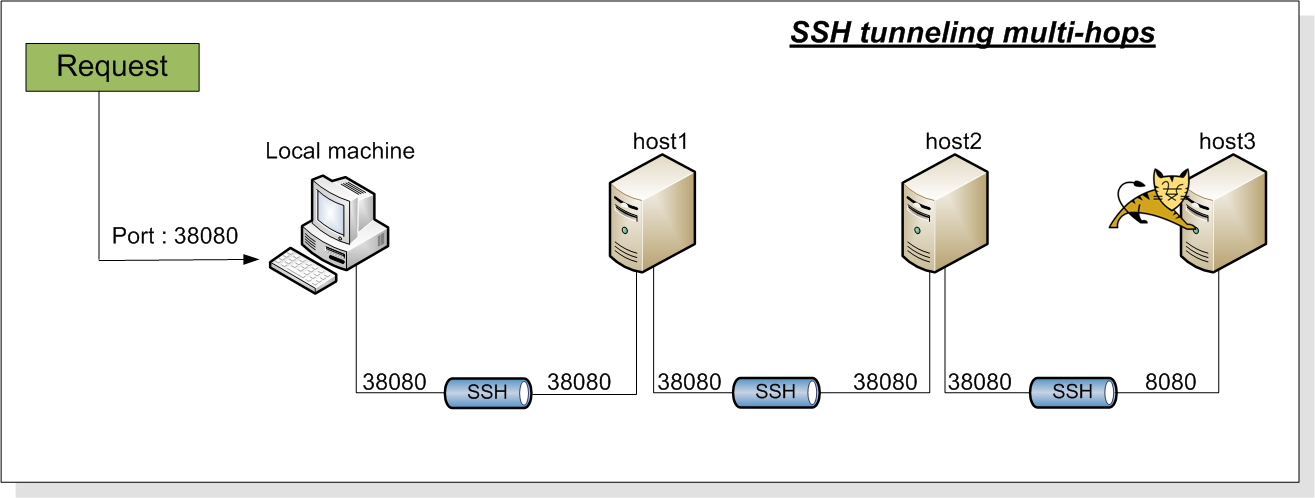
Consider the following scenario :

  • An application is deployed on a tomcat server on the host3 and listens on the port 8080
  • From my local machine I need to access the tomcat server on the machine host3 but it's not reachable from my machine
  • I need to carry out some tests that need a graphical browser (Firefox, Chrome, etc.)
  • host3 is only accessible from host2which is only accessible from host1

SSH tunneling can help you in this scenario; you can find more information regarding here by forwarding requests on a given port to another port on another machine all through a (or in our case multiple)SSH connection(s)

Below is a graphical representation of what I'm trying to accomplish :

So without anymore delay let's get to it :

All of the following commands are issued from a single terminal, prompt, shell or whatever you want to call it, that needs to remain open to keep alive the tunnels.

1.Connect the local machine to host1 (create the first tunnel)

[ufasoli@local]> ssh -L38080:localhost:38080 ufasoli@host1

2.Connect to host2 from host1 (create the second tunnel)

[ufasoli@host1]>ssh -L38080:localhost:38080 ufasoli@host2

3.Connect to host3 from host2 (create the third and last tunnel)

[ufasoli@host2]>ssh -L38080:localhost:8080 ufasoli@host3

4.Checking the result

Now if everything went as expected you should be able to see your tomcat application by firing your favorite browser with the and entering the target remote URL as a localhost URL with the 38080 port, like for example http://localhost:38080/mywebapp

5.Bonus points

If you prefer you can do all of the above steps in one giant SSH command using the -t flag to chain commands( I also added the -v flag for a more verbose output)

[ufasoli@local]> ssh -v -L38080:localhost:38080 ufasoli@host1  -t ssh -v -L38080:localhost:38080 ufasoli@host2 -t ssh -v -L38080:localhost:8080 ufasoli@host3

Devops mode - first steps using puppet to automate environment configuration and installation

So it has been some time since I was at the DevoxxFR 2 years ago and had the chance to assist a few presentations regarding this "obscure movement" called DevOps and even tough I'm always interested in new stuff to play around with, coming out of the conference my feeling was "meh, I'll try it out sometime later"... and I never did...

But recently I got a task assigned : "install and configure a development and integration server"

The requirements were the following :

  • Java JDK7
  • Apache MAVEN
  • Apache ANT
  • GIT
  • Subversion (SVN)
  • Jenkins with the following plugins :
    1. Git plugin
    2. Apache MAVEN plugin
    3. Apache ANT plugin
  • Jenkins should run on a custom port namely port 9999

Now I've done this several times and there's nothing really complicated about it. But usually when I do something more than a few times I try to find a way to automate things (apparently we developers are lazy by nature)

As I'm no sysadmin or Linux expert and installing and configuring these tools may be slightly different from one Linux distribution to another, I was looking for an abstraction layer that will handle all these specifics for me.

It has been some time now that I've been hearing about DevOps and tools such as Puppet or Chef but never had the chance to use them.

So this time it was the perfect occasion for a Hello world in the DevOps universe, since this was a fairly small and simple configuration

After Googling a bit I decided to use Puppet instead of Chef this is a personal preference since I find it's JSON syntax easier to read, plus somewhere I read that there were more Puppet Forge modules than Chef recipes (these are pre-configured "plugins" for easier install) out there, but once again this criteria may depend on what you are attempting to install

After following the getting started tutorial available here I must say I was surprised on how easy some things can be done (granted this is a pretty basic tutorial, but we must begin somewhere) I encourage you to read it before checking the rest of the post.

There are 2 puppet versions the Free and the Enterprise version as well as a client-server or standalone approach

With the enterprise version you get a few nice things like a GUI console, a repository where you can manage your scripts, but I prefer the self-contained standalone approach and this is what I will be showing here.

Please note that this blog ticket is not meant to be an introduction to Puppet nor a fully configured production integration server but rather a simple use case based on a personal experience to get things started in the DevOps universe.

Below are the steps that I followed to achieve the task that was given to me :

1. Install Puppet

rpm -ivh http://yum.puppetlabs.com/el/6/products/i386/puppetlabs-release-6-7.noarch.rpm
yum install puppet

This step is distribution specific (I'm using CentOS)if you are not go check the install instructions for your Linux distribution

2. Install Puppet modules

2.1 Java

 puppet module install puppetlabs/java

2.2 Maven

puppet module install maestrodev/maven

2.3 Ant

 puppet module install maestrodev/ant

2.4 Git

 puppet module install puppetlabs/git

2.5 SVN

puppet module install maestrodev/svn

2.5 Jenkins

puppet module install rtyler/jenkins

3. Write your puppet script

include java
include maven
include ant
include git
include svn
include jenkins
jenkins::plugin{ "git" : ;}
jenkins::plugin{"ant": ;}

file_line{'jenkins_port':
        path => '/etc/sysconfig/jenkins',
        line => 'JENKINS_PORT="9999"',
        match => '^JENKINS_PORT=.*$',
        ensure => present
}

These pretty simple puppet script will install the different tools by including each one of the plugins we previously installed and in the end it will change the default Jenkins to the one required by using a puppet function file_line to manipulate a file and replace a line that matches the regular expression

So there you go I had some fun playing a bit with Puppet and will surely use it again in a similar situation..

Glassfish Cluster SSH - Tutorial : How to create and configure a glassfish cluster with SSH (Part 2)

3. Glassfish cluster configuration

With our pre-requirements covered it's time to start configuring our cluster

A. Enabling remote access on the glassfish servers

By default the remote administration feature is disabled on the GlassFishServer This is to reduce your exposure to an attack from elsewhere in the network.

So if you attempt to administer the server remotely you will get a 403 - Forbidden HTTP status as the response. This is true regardless of whether you use the asadmin command, an IDE, or the REST interface.

You will need to start up the glassfish server on each one of your servers by executing the following command

$GFISH_HOME/bin/asadmin start-domain domain1

Once the servers are up you can turn remote administration on running the following command locally in each one of the servers (please ensure the glassfish instance is running when you execute the command) and when prompted enter the appropriate user/password :

$GFISH_HOME/bin/asadmin enable-secure-admin

This commands actually accomplishes 2 things it enables remote administration and encrypts all admin traffic.

In order for your modifications to be taken into account you will need to restart the glassfish server by running the following commands :

$GFISH_HOME/bin/asadmin stop-domain domain1

Once the sever is stopped you need to start it again so it can pick-up the remote admin parameter

You can now stop the running servers on all the nodes (except server1) by executing the above stop-domaincommand

Note : From this point forward all the operations should be executed on the server hosting the DAS(Domain Admin Server) in our case server1 so make sure it's running.


Tip : To avoid having to type your glassfish user/password when you run each command you can check my other post regarding the asadmin login command here that will prompt you once your your credentials and store them in an encrypted file under /home/gfish/.asadminpass


B. Creating the cluster nodes

A node represents a host on which the GlassFish Server software is installed.

A node must exist for every host on which GlassFish Server instances reside. A node's configuration contains information about the host such as the name of the host and the location where the GlassFish Server is installed on the host. For more info regarding glassfish nodes click here

The node for server1 is automatically created when you create your domain so we will create a node for each of the remaining servers (server2 & server3).

Creating the node2 on server2

[server1]$ $GFISH_HOME/bin/asadmin create-node-ssh --nodehost=server2 node2
Enter admin user name>  admin
Enter admin password for user "admin">
Command create-node-ssh executed successfully.

Creating the node3 on server3

[server1] $GFISH_HOME/bin/asadmin create-node-ssh --nodehost=server3 node3
Enter admin user name>  admin
Enter admin password for user "admin">
Command create-node-ssh executed successfully.

Note : If you followed my tip regarding the credentials storage your output might be slightly different (no user/password prompt)

C. Creating the cluster

Once the nodes created it's time for us to create our cluster


[server1]$ $GFISH_HOME/bin/asadmin create-cluster myCluster
Enter admin user name>  admin
Enter admin password for user "admin">
Command create-cluster executed successfully.

D. Creating the cluster instances

Now that we have the nodes and the cluster configured, we need to create the instances that will be part of the cluster.

a. Creating the local instance (instance that will be running on the same server as the DAS)

[server1]$ $GFISH_HOME/bin/asadmin create-local-instance --cluster myCluster --node localhost i_1
Command _create-instance-filesystem executed successfully.
Port Assignments for server instance i_1:
JMX_SYSTEM_CONNECTOR_PORT=28686
JMS_PROVIDER_PORT=27676
HTTP_LISTENER_PORT=28081
ASADMIN_LISTENER_PORT=24848
JAVA_DEBUGGER_PORT=29009
IIOP_SSL_LISTENER_PORT=23820
IIOP_LISTENER_PORT=23700
OSGI_SHELL_TELNET_PORT=26666
HTTP_SSL_LISTENER_PORT=28181
IIOP_SSL_MUTUALAUTH_PORT=23920
The instance, i_1, was created on host localhost
Command create-instance executed successfully.
b. Creating the remote instances

node2 --> i_2

[server1]$GFISH_HOME/bin/asadmin create-instance --cluster myCluster --node node2 i_2

node3 --> i_3

[server1]$GFISH_HOME/bin/asadmin create-instance --cluster myCluster --node node3 i_3
The message output should be similar to the one shown in the first code snippet (omitted for readability).

E. Working with the cluster

This section show a few useful commands when managing clusters

a. Showing clusters status
[server1]$GFISH_HOME/bin/asadmin list-clusters
myCluster running
b. Instance status

[server1]$ $GFISH_HOME/bin/asadmin list-instances
i_1   running
i_2   running
i_3   running
Command list-instances executed successfully.
c. Starting the cluster
/data/glassfish/bin/asadmin start-cluster myCluster
d. Stopping the cluster
$GFISH_HOME/bin/asadmin stop-cluster myCluster
d. Starting an instance
$GFISH_HOME/bin/asadmin start-instance i_1
d. Stopping an instance
$GFISH_HOME/bin/asadmin stop-instance i_1
e. Deploying a war to the cluster
$GFISH_HOME/bin/asadmin deploy --enabled=true --name=myApp:1.0 --target myCluster myApp.war

4. Configuring the glassfish as a daemon/service

In a production environment you will probably want your cluster to startup automatically (as a daemon/service) when your operating system boots

In this section I will show you how to create 2 possible scripts for starting/stopping a glassfish server under a Linux CentOS distribution (please note that depending on your Linux distribution this might not be the same)

In our cluster configuration there are mainly 2 types of instances :

  • DAS(Domain Admin Server) instance : This is our main instance it will handle the cluster configuration and propagate it to the cluster instances
  • Clustered instance : A clustered instance inherits its configuration from the cluster to which the instance belongs and shares its configuration with other instances in the cluster.

Please note that due to this difference the startup scripts for each instance type will be slightly different.

Whether we are configuring a clustered instance or DAS instance the script will be under :

/etc/init.d/glassfish
A. Creating the service script for the DAS (server1)

The following is an example start-up script for managing a glassfish DAS instance. It assumes the glassfish password is already stored in the .asadminpass file as show before.

#!/bin/bash
#
# chkconfig: 3 80 05
# description: Startup script for Glassfish
GLASSFISH_HOME=/opt/glassfish/bin;
GLASSFISH_OWNER=gfish;
GLASSFISH_DOMAIN=gfish;
CLUSTER_NAME=mycluster
export GLASSFISH_HOME GLASSFISH_OWNER GLASSFISH_DOMAIN CLUSTER_NAME
start() {
        echo -n "Starting Glassfish: "
        su $GLASSFISH_OWNER -c "$GLASSFISH_HOME/asadmin start-domain $GLASSFISH_DOMAIN"
        su $GLASSFISH_OWNER -c "$GLASSFISH_HOME/asadmin start-cluster $CLUSTER_NAME"
        echo "done"
}
stop() {
        echo -n "Stopping Glassfish: "
        su $GLASSFISH_OWNER -c "$GLASSFISH_HOME/asadmin stop-cluster $CLUSTER_NAME"
        su $GLASSFISH_OWNER -c "$GLASSFISH_HOME/asadmin stop-domain $GLASSFISH_DOMAIN"
        echo "done"
}
stop_cluster(){
     echo -n "Stopping glassfish cluster $CLUSTER_NAME"
     su $GLASSFISH_OWNER -c "$GLASSFISH_HOME/asadmin stop-cluster $CLUSTER_NAME"
     echo "glassfish cluster stopped"

}

start_cluster(){
     echo -n "Starting glassfish cluster $CLUSTER_NAME"
     su $GLASSFISH_OWNER -c "$GLASSFISH_HOME/asadmin start-cluster $CLUSTER_NAME"
     echo "Glassfish cluster started"
}
case "$1" in
        start)
                start
                ;;
        stop)
                stop
                ;;
        stop-cluster)
               stop_cluster
                ;;
       start-cluster)
              start_cluster
              ;;
        restart)
                stop
                start
                ;;
        *)
                echo $"Usage: Glassfish {start|stop|restart|start-cluster|stop-cluster}"
                exit
esac
B. Creating the service script for the cluster instances (server2,server3)

Below is an exemple script for configuring a glassfish cluster instance

#!/bin/bash
#
# chkconfig: 3 80 05
# description: Startup script for Glassfish
GLASSFISH_HOME=/opt/glassfish/bin;
GLASSFISH_OWNER=gfish;
NODE=n2
INSTANCE=i2

export GLASSFISH_HOME GLASSFISH_OWNER NODE INSTANCE
start() {
        echo -n "Starting Glassfish: "
        su $GLASSFISH_OWNER -c "$GLASSFISH_HOME/asadmin --user $GLASSFISH_ADMIN --passwordfile $GLASSFISH_PASSWORD  start-local-instance --node $NODE --sync normal $INSTANCE"
        echo "done"
}
stop() {
        echo -n "Stopping Glassfish: "
        su $GLASSFISH_OWNER -c "$GLASSFISH_HOME/asadmin stop-local-instance --node $NODE $INSTANCE"
        echo "done"
}
case "$1" in
        start)
                start
                ;;
        stop)
                stop
                ;;
        restart)
                stop
                start
                ;;
        *)
                echo $"Usage: Glassfish {start|stop|restart}"
                exit
esac

Warning : Since clustered instances cannot exist outside a cluster it's important that the local glassfish server is not started using the asadmin start-domain.If you do so you will probably loose all your cluster configuration for that instance.

You should always start the clustered instances with the command shown above

7. Troubleshooting & additional resources

I'm getting the message 'remote failure ...'


remote failure: Warning: some parameters appear to be invalid.
SSH node not created. To force creation of the node with these parameters rerun the command using the --force option.
Could not connect to host arte-epg-api1.sdv.fr using SSH.
The subsystem request failed.
The server denied the request.
Command create-node-ssh failed.

This is probably because the SFTP subsystem is not enabled on the target node. Please ensure that the following line is uncommented in the sshd_config file

Subsystem       sftp    /usr/libexec/openssh/sftp-server

Where can I find the glassfish startup/shutdown scripts ?

You can find these scripts over at my github account

Glassfish Cluster SSH - Tutorial : How to create and configure a glassfish cluster with SSH (Part 1)

0. Presentation

A cluster is a named collection of GlassFish Server instances that share the same applications, resources, and configuration information.

GlassFish Server enables you to administer all the instances in a cluster as a single unit from a single host, regardless of whether the instances reside on the same host or different hosts. You can perform the same operations on a cluster that you can perform on an unclustered instance, for example, deploying applications and creating resources.

In this we will configure a 3 node Glassfish cluster using SSH and using only the command-line util asadmin.

Below is a global picture of the target cluster structure :

The following are the conventions/assumptions that will be used throughout this tutorial

  • linux user : gfish
  • glassfish domain : domain1
  • glassfish cluster name : myCluster

1. Pre-requirements

A. SSH key configuration (Optional but used in this tutorial)

In order for the different instances of glassfish to communicate easily with each other it's a good idea to generate ssh keys for each of the users running the glassfish process (ideally the same user/password combination in each machine).

We will be generating the keys for the same user that runs the glassfish process. For this tutorial it will be assumed the user is gfish

a. Generating the ssh keys

On each of the machines (sever1, sever2, sever3) execute the following command, and leave the default options

[server] ssh-keygen -t rsa

Your output should be similar to the one below :

generating public/private rsa key pair.
Enter file in which to save the key (/home/gfish/.ssh/id_rsa):
Enter passphrase (empty for no passphrase):
Enter same passphrase again:
Your identification has been saved in /home/gfish/.ssh/id_rsa.
Your public key has been saved in /home/gfish/.ssh/id_rsa.pub.
The key fingerprint is:
00:6a:ef:30:65:45:7a:15:1f:f0:65:6d:81:03:cd:1d gfish@server1
The key's randomart image is:
+--[ RSA 2048]----+
|    ..o +oo+o+Eo |
|   . + . o += +  |
|  o + o   o  o   |
| . + . .         |
|  o .   S        |
|   +             |
|    .            |
|                 |
|                 |
+-----------------+
b. Copying the ssh keys to the servers

Once your key is generated you will need to copy your each one of the generated server keys between the different servers allowing you to connect without entering a password.

For that you will need to execute the following command on each one of the servers by slightly modifying it to reflect the target server


[server1] cat /home/gfish/.ssh/id_rsa.pub | ssh gfish@server2 'cat >> .ssh/authorized_keys'

In this example we are copying the ssh key belonging to the server1 to the server2 authorized_keys file this will allow the user gfish to connect to the api1 server without using a password.

As stated before this operation needs to be repeated for each one of the servers by by adapting the syntax to your case

In the end your key distribution should be similar to :

server1 key
server2
server3
server2 key
server1
server3(optional)
server3 key
server1
server2(optional)
c. Authorized_keys2 (optional)

Depending on the ssh version you are using you will probably make a copy of the authorized_keys file and name it authorized_keys2.

This can be done by executing the following command (again on each one of your servers :

cp authorized_keys authorized_keys2

Once the previous steps are completed you should be able to log from one server to another through SSH without the need for a password.

Execute the following command to confirm it:

[server1]ssh gfish@server2

If you are prompted to enter a password when executing the previous command then something went wrong so you should recheck your config.

B. SSH Subsytem

When deploying applications on a cluster they are deployed to the cluster nodes using SFTP. You will need to ensure that the SFTP SSH subsytem is enabled in all of the machines that will be hosting the glassfish instances

To do this please ensure that your sshd_config file (probably under /etc/ssh/sshd_config) has the following line and that it's not commented :

Subsystem       sftp    /usr/libexec/openssh/sftp-server

Otherwise you may run into this kind of message errors when creating the ssh nodes (see troubleshooting)

Spring MVC and Swagger. Generating documentation for your RESTful web services - PART 1

Automating your RESTful web services documentation Using Spring MVC with Swagger for generating it


Part 1 - Setting up the WAR and spring configuration


1.- Introduction


Through this simple tutorial I will be developing a simple web application using the following technologies :

The main goal of this tutorial is to illustrate how the swagger documentation framework can be integrated into a spring mvc application.

2.- The Database Model

In this tutorial we will be using a very simple model consisting of 1 table :


3.- Creating the maven project structure

There are a few of Spring archetypes when creating java web applications but I find them oversized for this simple tutorial so I will use here the org.codehaus.mojo.archetypes.webapp-javaee6 archetype :


mvn archetype:generate -DarchetypeGroupId=org.codehaus.mojo.archetypes -DarchetypeArtifactId=webapp-javaee6 -DpackageName=com.ufasoli.tutorial.swagger.springmvc -DgroupId=com.ufasoli.tutorial -DartifactId=swagger-spring-mvc -Dversion=1.0

This should generate a pretty standard maven WAR project structure

Note : You should adapt your groupId and artifactId according to your config.

4.- Dependencies

In your pom.xml file add the following dependencies that we are going to need for our project :


...
 
        ${project.build.directory}
        UTF-8
        3.2.1.RELEASE
        1.8.0.10


            javax
            javaee-web-api
            6.0
            provided


            com.mangofactory
            swagger-springmvc
            0.5.2


            org.springframework
            spring-core
            ${version.spring}


            org.springframework
            spring-jdbc
            ${version.spring}
        
        
            org.springframework
            spring-expression
            ${version.spring}
        
        
            org.springframework
            spring-web
            ${version.spring}
        
        
            org.springframework
            spring-webmvc
            ${version.spring}


            org.springframework
            spring-beans
            ${version.spring}
        
        
            org.hsqldb
            hsqldb
            ${version.hsqldb}


...

5.- Spring Configuration

There are many schools when it comes to creating spring context files
I usually create a spring-web.xml file under the src/main/webapp/WEB-INF folder that I will use as my web application context and an applicationContext.xml file under src/main/resources/META-INF/spring that will be my application context.

5.1.- Configuring the Application Context (applicationContext.xml)
5.1.1- Setting up the classpath scanner


5.1.2- Setting up the database

Spring has a pretty nifty way to step up an in-memory database.You can provide a list of SQL scripts that will be executed when the database is started

I have written 2 SQL scripts one for creating the database and another one to have some sample data inserted in the database

This scripts can be found under src/main/resources/sql :

CREATE TABLE BOOKS (id VARCHAR NOT NULL, title VARCHAR NOT NULL, author VARCHAR NOT NULL, publicationYear INTEGER, comment VARCHAR, PRIMARY KEY(id))
INSERT INTO BOOKS VALUES ('1', 'A Game of Thrones', 'George R. R. Martin', 1996, 'n.c.');
INSERT INTO BOOKS VALUES ('2', 'A Clash of Kings', 'George R. R. Martin', 1998, 'n.c.');
INSERT INTO BOOKS VALUES ('3', 'A Storm of Swords', 'George R. R. Martin', 2000, 'n.c.');
INSERT INTO BOOKS VALUES ('4', 'A Feast for Crows ', 'George R. R. Martin', 2005, 'n.c.');
INSERT INTO BOOKS VALUES ('5', 'A Dance with Dragons', 'George R. R. Martin', 2011, 'It was about time!');
INSERT INTO BOOKS VALUES ('6', 'The Winds of Winter', 'George R. R. Martin', 2014, 'If we are lucky!');
INSERT INTO BOOKS VALUES ('7', 'A Dream of Spring', 'George R. R. Martin', 2100, 'oh c`mon');

We will now configure the applicationContext.xml file using a HSQL in-memory database and instruct spring to execute the SQL scripts in a predefined order as well as bootstrap Spring's JDBC template class which is an utility class that simplifies the use of JDBC

Below is how the applicationContext.xml file should look like :


With this configuration every time the application is started the database will be bootstraped and some sample data will be inserted

5.2.- Configuring the Web Application Context (spring-web.xml)

The Web Application context extended Application Context which is designed for work with the standard javax.servlet.ServletContext so it's able to communicate with the container.

5.2.1- Setting up the classpath scanner & the Spring MVC configuration

I will not go into the details of Spring but to sumarize the classpath scanner for the web application context will essentially pick up the controllers and register them in the context whereas the Spring MVC configuration will define how controllers should by discovered and how URLs should be handled


5.3.- Configuring the web.xml descriptor

It's now time to tell our web app to use spring-mvc. For this to happen we need to edit the web.xml file under src/main/webapp/WEB-INF and add the spring configuration :


    Spring MVC Swagger integration


            index.html


        contextConfigLocation
        classpath:/META-INF/spring/applicationContext.xml


        org.springframework.web.context.ContextLoaderListener


        spring-servlet
        org.springframework.web.servlet.DispatcherServlet
        
        
            contextConfigLocation
            /WEB-INF/spring-web.xml
        
        1


        spring-servlet
        /


6.- Taking it for a spin

If everything goes according to plan we should be able to take our application for a spin with a simple hello world!

6.1.- Creating the HelloWorld Controller

Create a HelloWorldService.java file under src/main/java/ and the package of your choice

package com.ufasoli.tutorial.swagger.springmvc.web.services;

import org.springframework.http.MediaType;
import org.springframework.stereotype.Controller;
import org.springframework.web.bind.annotation.RequestMapping;
import org.springframework.web.bind.annotation.RequestMethod;
import org.springframework.web.bind.annotation.ResponseBody;
import javax.servlet.http.HttpServletResponse;

@Controller
@RequestMapping(value = "/hello", produces = MediaType.TEXT_PLAIN_VALUE)
public class HelloWorldService {

    @RequestMapping( produces = MediaType.TEXT_PLAIN_VALUE, method = RequestMethod.GET)
    public @ResponseBody String sayHelloWorld(HttpServletResponse response){

        return "Hello World!";
    }
}

With this configuration spring will register your hello-world controller under :

  ${context.root}/hello
6.2.- Configuring jetty and running the app

We are almost there, the last thing we need to do is to configure our embedded Jetty server

Head to your pom.xml file

...


    ...
     
      org.mortbay.jetty
      maven-jetty-plugin
      6.1.26
      
        
          /spring-mvc-swagger-tutorial
        
        0
        
          
             9090
             60000


     ...


...

This configuration will start a jetty server under the port 9090 and deploy my application under the /spring-mvc-swagger-tutorial context-root

6.3.- Running the app

Head to your command line or favorite IDE and run the following maven goal

   mvn jetty:run

Wait for your server to start, you should see a message similar to:

...
  2013-06-06 15:23:50.668:INFO::jetty-6.1.26
2013-06-06 15:23:50.825:INFO::No Transaction manager found - if your webapp requires one, please configure one.
2013-06-06 15:23:51.135:INFO:/spring-mvc-swagger-tutorial:Initializing Spring root WebApplicationContext
log4j:WARN No appenders could be found for logger (org.springframework.web.context.ContextLoader).
log4j:WARN Please initialize the log4j system properly.
log4j:WARN See http://logging.apache.org/log4j/1.2/faq.html#noconfig for more info.
2013-06-06 15:23:51.957:INFO:/spring-mvc-swagger-tutorial:Initializing Spring FrameworkServlet 'spring-servlet'
2013-06-06 15:23:53.511:INFO::Started SelectChannelConnector@0.0.0.0:9090
[INFO] Started Jetty Server

Now crack open your favorite browser and head to :

http://localhost:9090/spring-mvc-swagger-tutorial/hello

And if the programming Gods are good you should get your well deserved greeting

6.- Wrapping-up part 1

So that's it for part 1 of the tutorial. On the second part we will create a more complex controller and see how to integrate the Swagger framework into our project

You can find this sample application over at github :

Swagger - Spring MVC tutorial sample application code

OSX show used ports or listening applications with their PID

On OSX you can display applications listening on a given port using the lsof the commands described below will show listening application...