Showing posts with label java. Show all posts

Top 5 small java libraries for projects (functional, date, etc.)

For some time now most of my Java projects revolve around the Spring Boot Stack which contains pretty much everything you can need, however there's a list of small libraries and utilities that I love to use in my projects

Below is my top 5 small libraries I use in my projects

  • TotallyLazy : enhances the functional standard library with some syntaxic sugar
  • Lombok : because who wants to write setters/getters manually
  • JodaTime Yes, yes I know I should use now the new java API but I still like Joda best!
  • jOOλ : More functional sweetness
  • Apache Commons : Multi-purpose library

The above are my way-to-go small libraries for my projects, of course there are some specific libraries for a given case Jackson JSON or Caffeine Cache

BigDecimal rounding to the nearest 5 cents with Java's BigDecimal

Recently I hat to implement a function that would round to the nearest 5 cents and after googling around a bit I found bits and pieces here and there but none just worked for me, so below you can find a function that should do just that

/**
     * Rounds a decimal number to the nearest 5 cents using the following rules
     * 
     * Rounding rules :
     * - 0.1299 = 0.10
     * - 0.1300 = 0.15
     * - 0.1799 = 0.15
     * - 0.1800 = 0.20
     *
     * @param value the BigDecimal value to round
     * @return the rounded value for the big decimal with a scale of 2
     */
    public static BigDecimal roundToNearest5Cents(final BigDecimal value) {
        return value.setScale(2, RoundingMode.FLOOR).multiply(new BigDecimal(20)).add(new BigDecimal("0.5"))
                .setScale(0, RoundingMode.FLOOR).divide(new BigDecimal(20)).setScale(2, RoundingMode.FLOOR);
    }

Debug Java SSL/HTTPS WebService with man in the middle proxy

In this article I will be showing how to debug WebServices HTTPS/SSL requests by using a Man in the Middle proxy, this can especially be useful when dealing with WebServices errors since all request will go through the proxy we will be able to see all the content that is sent back and forward

There are several proxies out there that support HTTPS/SSL queries but my favorite by far is mitmproxy and this is the one I will be showing in this post.

The installation instructions detailed here for mitmproxy are for MacOSX but can easily be adapted to Linux distributions; please note that a lot of the instructions detailed here apply to Java applications

1. Install mitmproxy

Personally I use home-brew for my package management; so I assume you have it installed (otherwise you'll have to install mitmproxy manually)

Run the following command to install mitmproxy :

brew install mitmproxy

Your output should look something similar to this

==> Installing dependencies for mitmproxy: libpng, freetype, jpeg
==> Installing mitmproxy dependency: libpng
==> Downloading https://homebrew.bintray.com/bottles/libpng-1.6.21.el_capitan.bottle.tar.gz
######################################################################## 100,0%
==> Pouring libpng-1.6.21.el_capitan.bottle.tar.gz
🍺  /usr/local/Cellar/libpng/1.6.21: 25 files, 1.2M
==> Installing mitmproxy dependency: freetype
==> Downloading https://homebrew.bintray.com/bottles/freetype-2.6.3.el_capitan.bottle.tar.gz
######################################################################## 100,0%
==> Pouring freetype-2.6.3.el_capitan.bottle.tar.gz
🍺  /usr/local/Cellar/freetype/2.6.3: 61 files, 2.5M
==> Installing mitmproxy dependency: jpeg
==> Downloading https://homebrew.bintray.com/bottles/jpeg-8d.el_capitan.bottle.2.tar.gz
######################################################################## 100,0%
==> Pouring jpeg-8d.el_capitan.bottle.2.tar.gz
🍺  /usr/local/Cellar/jpeg/8d: 19 files, 713.7K
==> Installing mitmproxy
==> Downloading https://homebrew.bintray.com/bottles/mitmproxy-0.16.el_capitan.bottle.1.tar.gz
######################################################################## 100,0%
==> Pouring mitmproxy-0.16.el_capitan.bottle.1.tar.gz
🍺  /usr/local/Cellar/mitmproxy/0.16: 1,317 files, 19.8M

2. Add the appropriate SSL certificates to the keystore and truststore

Before anything you will need to add at least the 2 following certificates to your truststore and keystore :

  • The SSL certificate of the site your invoking through your web service
  • The mitmproxy certificate

Please note that I assume you already have a truststore and keystore already configured on your environment

Add the website certificate

   keytool -import -file mywebsite.com -alias mtimproxy -keystore truststore
   keytool -import -file mywebsite.com -alias mtimproxy -keystore keystore

When prompted provide the appropriate password

The mitmproxy certificate can be found under ~/.mitmproxy/ (if the folder does not exist yet it might be necessary to run once the mitmproxy so it will be created)

   keytool -import -file ~/.mitmproxy/mitmproxy-ca-cert.pem -alias mtimproxy -keystore truststore
   keytool -import -file ~/.mitmproxy/mitmproxy-ca-cert.pem -alias mtimproxy -keystore keystore

3. Start mitmproxy

Here I'm starting the proxy and making it listen on port 8080

   mitmproxy --app-port 8080

Once the command executed you should see the console open on your terminal and you will start seeing the request going through the proxy

4. Configure Java proxy and keystore / truststore paths

        System.setProperty("javax.net.ssl.trustStore", "./truststore");
        System.setProperty("javax.net.ssl.trustStorePassword", "password");
        System.setProperty("javax.net.ssl.keystore", "./keystore");
        System.setProperty("javax.net.ssl.keyStorePassword", "password");
        System.getProperties().put("http.proxyHost", "localhost");
        System.getProperties().put("http.proxyPort", "8080");
        System.getProperties().put("https.proxyHost", "localhost");
        System.getProperties().put("https.proxyPort", "8080");

5. Check mitmproxy output

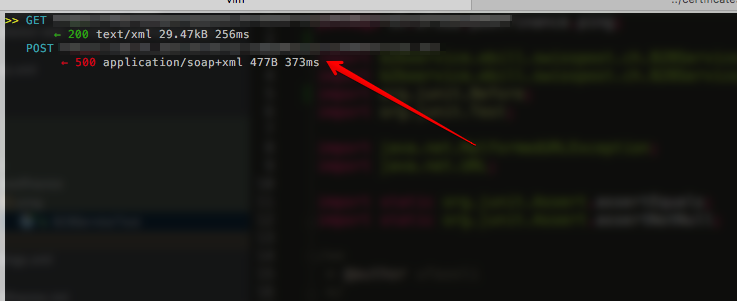
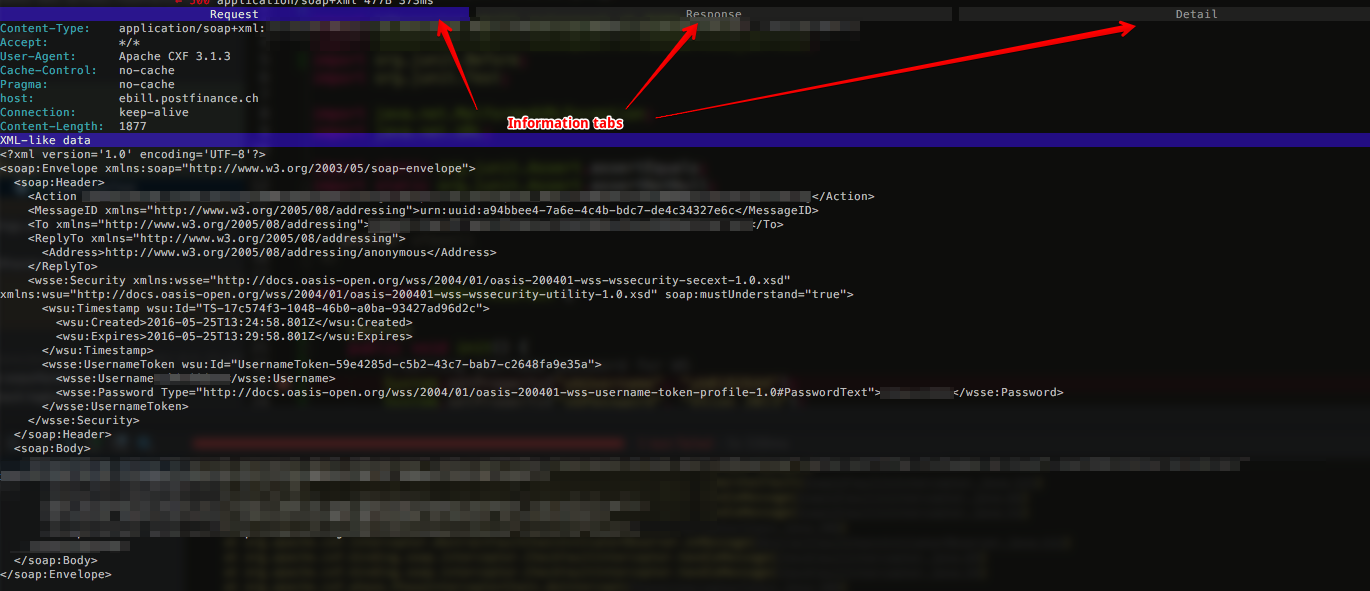
Once the request start going through the proxy you should be able to see them on the console and click on the ones you would like more detail

As you can see from the screenshots you have multiple tabs containing a lot of info

Jaspersoft Studio OSX jdk 8/7 not starting

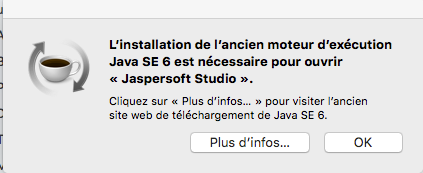
Recently I downloaded Jaspersoft studio on my Mac OSX but I was having trouble laughing the app as the system kept telling me I needed the older runtime version of Java, as you can see from the screenshot below (sorry in french)

Luckily this is solved pretty easy head up to your Applications folder and right click on Jaspersoft Studio.app then on the pop-up menu show package contents then inside the Contents folder you should find an info.plist file; edit the file and add the following line (or change the Current in the path with the JDK version you want) :

-vm/System/Library/Frameworks/JavaVM.framework/Versions/Current/Commands/java

Save the edited file; you should now be able to launch the software without problems

POI Excel : Making a read only final file prevent edit/select

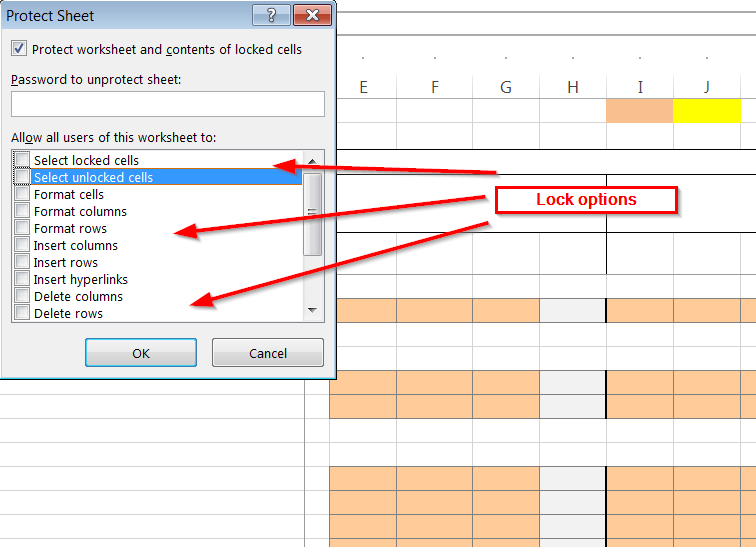
Excel allows to make the sheet of a workbook to be read only, with the possibility to fine tune the locking options like for example :

  • Locking cell edition
  • Locking cell selection
  • Locking cell format
  • Locking cell insertion

You can get the list of locking options from the Excel security configuration dialog as you can see in the screenshot provided below :

You will then have to provide a password for the locking feature

You can also achieve this easily with POI in a few easy steps as shown in the code below :


private static void lockAll(Sheet s, String password){
   
    // cast the sheet to the appropriate type
    XSSFSheet sheet = ((XSSFSheet)s);

     //protect the sheet with a password
     sheet.protectSheet(password);
     //enable the locking features
     sheet.enableLocking();

     // fine tune the locking options (in this example we are blocking all operations on the cells: select, edit, etc.)
     sheet.lockSelectLockedCells(true);
     sheet.lockSelectUnlockedCells(true);
    

}

Extract information from a java process that is running

Sometimes you need to obtain information regarding a JAVA process and the different options used to run this process such as the encoding, the timezone, the classpath, etc.

Luckily there a tool bundled with the JDK that allows you to do so, you just need to provide it the PID of the concerned process; this can be done in different ways, personally I prefer to use another tool bundled with the JDK JPS however this might not work (in windows) for wrapped java applications such as tomcat service, so you can do it with the task manager or another tool

Once you have the PID is pretty straight-forward in its most basic form just provide the PID to the command line tool like so :

jinfo 6544

You should get some output similar to this :

Attaching to process ID 6544, please wait...
Debugger attached successfully.
Server compiler detected.
JVM version is 25.20-b23
Java System Properties:

java.vendor = Oracle Corporation
catalina.base = C:\dev\servers\tomcat8
sun.management.compiler = HotSpot 64-Bit Tiered Compilers
catalina.useNaming = true
os.name = Windows Server 2012
sun.boot.class.path = C:\Program Files\Java\jre1.8.0_20\lib\resources.jar;C:\Pro
gram Files\Java\jre1.8.0_20\lib\rt.jar;C:\Program Files\Java\jre1.8.0_20\lib\sun
rsasign.jar;C:\Program Files\Java\jre1.8.0_20\lib\jsse.jar;C:\Program Files\Java
\jre1.8.0_20\lib\jce.jar;C:\Program Files\Java\jre1.8.0_20\lib\charsets.jar;C:\P
rogram Files\Java\jre1.8.0_20\lib\jfr.jar;C:\Program Files\Java\jre1.8.0_20\clas
ses
java.util.logging.config.file = C:\dev\servers\tomcat8\c
onf\logging.properties
user.country.format = CH
sun.desktop = windows
java.vm.specification.vendor = Oracle Corporation
java.runtime.version = 1.8.0_20-b26
user.name = GERAS$
tomcat.util.scan.StandardJarScanFilter.jarsToScan = log4j-core*.jar,log4j-taglib
*.jar
shared.loader =
user.language.format = de
tomcat.util.buf.StringCache.byte.enabled = true
user.language = en
java.naming.factory.initial = org.apache.naming.java.javaURLContextFactory
sun.boot.library.path = C:\Program Files\Java\jre1.8.0_20\bin
PID = 6544
java.version = 1.8.0_20
java.util.logging.manager = org.apache.juli.ClassLoaderLogManager
user.timezone = Europe/Berlin
sun.arch.data.model = 64
java.endorsed.dirs = C:\dev\servers\tomcat8\endorsed
sun.cpu.isalist = amd64
sun.jnu.encoding = Cp1252
file.encoding.pkg = sun.io
package.access = sun.,org.apache.catalina.,org.apache.coyote.,org.apache.jasper.
,org.apache.tomcat.
file.separator = \
java.specification.name = Java Platform API Specification
java.class.version = 52.0
user.country = US
java.home = C:\Program Files\Java\jre1.8.0_20
java.vm.info = mixed mode
os.version = 6.2
path.separator = ;
java.vm.version = 25.20-b23
org.jboss.logging.provider = slf4j
user.variant =
jboss.i18n.generate-proxies = true
java.awt.printerjob = sun.awt.windows.WPrinterJob
sun.io.unicode.encoding = UnicodeLittle
awt.toolkit = sun.awt.windows.WToolkit
package.definition = sun.,java.,org.apache.catalina.,org.apache.coyote.,org.apac
he.jasper.,org.apache.naming.,org.apache.tomcat.
user.script =
java.naming.factory.url.pkgs = org.apache.naming
user.home = C:\Windows\system32\config\systemprofile
java.specification.vendor = Oracle Corporation
tomcat.util.scan.StandardJarScanFilter.jarsToSkip = bootstrap.jar,commons-daemon
.jar,tomcat-juli.jar,annotations-api.jar,el-api.jar,jsp-api.jar,servlet-api.jar,
websocket-api.jar,catalina.jar,catalina-ant.jar,catalina-ha.jar,catalina-storeco
nfig.jar,catalina-tribes.jar,jasper.jar,jasper-el.jar,ecj-*.jar,tomcat-api.jar,t
omcat-util.jar,tomcat-util-scan.jar,tomcat-coyote.jar,tomcat-dbcp.jar,tomcat-jni
.jar,tomcat-spdy.jar,tomcat-websocket.jar,tomcat-i18n-en.jar,tomcat-i18n-es.jar,
tomcat-i18n-fr.jar,tomcat-i18n-ja.jar,tomcat-juli-adapters.jar,catalina-jmx-remo
te.jar,catalina-ws.jar,tomcat-jdbc.jar,tools.jar,commons-beanutils*.jar,commons-
codec*.jar,commons-collections*.jar,commons-dbcp*.jar,commons-digester*.jar,comm
ons-fileupload*.jar,commons-httpclient*.jar,commons-io*.jar,commons-lang*.jar,co
mmons-logging*.jar,commons-math*.jar,commons-pool*.jar,jstl.jar,geronimo-spec-ja
xrpc*.jar,wsdl4j*.jar,ant.jar,ant-junit*.jar,aspectj*.jar,jmx.jar,h2*.jar,hibern
ate*.jar,httpclient*.jar,jmx-tools.jar,jta*.jar,log4j*.jar,mail*.jar,slf4j*.jar,
xercesImpl.jar,xmlParserAPIs.jar,xml-apis.jar,junit.jar,junit-*.jar,ant-launcher
.jar,cobertura-*.jar,asm-*.jar,dom4j-*.jar,icu4j-*.jar,jaxen-*.jar,jdom-*.jar,je
tty-*.jar,oro-*.jar,servlet-api-*.jar,tagsoup-*.jar,xmlParserAPIs-*.jar,xom-*.ja
r
java.library.path = C:\dev\servers\tomcat8\bin;C:\Window
s\Sun\Java\bin;C:\Windows\system32;C:\Windows;C:\ProgramData\Oracle\Java\javapat
h;C:\Windows\system32;C:\Windows;C:\Windows\System32\Wbem;C:\Windows\System32\Wi
ndowsPowerShell\v1.0\;C:\Program Files\Microsoft SQL Server\110\DTS\Binn\;C:\Pro
gram Files (x86)\Microsoft SQL Server\110\Tools\Binn\;C:\Program Files\Microsoft
 SQL Server\110\Tools\Binn\;C:\Program Files (x86)\Microsoft SQL Server\110\Tool
s\Binn\ManagementStudio\;C:\Program Files (x86)\Microsoft Visual Studio 10.0\Com
mon7\IDE\PrivateAssemblies\;C:\Program Files (x86)\Microsoft SQL Server\110\DTS\
Binn\;;.
java.vendor.url = http://java.oracle.com/
java.vm.vendor = Oracle Corporation
common.loader = "${catalina.base}/lib","${catalina.base}/lib/*.jar","${catalina.
home}/lib","${catalina.home}/lib/*.jar"
java.runtime.name = Java(TM) SE Runtime Environment
java.class.path = C:\dev\servers\tomcat8\bin\bootstrap.j
ar;C:\dev\servers\tomcat8\bin\tomcat-juli.jar
java.vm.specification.name = Java Virtual Machine Specification
java.vm.specification.version = 1.8
catalina.home = C:\dev\servers\tomcat8
sun.cpu.endian = little
sun.os.patch.level =
java.awt.headless = true
java.io.tmpdir = C:\dev\servers\tomcat8\temp
java.vendor.url.bug = http://bugreport.sun.com/bugreport/
server.loader =
os.arch = amd64
java.awt.graphicsenv = sun.awt.Win32GraphicsEnvironment
java.ext.dirs = C:\Program Files\Java\jre1.8.0_20\lib\ext;C:\Windows\Sun\Java\li
b\ext
user.dir = C:\dev\servers\tomcat8
line.separator =

java.vm.name = Java HotSpot(TM) 64-Bit Server VM
file.encoding = UTF-8
java.specification.version = 1.8

VM Flags:
Non-default VM flags: -XX:CICompilerCount=3 -XX:InitialHeapSize=4294967296 -XX:M
axHeapSize=4294967296 -XX:MaxNewSize=1431306240 -XX:MinHeapDeltaBytes=524288 -XX
:NewSize=1431306240 -XX:OldSize=2863661056 -XX:+UseCompressedClassPointers -XX:+
UseCompressedOops -XX:-UseLargePagesIndividualAllocation -XX:+UseParallelGC
Command line:  -Dcatalina.home=C:\dev\servers\tomcat8 -D
catalina.base=C:\dev\servers\tomcat8 -Djava.endorsed.dir
s=C:\dev\servers\tomcat8\endorsed -Djava.io.tmpdir=C:\Pr
ojects\Geras\Tomcat 8.0_Tomcat8_Geras_UAT\temp -Dfile.encoding=UTF-8 -Djava.util
.logging.manager=org.apache.juli.ClassLoaderLogManager -Djava.util.logging.confi
g.file=C:\dev\servers\tomcat8\conf\logging.properties ex
it -Xms4096m -Xmx4096m
Please note that these tools can be found in the BIN folder of your JDK so if you don't have that folder in your path you will need to either add it or run it from this folder in order for this to work

Edit tomcat service start-up options

There is an easy way to change a Tomcat configured as a service start-up options and configurations such as :

  • Memory options (xmx, xms, etc.)
  • Logging configuration
  • Miscellaneous Java configuration

This can be done through the tomcat binary.

1.-Head up to your tomcat's binary folder
    cd C:\dev\servers\tomcat8\bin>
2.- Launch the "Apache tomcat properties" window
tomcat8w.exe //ES//MyServiceName

Where MyServiceName is the name of the service you configured when installing tomcat as a service. This should open the following popup window :

3.- Edit your required properties

Edit the properties; save the configuration and start/restart the service and you are done

Java Mail network is unreacheable connect exception

Recently I stumbled upon a weird problem while debugging a simple java application that needed to send an email

Since I was debbuging this application locally I used the FakeSMTP tool that I described in this tutorial here : Testing email sending functionality with FakeSMTP which I run locally on my machine

So after editing the configuration on my Java program and firing up the SMTP server I was quite surprised to get the following exception :

Caused by: javax.mail.MessagingException: Could not connect to SMTP host: 127.0.0.1, port: 25 (java.net.SocketException: Network is unreachable: connect)
System.setProperty("java.net.preferIPv4Stack" , "true");

So once you are sure you problem is not coming from a non running SMTP server or a network connection, you can check if the culprit is no other than Java

If you read the Oracle documentation here you will see that by default Java prefers IPv6 to IPv4 which is the problem in our case since FakeSMTP binds on IPv4

Luckily there is a way to force Java to prefer IPv4 over IPv6 using the system property java.net.preferIPv4Stack

This can either be done :

  • programmatically
  • using java options

1. Programmatically


 System.setProperty("java.net.preferIPv4Stack" , "true");

2. Using java options


java -jar myJar.jar -Djava.net.preferIPv4Stack=true

That should take care of the problem

Another solution would be to disable IPv6 networking on your machine but that may have other side effects on your system..

Custom number formatting in JSP with JSTL for a given locale

So this one was pretty painful to resolve and I spent a few hours struggling with it.. especially since I haven't work with JSP for A WHILE...

Usually when you need to format a given number (in my case a BigDecimal) you can use the fmt:formatNumber tag if you have setted your locale properly it should use the appropriate decimal separator according to the language.

However this time it wasn't working and I'm really not sure why, other fields in which I was using the spring tag spring:bind the output was properly formatted

I needed to output a large number using grouping separators (by groups of 3) and at least 2 decimals

What I was trying to accomplish was to have a number with Swiss grouping and decimal separators like this 2'300'120.40 but I was getting this 2 300 120,40

I tried a lot of things, like setting the locale for the page using the setLocaletag


Forcing the pattern when calling the formatNumber function


And different combinations of values for the different attributes of the formatNumber tag, such as type="currency" nothing worked!! and the spring:bind just stood there gloating !!

It would have been great if the formatNumbertag would allow you to force the grouping and decimal character that would be used, but it's just not possible.

Luckily however this can be done in Java using the java.text.DecimalFormat ; and java.text.DecimalFormatSymbols

Since I was running out of time the workaround that I found was :

  1. Create a Util class in Java with a static method that would do the formatting and conversion how I wanted it to be done
  2. Declare this static method as a custom JSTL tag
  3. Call this function with my number as argument to obtain the formatted String
  4. Go enjoy a coffee :)

Below are the code snippets I used

The Java util method :


  public static String bigDecimalToFormattedString(BigDecimal bd)
  {
    String formattedString = null;
    try
    {
      DecimalFormatSymbols symbols = new DecimalFormatSymbols();
      symbols.setDecimalSeparator('.');
      symbols.setGroupingSeparator('\'');
      
      String strange = "###,###.##";
      
      DecimalFormat chCurrencyFormat = new DecimalFormat(strange, symbols);
      chCurrencyFormat.setGroupingSize(3);
      chCurrencyFormat.setMinimumFractionDigits(2);
      
      formattedString = chCurrencyFormat.format(bd);
    }
    catch (Exception e)
    {
     logger.error(String.format("Unable to convert BigDecimal : %s to String. error : %s", new Object[] { bd, e.getMessage() }));
    }
    return formattedString;
  }

You will need then to declare your custom functions in a .tld file that needs to be placed under the WEB-INF :


    Custom Functions    
    1.0
    http://java.sun.com/xml/ns/javaee:cf

    
      Converts a given BigDecimal to a formatted String with decimal and grouping separators
        bd2s
        com.ufasoli.StringUtils
        String bigDecimalToFormattedString(java.math.BigDecimal)      
    

Once this is done you can use your custom functions by simply importing the taglib in a JSP file


<%@taglib prefix="cf" uri="http://java.sun.com/xml/ns/javaee:cf"  %>
.....
......

Now all of this can certainly be improved like by allowing the user to override the pattern, or the grouping separator, but in my case the output would be the same formatting throughout the application so I didn't need them. Regarding the hyper generic I know it's a really bad practice and should not be used but in this case we needed a quick and dirty solution that will not cause the app to fail if an exception occurred when formatting a given number

Glassfish Cluster SSH - Tutorial : How to create and configure a glassfish cluster with SSH (Part 2)

3. Glassfish cluster configuration

With our pre-requirements covered it's time to start configuring our cluster

A. Enabling remote access on the glassfish servers

By default the remote administration feature is disabled on the GlassFishServer This is to reduce your exposure to an attack from elsewhere in the network.

So if you attempt to administer the server remotely you will get a 403 - Forbidden HTTP status as the response. This is true regardless of whether you use the asadmin command, an IDE, or the REST interface.

You will need to start up the glassfish server on each one of your servers by executing the following command

$GFISH_HOME/bin/asadmin start-domain domain1

Once the servers are up you can turn remote administration on running the following command locally in each one of the servers (please ensure the glassfish instance is running when you execute the command) and when prompted enter the appropriate user/password :

$GFISH_HOME/bin/asadmin enable-secure-admin

This commands actually accomplishes 2 things it enables remote administration and encrypts all admin traffic.

In order for your modifications to be taken into account you will need to restart the glassfish server by running the following commands :

$GFISH_HOME/bin/asadmin stop-domain domain1

Once the sever is stopped you need to start it again so it can pick-up the remote admin parameter

You can now stop the running servers on all the nodes (except server1) by executing the above stop-domaincommand

Note : From this point forward all the operations should be executed on the server hosting the DAS(Domain Admin Server) in our case server1 so make sure it's running.


Tip : To avoid having to type your glassfish user/password when you run each command you can check my other post regarding the asadmin login command here that will prompt you once your your credentials and store them in an encrypted file under /home/gfish/.asadminpass


B. Creating the cluster nodes

A node represents a host on which the GlassFish Server software is installed.

A node must exist for every host on which GlassFish Server instances reside. A node's configuration contains information about the host such as the name of the host and the location where the GlassFish Server is installed on the host. For more info regarding glassfish nodes click here

The node for server1 is automatically created when you create your domain so we will create a node for each of the remaining servers (server2 & server3).

Creating the node2 on server2

[server1]$ $GFISH_HOME/bin/asadmin create-node-ssh --nodehost=server2 node2
Enter admin user name>  admin
Enter admin password for user "admin">
Command create-node-ssh executed successfully.

Creating the node3 on server3

[server1] $GFISH_HOME/bin/asadmin create-node-ssh --nodehost=server3 node3
Enter admin user name>  admin
Enter admin password for user "admin">
Command create-node-ssh executed successfully.

Note : If you followed my tip regarding the credentials storage your output might be slightly different (no user/password prompt)

C. Creating the cluster

Once the nodes created it's time for us to create our cluster


[server1]$ $GFISH_HOME/bin/asadmin create-cluster myCluster
Enter admin user name>  admin
Enter admin password for user "admin">
Command create-cluster executed successfully.

D. Creating the cluster instances

Now that we have the nodes and the cluster configured, we need to create the instances that will be part of the cluster.

a. Creating the local instance (instance that will be running on the same server as the DAS)

[server1]$ $GFISH_HOME/bin/asadmin create-local-instance --cluster myCluster --node localhost i_1
Command _create-instance-filesystem executed successfully.
Port Assignments for server instance i_1:
JMX_SYSTEM_CONNECTOR_PORT=28686
JMS_PROVIDER_PORT=27676
HTTP_LISTENER_PORT=28081
ASADMIN_LISTENER_PORT=24848
JAVA_DEBUGGER_PORT=29009
IIOP_SSL_LISTENER_PORT=23820
IIOP_LISTENER_PORT=23700
OSGI_SHELL_TELNET_PORT=26666
HTTP_SSL_LISTENER_PORT=28181
IIOP_SSL_MUTUALAUTH_PORT=23920
The instance, i_1, was created on host localhost
Command create-instance executed successfully.
b. Creating the remote instances

node2 --> i_2

[server1]$GFISH_HOME/bin/asadmin create-instance --cluster myCluster --node node2 i_2

node3 --> i_3

[server1]$GFISH_HOME/bin/asadmin create-instance --cluster myCluster --node node3 i_3
The message output should be similar to the one shown in the first code snippet (omitted for readability).

E. Working with the cluster

This section show a few useful commands when managing clusters

a. Showing clusters status
[server1]$GFISH_HOME/bin/asadmin list-clusters
myCluster running
b. Instance status

[server1]$ $GFISH_HOME/bin/asadmin list-instances
i_1   running
i_2   running
i_3   running
Command list-instances executed successfully.
c. Starting the cluster
/data/glassfish/bin/asadmin start-cluster myCluster
d. Stopping the cluster
$GFISH_HOME/bin/asadmin stop-cluster myCluster
d. Starting an instance
$GFISH_HOME/bin/asadmin start-instance i_1
d. Stopping an instance
$GFISH_HOME/bin/asadmin stop-instance i_1
e. Deploying a war to the cluster
$GFISH_HOME/bin/asadmin deploy --enabled=true --name=myApp:1.0 --target myCluster myApp.war

4. Configuring the glassfish as a daemon/service

In a production environment you will probably want your cluster to startup automatically (as a daemon/service) when your operating system boots

In this section I will show you how to create 2 possible scripts for starting/stopping a glassfish server under a Linux CentOS distribution (please note that depending on your Linux distribution this might not be the same)

In our cluster configuration there are mainly 2 types of instances :

  • DAS(Domain Admin Server) instance : This is our main instance it will handle the cluster configuration and propagate it to the cluster instances
  • Clustered instance : A clustered instance inherits its configuration from the cluster to which the instance belongs and shares its configuration with other instances in the cluster.

Please note that due to this difference the startup scripts for each instance type will be slightly different.

Whether we are configuring a clustered instance or DAS instance the script will be under :

/etc/init.d/glassfish
A. Creating the service script for the DAS (server1)

The following is an example start-up script for managing a glassfish DAS instance. It assumes the glassfish password is already stored in the .asadminpass file as show before.

#!/bin/bash
#
# chkconfig: 3 80 05
# description: Startup script for Glassfish
GLASSFISH_HOME=/opt/glassfish/bin;
GLASSFISH_OWNER=gfish;
GLASSFISH_DOMAIN=gfish;
CLUSTER_NAME=mycluster
export GLASSFISH_HOME GLASSFISH_OWNER GLASSFISH_DOMAIN CLUSTER_NAME
start() {
        echo -n "Starting Glassfish: "
        su $GLASSFISH_OWNER -c "$GLASSFISH_HOME/asadmin start-domain $GLASSFISH_DOMAIN"
        su $GLASSFISH_OWNER -c "$GLASSFISH_HOME/asadmin start-cluster $CLUSTER_NAME"
        echo "done"
}
stop() {
        echo -n "Stopping Glassfish: "
        su $GLASSFISH_OWNER -c "$GLASSFISH_HOME/asadmin stop-cluster $CLUSTER_NAME"
        su $GLASSFISH_OWNER -c "$GLASSFISH_HOME/asadmin stop-domain $GLASSFISH_DOMAIN"
        echo "done"
}
stop_cluster(){
     echo -n "Stopping glassfish cluster $CLUSTER_NAME"
     su $GLASSFISH_OWNER -c "$GLASSFISH_HOME/asadmin stop-cluster $CLUSTER_NAME"
     echo "glassfish cluster stopped"

}

start_cluster(){
     echo -n "Starting glassfish cluster $CLUSTER_NAME"
     su $GLASSFISH_OWNER -c "$GLASSFISH_HOME/asadmin start-cluster $CLUSTER_NAME"
     echo "Glassfish cluster started"
}
case "$1" in
        start)
                start
                ;;
        stop)
                stop
                ;;
        stop-cluster)
               stop_cluster
                ;;
       start-cluster)
              start_cluster
              ;;
        restart)
                stop
                start
                ;;
        *)
                echo $"Usage: Glassfish {start|stop|restart|start-cluster|stop-cluster}"
                exit
esac
B. Creating the service script for the cluster instances (server2,server3)

Below is an exemple script for configuring a glassfish cluster instance

#!/bin/bash
#
# chkconfig: 3 80 05
# description: Startup script for Glassfish
GLASSFISH_HOME=/opt/glassfish/bin;
GLASSFISH_OWNER=gfish;
NODE=n2
INSTANCE=i2

export GLASSFISH_HOME GLASSFISH_OWNER NODE INSTANCE
start() {
        echo -n "Starting Glassfish: "
        su $GLASSFISH_OWNER -c "$GLASSFISH_HOME/asadmin --user $GLASSFISH_ADMIN --passwordfile $GLASSFISH_PASSWORD  start-local-instance --node $NODE --sync normal $INSTANCE"
        echo "done"
}
stop() {
        echo -n "Stopping Glassfish: "
        su $GLASSFISH_OWNER -c "$GLASSFISH_HOME/asadmin stop-local-instance --node $NODE $INSTANCE"
        echo "done"
}
case "$1" in
        start)
                start
                ;;
        stop)
                stop
                ;;
        restart)
                stop
                start
                ;;
        *)
                echo $"Usage: Glassfish {start|stop|restart}"
                exit
esac

Warning : Since clustered instances cannot exist outside a cluster it's important that the local glassfish server is not started using the asadmin start-domain.If you do so you will probably loose all your cluster configuration for that instance.

You should always start the clustered instances with the command shown above

7. Troubleshooting & additional resources

I'm getting the message 'remote failure ...'


remote failure: Warning: some parameters appear to be invalid.
SSH node not created. To force creation of the node with these parameters rerun the command using the --force option.
Could not connect to host arte-epg-api1.sdv.fr using SSH.
The subsystem request failed.
The server denied the request.
Command create-node-ssh failed.

This is probably because the SFTP subsystem is not enabled on the target node. Please ensure that the following line is uncommented in the sshd_config file

Subsystem       sftp    /usr/libexec/openssh/sftp-server

Where can I find the glassfish startup/shutdown scripts ?

You can find these scripts over at my github account

Glassfish Cluster SSH - Tutorial : How to create and configure a glassfish cluster with SSH (Part 1)

0. Presentation

A cluster is a named collection of GlassFish Server instances that share the same applications, resources, and configuration information.

GlassFish Server enables you to administer all the instances in a cluster as a single unit from a single host, regardless of whether the instances reside on the same host or different hosts. You can perform the same operations on a cluster that you can perform on an unclustered instance, for example, deploying applications and creating resources.

In this we will configure a 3 node Glassfish cluster using SSH and using only the command-line util asadmin.

Below is a global picture of the target cluster structure :

The following are the conventions/assumptions that will be used throughout this tutorial

  • linux user : gfish
  • glassfish domain : domain1
  • glassfish cluster name : myCluster

1. Pre-requirements

A. SSH key configuration (Optional but used in this tutorial)

In order for the different instances of glassfish to communicate easily with each other it's a good idea to generate ssh keys for each of the users running the glassfish process (ideally the same user/password combination in each machine).

We will be generating the keys for the same user that runs the glassfish process. For this tutorial it will be assumed the user is gfish

a. Generating the ssh keys

On each of the machines (sever1, sever2, sever3) execute the following command, and leave the default options

[server] ssh-keygen -t rsa

Your output should be similar to the one below :

generating public/private rsa key pair.
Enter file in which to save the key (/home/gfish/.ssh/id_rsa):
Enter passphrase (empty for no passphrase):
Enter same passphrase again:
Your identification has been saved in /home/gfish/.ssh/id_rsa.
Your public key has been saved in /home/gfish/.ssh/id_rsa.pub.
The key fingerprint is:
00:6a:ef:30:65:45:7a:15:1f:f0:65:6d:81:03:cd:1d gfish@server1
The key's randomart image is:
+--[ RSA 2048]----+
|    ..o +oo+o+Eo |
|   . + . o += +  |
|  o + o   o  o   |
| . + . .         |
|  o .   S        |
|   +             |
|    .            |
|                 |
|                 |
+-----------------+
b. Copying the ssh keys to the servers

Once your key is generated you will need to copy your each one of the generated server keys between the different servers allowing you to connect without entering a password.

For that you will need to execute the following command on each one of the servers by slightly modifying it to reflect the target server


[server1] cat /home/gfish/.ssh/id_rsa.pub | ssh gfish@server2 'cat >> .ssh/authorized_keys'

In this example we are copying the ssh key belonging to the server1 to the server2 authorized_keys file this will allow the user gfish to connect to the api1 server without using a password.

As stated before this operation needs to be repeated for each one of the servers by by adapting the syntax to your case

In the end your key distribution should be similar to :

server1 key
server2
server3
server2 key
server1
server3(optional)
server3 key
server1
server2(optional)
c. Authorized_keys2 (optional)

Depending on the ssh version you are using you will probably make a copy of the authorized_keys file and name it authorized_keys2.

This can be done by executing the following command (again on each one of your servers :

cp authorized_keys authorized_keys2

Once the previous steps are completed you should be able to log from one server to another through SSH without the need for a password.

Execute the following command to confirm it:

[server1]ssh gfish@server2

If you are prompted to enter a password when executing the previous command then something went wrong so you should recheck your config.

B. SSH Subsytem

When deploying applications on a cluster they are deployed to the cluster nodes using SFTP. You will need to ensure that the SFTP SSH subsytem is enabled in all of the machines that will be hosting the glassfish instances

To do this please ensure that your sshd_config file (probably under /etc/ssh/sshd_config) has the following line and that it's not commented :

Subsystem       sftp    /usr/libexec/openssh/sftp-server

Otherwise you may run into this kind of message errors when creating the ssh nodes (see troubleshooting)

JSF 2 performance improvement on latest release (Mojarra)

According to this blog the latest version of Mojarra JSF (2.1.22) performance should improve dramatically when handling pages with a large quantity of objects (1000+).

jsf-performance-mojarra-improves-dramatically

Always acording to the blog author with the previous version of Mojarra, rendering a page with 1000+ components would take up to 5 times more compared to the other JSF implementation Apache MyFaces.

This is great news and comes as a welcomed improvement!

This improvement comes mainly from the resolution of the bug :

JAVASERVERFACES-2494

Custom Database function using JPA JPQL and eclipselink

Sometimes it's useful to exploit some of the native functions provided by database vendors while using JPA and JPQL.

And although it's possible to execute native queries, you'll loose some of the JPA magic in the process.

Thankfully Eclipselink (and probably Hibernate) allow some degree of flexibility through special operators.

According to the official documentation the FUNC operator allows for a database function to be call from JPQL. It allows calling any database functions not supported directly in JPQL, and calling user or library specific functions.


@Entity
public class Employee implements Serializable{
   
   @Id
   private Long id;   
   private String firstname;
   private String lastname;

  // Setters - Getters

}

Below is a quick example on how to use FUNC to call Oracle's TO_CHAR function and convert all the ids in the query to a String.

Let's say that for an obscure reason we would like to get a list of all the employees id's but not as a list of java.lang.Long but as a list of java.lang.String.

We could write the query like so :


List employeesId = 
     em.createQuery("SELECT FUNC('TO_CHAR', e.id) FROM Employee e ").getResultList();

The usage is pretty straightforward the first argument is the name of the native function followed by the function arguments

More information about this can be found in Eclipselink's official documentation here

It's good no note that FUNC will be changed to FUNCTION in JPA 2.1

JPA Eclipselink optimizing query performance on a large resultset

Recently I had to look for ways of optimizing a very slow database request on a very large ResultSet (more than 5000 results with several @OneToMany associations).

While reading EclipseLink's documentation I stumbled upon an interesting piece of information regarding handling large ResultSets. EclipseLink recommends using Streamed Cursors when handling large resultsets

According to the documentation : Cursored streams provide the ability to read back a query result set from the database in manageable subsets, and to scroll through the result set stream.

The initial query would load practically the entire database into memory in one request (all the associations are marked with QueryHint.LEFT_FETCH in order to eagerly fetch the associations upon the initial request).

I will not go into details regarding the process since it's irrelevant to this post not the goal of this post, but basically the program would query an Oracle Database transform every JPA Entity and store it in a somewhat different object in a Mongo Database

The process was really long (more than 1 hour between recovering all the objects from the Oracle Database and processing them into the Mongo Database

The DAO class

public CursoredStream getMyLargeResultset(){

   Query programsQuery = em.createNamedQuery("MyNamedQuery");
   // tell the EntityManager to return a StreamedCursor
   programsQuery.setHint("eclipselink.cursor", true);    
   return (CursoredStream) programsQuery.getSingleResult();
}

The client


public void synchronizeDatabases(){


    final int PAGE_SIZE = 50;

    //get the cursor
    CursoredStream cursor= myDao.getMyLargeResultset();
      
    // iterate through curor 
    cursor(!cursor.atEnd()){ 
 
        // get the next batch of objects and
        // cast it to the target entity 
        List myEntities = (List)(List)cursor.next(PAGE_SIZE);
 processEntities(myEntities);
      }

    cursor.close();

}

By using this technique I was able to reduce by a factor of 10 the process time of this operation!

PS: I realize that the double casting on the List is not very pretty and I could use a different approach by using the next() method without arguments but the existent method processEntities() accepted a List as a parameter and I wasn't allowed to modify that method

Documentation sources


Resolving Spring's data error message "Cannot resolve the name to a(n) 'element declaration"

While working on a project combining Spring Data JPA and Spring Data MongoDB I run into a lot of trouble when I introduced the


The error message :

Cannot resolve the name to a(n) 'element declaration

I spent some time looking for the cause, and then I realised that the version of SpringDataMongoDB and SpringDataJPA had dependencies on different versions of SpringDataCore. and it was causing trouble

So if you get the same error just check your maven dependency hierarchy or go check the POM files for the libraries.

You can check out the POM files in Spring's repo :

Spring Maven repository

OSX show used ports or listening applications with their PID

On OSX you can display applications listening on a given port using the lsof the commands described below will show listening application...