OSX show used ports or listening applications with their PID

On OSX you can display applications listening on a given port using the lsof the commands described below will show listening applications as well as the PID for each application

lsof -nP -i4TCP | grep LISTEN

lsof -nP -i4TCP:[PORT] | grep LISTEN

Where [PORT] is the given port you want to check for


lsof -nP -i4TCP:80 | grep LISTEN

Your output should look something similar to this :


idea      28856 ufasoli   15u  IPv4 0xdc1e11a68e7f918b      0t0  TCP 127.0.0.1:17434 (LISTEN)
idea      28856 ufasoli   52u  IPv4 0xdc1e11a690bab54b      0t0  TCP 127.0.0.1:6942 (LISTEN)
idea      28856 ufasoli  748u  IPv4 0xdc1e11a690b9dccb      0t0  TCP 127.0.0.1:63344 (LISTEN)
idea      28856 ufasoli 1076u  IPv4 0xdc1e11a68e7fa54b      0t0  TCP 127.0.0.1:54243 (LISTEN)
idea      28856 ufasoli 1082u  IPv4 0xdc1e11a67124254b      0t0  TCP 127.0.0.1:54266 (LISTEN)
rapportd  28871 ufasoli    5u  IPv4 0xdc1e11a665f15b6b      0t0  TCP *:51387 (LISTEN)
node      33709 ufasoli   28u  IPv4 0xdc1e11a66304354b      0t0  TCP 127.0.0.1:4200 (LISTEN)
java      34245 ufasoli  168u  IPv6 0xdc1e11a66dd5f11b      0t0  TCP *:52439 (LISTEN)
java      34245 ufasoli  182u  IPv6 0xdc1e11a6803af4db      0t0  TCP *:33389 (LISTEN)
java      34245 ufasoli  183u  IPv6 0xdc1e11a6803afafb      0t0  TCP *:8080 (LISTEN)

Soap WebService NTLM Authentication with Apache CXF and Spring

Recently I had the "chance" to consume an old school WebService in good old SOAP on top of that it was a C# WebService using the dataset construct which is in itself a world of pain... but we will not talk about that here

A more easy thing to tackle is the NTLM authentication, below is how I implemented it using Spring and Spring boot :

1. Define a set of custom properties in the application.yaml file
 ws:
    base-url: "http://host/ws.asmx?wsdl"
    username: "myusername"
    password: "mypassword"
    authentication: "NTLM"
2. Map the properties in application.yaml to a Java class

import lombok.Data;
import org.springframework.boot.context.properties.ConfigurationProperties;
import org.springframework.boot.context.properties.EnableConfigurationProperties;
import org.springframework.stereotype.Component;


@Component
@EnableConfigurationProperties
@ConfigurationProperties(prefix = "app")
@Data
public class YAMLConfig {

    private Ws ws;    

    @Data
    public static class Ws {
        private String baseUrl;
        private String username;
        private String password;
        private String authentication;


    }   

}


import org.apache.cxf.endpoint.Client;
import org.apache.cxf.frontend.ClientProxy;
import org.apache.cxf.jaxws.JaxWsProxyFactoryBean;
import org.apache.cxf.transport.http.HTTPConduit;
import org.apache.cxf.transports.http.configuration.HTTPClientPolicy;
import org.springframework.stereotype.Service;
import org.w3c.dom.Element;


import javax.xml.bind.JAXBContext;
import java.util.HashSet;
import java.util.List;
import java.util.Set;
import java.util.stream.Collectors;
//Injection and other properties omitted for brevity
public void consume(){

        JaxWsProxyFactoryBean factory1 = new JaxWsProxyFactoryBean();
        factory1.setServiceClass(EntityInformationSoap.class);
        factory1.setAddress(yamlConfig.getWs().getBaseUrl());
        factory1.setUsername(yamlConfig.getWs().getUsername());
        factory1.setPassword(yamlConfig.getWs().getPassword());

        EntityInformationSoap service = (EntityInformationSoap) factory1.create();
        Client client = ClientProxy.getClient(service);

        HTTPConduit conduit = (HTTPConduit) client.getConduit();
        conduit.getAuthorization().setAuthorizationType(yamlConfig.getWs().getAuthentication());
        conduit.getAuthorization().setUserName(yamlConfig.getWs().getUsername());
        conduit.getAuthorization().setPassword(yamlConfig.getWs().getPassword());

        HTTPClientPolicy httpClientPolicy = new HTTPClientPolicy();
        httpClientPolicy.setConnectionTimeout(36000);
        httpClientPolicy.setAllowChunking(false);
        conduit.setClient(httpClientPolicy);
}

OSX find and display saved wifi password

https://www.mactip.net/how-to-find-a-saved-wi-fi-password-on-the-mac/

If you are like me once you entered a Wi-fi password, literally 2 seconds after it's forgotten, so what happens when your colleague asks you for the password? Well it turns out it's quite easy to accomplish on OSX (as long as you have an administrator account, below you will find the required steps

1. Open the keychain app (you can find it in the utilities folder or find it using spotlight)
2. Select the "System" icon on the sidebar
3. Double click on the Wi-fi network that you are interested in and then click on the "Show password" checkbox
4. You will now be prompted to enter an admin username/password
5. Once you entered a valid username/password you will be able to see the password for the Wi-fi network

Top 5 small java libraries for projects (functional, date, etc.)

For some time now most of my Java projects revolve around the Spring Boot Stack which contains pretty much everything you can need, however there's a list of small libraries and utilities that I love to use in my projects

Below is my top 5 small libraries I use in my projects

  • TotallyLazy : enhances the functional standard library with some syntaxic sugar
  • Lombok : because who wants to write setters/getters manually
  • JodaTime Yes, yes I know I should use now the new java API but I still like Joda best!
  • jOOλ : More functional sweetness
  • Apache Commons : Multi-purpose library

The above are my way-to-go small libraries for my projects, of course there are some specific libraries for a given case Jackson JSON or Caffeine Cache

Docker copy images between hosts

Copying docker images (import/export) between hosts

Sometimes it's useful to export a local docker image to another host without going through a repository

docker save -o [path for generated tar file] [image name]

For example :

docker save -o mycool-container.tar ufasoli/mycool-container:1.0

You will then need to copy the saved .tar image to the target host by however mean suits you (FTP, USB, SCP)

Once the image copied to the target host import the image to the local docker

docker load -i [path to image tar file]

Like so :

docker load -i mycool-container.tar

Depending on the size of the image this can be a long operation, but once it's finished you should be able to see your image with the usual docker images command

docker compose on multiple environments

docker-compose is a pretty cool tool that allows you to bootstrap and run multiple docker containers with 1 configuration file

Below is an example docker-compose file for staring a 3 node confluent kafka cluster

---
version: '2'
services:
  zookeeper:
    image: confluentinc/cp-zookeeper:latest
    network_mode: host
    environment:
      ZOOKEEPER_CLIENT_PORT: 32181
      ZOOKEEPER_TICK_TIME: 2000
    extra_hosts:
      - "moby:127.0.0.1"
    restart: always

  kafka-1:
    image: confluentinc/cp-kafka:latest
    network_mode: host
    depends_on:
      - zookeeper
    environment:
      KAFKA_BROKER_ID: 1
      KAFKA_ZOOKEEPER_CONNECT: localhost:32181
      KAFKA_ADVERTISED_LISTENERS: PLAINTEXT://myserver.com:29092
    restart: always
    extra_hosts:
      - "moby:127.0.0.1"

  kafka-2:
      image: confluentinc/cp-kafka:latest
      network_mode: host
      depends_on:
        - zookeeper
      environment:
        KAFKA_BROKER_ID: 2
        KAFKA_ZOOKEEPER_CONNECT: localhost:32181
        KAFKA_ADVERTISED_LISTENERS: PLAINTEXT://myserver.com:29093
      restart: always
      extra_hosts:
        - "moby:127.0.0.1"

  kafka-3:
        image: confluentinc/cp-kafka:latest
        network_mode: host
        depends_on:
          - zookeeper
        environment:
          KAFKA_BROKER_ID: 3
          KAFKA_ZOOKEEPER_CONNECT: localhost:32181
          KAFKA_ADVERTISED_LISTENERS: PLAINTEXT://myserver.com:29094
        restart: always
        extra_hosts:
          - "moby:127.0.0.1"

  kafka-rest:
    image: confluentinc/cp-kafka-rest:latest
    network_mode: host
    depends_on:
      - kafka-1
      - kafka-2
      - kafka-3
    restart: always
    environment:
      KAFKA_REST_ZOOKEEPER_CONNECT: localhost:32181
      KAFKA_REST_LISTENERS: http://0.0.0.0:8082
      KAFKA_REST_HOST_NAME: kafka-rest
    extra_hosts:
      - "moby:127.0.0.1"

---
version: '2'
services:
  zookeeper:
    image: confluentinc/cp-zookeeper:latest
    network_mode: host
    environment:
      ZOOKEEPER_CLIENT_PORT: 32181
      ZOOKEEPER_TICK_TIME: 2000
    extra_hosts:
      - "moby:127.0.0.1"
    restart: always

  kafka-1:
    image: confluentinc/cp-kafka:latest
    network_mode: host
    depends_on:
      - zookeeper
    environment:
      KAFKA_BROKER_ID: 1
      KAFKA_ZOOKEEPER_CONNECT: localhost:32181
      KAFKA_ADVERTISED_LISTENERS: PLAINTEXT://test.myserver.com:29092
    restart: always
    extra_hosts:
      - "moby:127.0.0.1"

  kafka-2:
      image: confluentinc/cp-kafka:latest
      network_mode: host
      depends_on:
        - zookeeper
      environment:
        KAFKA_BROKER_ID: 2
        KAFKA_ZOOKEEPER_CONNECT: localhost:32181
        KAFKA_ADVERTISED_LISTENERS: PLAINTEXT://test.myserver.com:29093
      restart: always
      extra_hosts:
        - "moby:127.0.0.1"

  kafka-3:
        image: confluentinc/cp-kafka:latest
        network_mode: host
        depends_on:
          - zookeeper
        environment:
          KAFKA_BROKER_ID: 3
          KAFKA_ZOOKEEPER_CONNECT: localhost:32181
          KAFKA_ADVERTISED_LISTENERS: PLAINTEXT://test.myserver.com:29094
        restart: always
        extra_hosts:
          - "moby:127.0.0.1"

  kafka-rest:
    image: confluentinc/cp-kafka-rest:latest
    network_mode: host
    depends_on:
      - kafka-1
      - kafka-2
      - kafka-3
    restart: always
    environment:
      KAFKA_REST_ZOOKEEPER_CONNECT: localhost:32181
      KAFKA_REST_LISTENERS: http://0.0.0.0:8082
      KAFKA_REST_HOST_NAME: kafka-rest
    extra_hosts:
      - "moby:127.0.0.1"

You can now run docker-compose by with a second -f and the redefined properties in the test file will ovewrite those in the base file

docker-compose -f docker-compose.yml -f docker-compose.test.yml up -d

More information regarding docker compose advanced configuration can be found here

Angular6 hiding component selector

It's sometimes useful to have angular's component selector not to be rendered in the page, as sometimes this can cause problems with CSS rendering (since we will have an intermediate tag in between 2 tags)

For example :


@Component({
    selector: 'my-component'
})
export class MyComponent{

@Input()
title:String;


}
...

Now you will use your component for example like so :


<html>
.....

<div class='container'>
<my-component [title]="'Test'" ></my-component>

</div>
.....

</html>

With this approach in the rendered HTML you will have the angular component tab generated inside the div but what if this causes problems with some CSS code ?

Well luckily enough there's a simple way to change this and that is changer your selector from a tag to an attribute


@Component({
    selector: '[my-component]'
})
export class MyComponent{

@Input()
title:String;


}
...

By changing the value of the selector property from my-component to [my-component] you should be able to "apply" your component directly to a standard HTML tag, so this will prevent the <my-component> tag to be rendered in the final HTML


<html>
.....
<div class='container' [title]="'Test'" my-component >


</div>
.....

</html>

OSX paste unformatted text / remove text formatting

So recently I found about what is for me one of the best keyboard shortcuts on OSX often I copy text from somewhere and whenever I paste it it comes with all the original formatting, which TBH mostly of the time is a pain (at least for me) even though a lot of applications have a "paste special" or something like that is a bit cumbersome to me

So the following keyboard shortcut allows you to paste unformatted text in almost any application :

This for me is a great productivity shortcut and one of the best ones I found for OSX

Angular 4/5 override class in body tag (Shadow Piercing combinators approach)

In angular component CSS styles are encapsulated into the component's view and don't affect the rest of the application; usually this is the behaviour that you want however sometimes it's useful to be able to affect tags outside the component, for example the body tag

This can be achieved in a few different ways, like for example tweaking view encapsulation parameters

In this post I will show you a CSS approach to this using The Shadow Piercing combinators, starting in Angular 4.3.0 you can use the custom shadow piercing combinator ::ng-deep to achieve this

For example if we had a component named "CustomComponent" we could have a set of files similar to :

  • custom.component.ts
  • custom.component.css
  • custom.component.html

In order for us to shadow and override the main body tag would be to put the following in the custom.component.css :

::ng-deep body {
  min-height: 75rem;
  padding-top: 4.5rem;
}

BigDecimal rounding to the nearest 5 cents with Java's BigDecimal

Recently I hat to implement a function that would round to the nearest 5 cents and after googling around a bit I found bits and pieces here and there but none just worked for me, so below you can find a function that should do just that

/**
     * Rounds a decimal number to the nearest 5 cents using the following rules
     * 
     * Rounding rules :
     * - 0.1299 = 0.10
     * - 0.1300 = 0.15
     * - 0.1799 = 0.15
     * - 0.1800 = 0.20
     *
     * @param value the BigDecimal value to round
     * @return the rounded value for the big decimal with a scale of 2
     */
    public static BigDecimal roundToNearest5Cents(final BigDecimal value) {
        return value.setScale(2, RoundingMode.FLOOR).multiply(new BigDecimal(20)).add(new BigDecimal("0.5"))
                .setScale(0, RoundingMode.FLOOR).divide(new BigDecimal(20)).setScale(2, RoundingMode.FLOOR);
    }

Spring application events lifecycle and earlyApplicationEvents

Not long ago I learned the hard way the way spring handles earlyApplication events when we started having problems in one of our projects

Basically we were using a MongoDB database as a cache layer, so when the application would startup we would pull most of the data from our RDBMS do some processing and denormalisation then fill the MongoDB with data

The application had been running mostly fine for some time but we saw some memory issues as the data kept growing within the application and I suspected a Memory leak issue

So I decided to do a java heap dump to try to see what was happening, and I found the culprit; way down the piping of spring the org.springframework.context.support.AbstractApplicationContext class had a private property earlyApplicationEvents that was keeping references to more than 3 million instances of BasicDBObject that were not Garbage collected even though they were no longer in scope and were already written to the database

After scouring the internet a fellow developer pointed out to me that the property : earlyApplicationEvents is :

basically holds onto events during startup until the listeners can be registered, at which point it will get set to null

So with this information I could simple push my heavy duty task later on the spring application events lifecycle by using spring's handy application events mechanism.

For those who don't know what application events are; application events are available since the very beginning of the Spring framework as a mean for loosely coupled components to exchange information; the main application events are :

  1. ContextRefreshedEvent : published when the ApplicationContext is either initialized or refreshed
  2. ContextStartedEvent : when the ApplicationContext is started using the start() method on the ConfigurableApplicationContext interface. You can poll your database or you can restart any stopped application after receiving this event
  3. ContextStoppedEvent : published when the ApplicationContext is stopped using the stop() method on the ConfigurableApplicationContext interface. You can do required housekeep work after receiving this event.
  4. ContextClosedEvent : published when the ApplicationContext is closed using the close() method on the ConfigurableApplicationContext interface. A closed context reaches its end of life; it cannot be refreshed or restarted.

in my case after the context has been refreshed like so :


@Configuration
public class MyConfigClass implements ApplicationListener<ContextRefreshedEvent>{


    //Misc code
    
    private final InitializationService initializationService;

    
    @Autowired
    public MyConfigClass(InitializationService initializationService){
       this. initializationService = initializationService;
    }

 @Override
    public void onApplicationEvent(ContextRefreshedEvent event) {
        initializationService.init();
    }
}

So if I can leave you with a parting "word of wisdom" : Be careful WHEN you are running certain operations in respect to the Spring Application events lifecycle and the possible side-effects that this can cause

for more info on application events please read the spring official documentation

Working with stateless session in hibernate and jpa

When doing heavy read-only operations in with the database it can be a good idea to take advantage of using Hibernate's Stateless Session

As it name indicates this session does not keep state of the entities that it retrieves from the database and so it bypasses the L1 and L2 cache

This can have significant performance impact on heavy DBA read operations (since the state of the entities is not bet tracked)


@Component
@Scope("prototype")
public class SomeJpaService {

public static final int SCROLL_STEP = 1000;

     @PersistenceContext
     private EntityManager entityManager;


     public void doInStatelessSession(){

       LOGGER.info("ABOUT to perform Heavy read operation on DB");

       StatelessSession statelessSession = entityManager.unwrap(Session.class).getSessionFactory().openStatelessSession();

        try (ScrollableResults r = statelessSession
                .createQuery("SELECT c FROM Order c")
                .setReadOnly(true)
                .setCacheable(false)
                .scroll()) {// create the scrollable results with a try/close resources block

            while (r.scroll(SCROLL_STEP)) {
                 Order o = (Order) r.get(0);
                //perform some operation on object
              
            }
        }      


        LOGGER.info("FINISHED heavy read operation");

        statelessSession.close();
   }


}

There's however a few caveats with this approach :

  • Collections cannot be fetched on stateless sessions
  • Because of the stateless nature of the session this can only be used on read-only operations

Serving angular2 content from Spring Boot application

Recently I had to ship an Angular2/Angular4 application within a Spring boot WAR packaged application and I was having some issues when dealing with the the urls in the angular routes, since it goes through the DispatcherServlet I was getting 404 all over the place

There are a few ways to handle this, below is my preferred solution :


@Controller
public class Angular2ViewController {


    @RequestMapping({"/books", "/login", "/admin", "/logout", "/configure"})
    public String index() {
        return "forward:/index.html";
    }

}

There you go, as easy as that

The inconvenience about this solution is that you have to maintain a set of urls in your controller also

Editable combobox in HTML5 and bootstrap

Creating an editable combobox in HTML5

Recently while reading the HTML5 specification I found out a new cool feature called datalist element


Which basically allows you to create an editable select form element by providing a list of possible values to an input whilst also allowing for new values to be provided (think of it as a basic auto-complete field)

Below is an example of how to implement this :


Note that this is also compatible with Bootstrap 4 and 3

Custom converter for Mongodb and Spring Data for BigDecimal type

Recently I found that MongoDB does not support java's java.math.BigDecimal as you can read in the official spring data mongodb documentation

As it turns out java.math.BigDecimal will be converted to java.lang.String when saved to the database and parsed back to BigDecimal which in most cases I guess it's alright

However as I found out things get broken when trying to perform range queries on this field such as : $gte, $lte you will get inconsistent results since MongoDB sees this as a String

Luckily this can be easily fixed by creating 2 custom converters (one for each side), below is how I've done it :

1. Define custom converters by implementing the appropriate interface

import org.springframework.core.convert.converter.Converter;

import java.math.BigDecimal;

public class BigDecimalToDoubleConverter implements Converter<BigDecimal, Double> {

    @Override
    public Double convert(BigDecimal source) {
        return source.doubleValue();
    }
}

import org.springframework.core.convert.converter.Converter;

import java.math.BigDecimal;


public class DoubleToBigDecimalConverter implements Converter<Double, BigDecimal> {

    @Override
    public BigDecimal convert(Double source) {
        return new BigDecimal(source);
    }
}

2. Configure the MongoTemplate to use the custom converters


@Configuration
public class MongoDBConfig  {

   
     //MongoDB properties read from the application.yaml configuration file (to handle different profiles)
    @Value("${spring.data.mongodb.host}")
    private String mongoHost;

    @Value("${spring.data.mongodb.port}")
    private int mongoPort;

    @Value("${spring.data.mongodb.database}")
    private String mongoDatabase;

   
    @Bean
    public MongoTemplate mongoTemplate() throws Exception {

        MongoTemplate mongoTemplate = new MongoTemplate(mongo(), mongoDatabase);
        MappingMongoConverter mongoMapping = (MappingMongoConverter) mongoTemplate.getConverter();
        mongoMapping.setCustomConversions(customConversions()); // tell mongodb to use the custom converters
        mongoMapping.afterPropertiesSet();
        return mongoTemplate;

    }

    /**
    * Configure the MongoDB client
    * 
    **/
    @Bean
    public Mongo mongo() throws Exception {
        return new MongoClient(mongoHost, mongoPort);
    }


   /**
    * Returns the list of custom converters that will be used by the MongoDB template
    * 
    **/
    public CustomConversions customConversions() {
        return new CustomConversions(Arrays.asList(new DoubleToBigDecimalConverter(), new BigDecimalToDoubleConverter()));
    }
}


Please note that this is OK in most cases however please note that in some cases this conversion from BigDecimal to Double may lead to issues; more info : Oracle's official doc on floating point arithmetic

Angular2 prevent ngboopstrap dialogs to close when clicking outside

The default behaviour for bootstrap modal dialogs is to close when you click outside the dialog however this is not always the desired behaviour

When using Bootstrap 4 without the angular wrapper you need to add the data-backdrop='static' and data-keyboard="false" to the button in order to achieve this :


If you are using the angular wrapper for bootstrap (and assuming you have your project already configured you can achieve this like so :

export class MyComponent implements OnInit {

    constructor(private modalService: NgbModal) {}

     showDialog(): void {
         this.modalService.open(ModalDialog,{size: "lg",backdrop: 'static', keyboard: false});
    }
}


And simply calling the showDialog() method from your template should do the trick

Prevent OSX from idle sleep

There are several ways to prevent an OSX system to sleep when idle such as the caffeine application or changing the parameters in the System preferences

However there is an even easier way to accomplish this without installing any extra apps, just open a terminal window and run the following command :

pmset noidle

You should see the following output :

Preventing idle sleep (^C to exit)...

Your OSX should now stay awake whilst pmset is running

Spring boot and mongodb with geo-localisation queries 1/3

MongoDB offers a number of indexes and query mechanisms to handle geospatial information, below are some of the features offered by the database :

  • Surfaces
  • Location Data
  • Query Operations
  • Geospatial indexes
  • .....

More detailed information can be found at their website : MongoDB Geospatial queries

In this 3 part post we will be creating a sample REST API application using Spring Boot, Spring Data and MongoDB to determinate if a given "Interest Point" is within a certain distance of the provided coordinates

1. Setup

Before we start please ensure that you have a running MongoDB instance

So let's get things started, we will be using Gradle as our build tool for this project, if you're not familiar with this build tool you can read the documentation

Below is the build file used to build our project, there is some noise in here that is related to IDE support as well as a few things needed to deploy this application in heroku which can be avoided but I've chosen to leave here for the sake of completion, the most interesting parts for us are the dependencies


buildscript {
 ext {
  springBootVersion = '1.5.2.RELEASE'
 }
 repositories {
  mavenCentral()
 }
 dependencies {
  classpath("org.springframework.boot:spring-boot-gradle-plugin:${springBootVersion}") 
 }
}

apply plugin: 'java'
apply plugin: 'eclipse'
apply plugin: 'spring-boot'


jar {
 baseName = 'spring_mongodb_geospatial_api'
 version = '0.0.1-SNAPSHOT'
}
sourceCompatibility = 1.8
targetCompatibility = 1.8

repositories {
 mavenCentral()
}

task stage {
    dependsOn build
}


task wrapper(type: Wrapper) {
    gradleVersion = '2.6'
}


task copyToLib(type: Copy) {
    into "$buildDir/lib"
    from(configurations.compile)
}

stage.dependsOn(copyToLib)

dependencies {
 compile('org.springframework.boot:spring-boot-starter-data-mongodb') {
  exclude group: 'org.springframework.boot', module: 'spring-boot-starter-logging'
 }
 compile('org.springframework.boot:spring-boot-starter-web') {
  exclude group: 'org.springframework.boot', module: 'spring-boot-starter-logging'
 }
 compile('org.springframework.boot:spring-boot-starter-actuator'){
  exclude group: 'org.springframework.boot', module: 'spring-boot-starter-logging'
 }

 compile('org.springframework.boot:spring-boot-starter-log4j')

 compileOnly ("org.projectlombok:lombok:1.16.14")

 testCompile('org.springframework.boot:spring-boot-starter-test'){
  exclude group: 'org.springframework.boot', module: 'spring-boot-starter-logging'
 }
}


eclipse {
 classpath {
   containers.remove('org.eclipse.jdt.launching.JRE_CONTAINER')
   containers 'org.eclipse.jdt.launching.JRE_CONTAINER/org.eclipse.jdt.internal.debug.ui.launcher.StandardVMType/JavaSE-1.8'
 }
}


Let's configure our spring boot application with the base info for our application to run (default profile, MongoDB info, etc.):

spring:
    application:
        name: spring_mongodb_geospatial_api
    profiles:
      active: dev


---
spring:
  profiles: dev
  data:
    mongodb:
      host: localhost
      port: 27017
      repositories:
        enabled: true

Let's now configure our bootstrap class :


package com.ufasoli.tutorials.mongogeospatial.ws;

import com.fasterxml.jackson.databind.Module;
import org.springframework.boot.SpringApplication;
import org.springframework.boot.autoconfigure.SpringBootApplication;
import org.springframework.context.annotation.Bean;
import org.springframework.context.annotation.Configuration;
import org.springframework.data.mongodb.core.geo.GeoJsonModule;
import org.springframework.scheduling.annotation.EnableAsync;

@SpringBootApplication
@Configuration
@EnableAsync
public class SpringMongoDBGeospatial {

     public static void main(String[] args) {
 SpringApplication.run(SpringMongoDBGeospatial.class, args);
     }

    //Register a custom Serializer/Deserializer for the geospatial information
    @Bean
    public Module registerGeoJsonModule(){
        return new GeoJsonModule();
    }
}

This is a pretty standard spring boot class except for the fact that we are declaring a custom JSON Serializer/Deserializer for handling geospatial information

Finally let's create our data model :

package com.ufasoli.tutorials.mongogeospatial.ws.model;

import lombok.Data;

import java.util.Date;


@Data
public class Updatable {

    private Date createdAt;
    private Date updatedAt;

    private Long updatedTimestamp;


}


package com.ufasoli.tutorials.mongogeospatial.ws.model;

import lombok.Data;
import org.hibernate.validator.constraints.NotBlank;
import org.springframework.data.annotation.Id;
import org.springframework.data.mongodb.core.geo.GeoJsonPoint;
import org.springframework.data.mongodb.core.index.GeoSpatialIndexType;
import org.springframework.data.mongodb.core.index.GeoSpatialIndexed;
import org.springframework.data.mongodb.core.mapping.Document;

import java.io.Serializable;
import java.util.List;


@Document
@Data
public class InterestPoint extends Updatable implements Serializable {

    @Id
    private String uuid;

    @NotBlank
    private String displayName;

    private String displayPhoto;


    private List categories;

    @GeoSpatialIndexed(type = GeoSpatialIndexType.GEO_2DSPHERE)
    private GeoJsonPoint location;


    public InterestPoint() {
    }

    public InterestPoint(String uuid, String displayName) {
        this.uuid = uuid;
        this.displayName = displayName;
    }

    public InterestPoint(String uuid, String displayName, GeoJsonPoint location) {
        this.uuid = uuid;
        this.displayName = displayName;
        this.location = location;
    }


}


package com.ufasoli.tutorials.mongogeospatial.ws.model;

import java.io.Serializable;

/**
 * Created by ufasoli
 */
public enum Category implements Serializable{

    CAFE,
    BAR,
    RESTAURANT,
    MUSEUM,
    BANK,
    METRO_STATION,
    BUS_STATION,
    THEATRE,
    HOTEL
}


And that it's for today, on the next part we will set up the web application and controllers

Spring Data force version and lastmodified date to update on JPA Entity

Spring data has a feature that allows you to track automatically a certain amount of fields through annotations :

  • @CreatedDate : The date on which the entity was created
  • @CreatedBy : The user that created the entity
  • @LastModifiedDate : The date the entity was last modified
  • @LastModifiedBy : The user that modified last the entity
  • @Version : the version of the entity (increased each time the entity is modified and savesd)

Let's say for example we have this simple entity with the appropriate annotations :


@Entity
@EntityListeners(AuditingEntityListener.class)
public class Contact implements Serializable {

    private static final long serialVersionUID = 1L;

    @Id
    @GeneratedValue(strategy = GenerationType.IDENTITY)
    private Long id;

    @Version()
    private Long version = 0L;

    @NotNull
    @CreatedDate
    private Date creationDate;

    @NotNull
    @Size(max = 50)
    @CreatedBy
    private String creationUserLogin;

    @NotNull
    @LastModifiedDate
    private Date modificationDate;

    @NotNull
    @Size(max = 50)
    @LastModifiedBy
    private String modificationUserLogin;

   private String firstName;

   private String lastName;

 //GETTERS - SETTERS and other code
   

}

And we're using the following service class and repository :


@Service
public class ContactServiceImpl implements ContactService{

   @Autowired
   private ContactRepository contactRepository;


  public Contact save(Contact contact){
   
    return contactRepository.save(entity);
  }
}


public interface ContactRepository extends JpaRepository<Contact, Long> {

}

Now whenever you change the value of one of the fields in the entity; the fields marked with @Version, @LastModified and @LastModifiedBy will be updated with new values automatically.

Now recently I had the case where I had to "touch" an entity (like in linux) so that the version will be increased as well as @LastModified and @LastModifiedBy will be updated accordingly even though none of the fields had been updated

Now you cannot update the automatically handled fields manually, but there is a way you can achieve this by using Spring's AuditingHandler; so we could modify our service class as follows :


@Service
public class ContactServiceImpl implements ContactService{

    @Autowired
    private ContactRepository contactRepository;

    @Autowired
    private AuditingHandler auditingHandler;

   
    public Contact save(Contact contact, boolean forceVersionIncrease){
         //force version update even though no values have changed in the entity
         if(forceVersionIncrease){
             auditingHandler.markModified(contact);
         }
   
     return contactRepository.save(entity);
   }
}

And there you go, you should be able now to "touch" your entities and force date and version updates

Use Github as a CDN to store and serve static content (JavaScript, CSS, Images) with rawgit

In this article I will be explaining how to use Github's "raw" feature coupled with rawgit to store and serve static content

Please note I assume you have some basic git knowledge
1.- Creating a Github account

Ok so first things first, in order to do this you need a Github account; so if you don't have one head up to the GitHub website and create one ; go ahead I'll wait :)

2.- Creating a Github repository

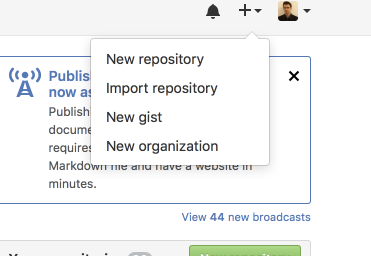
Login to your Git account and create a new repository :

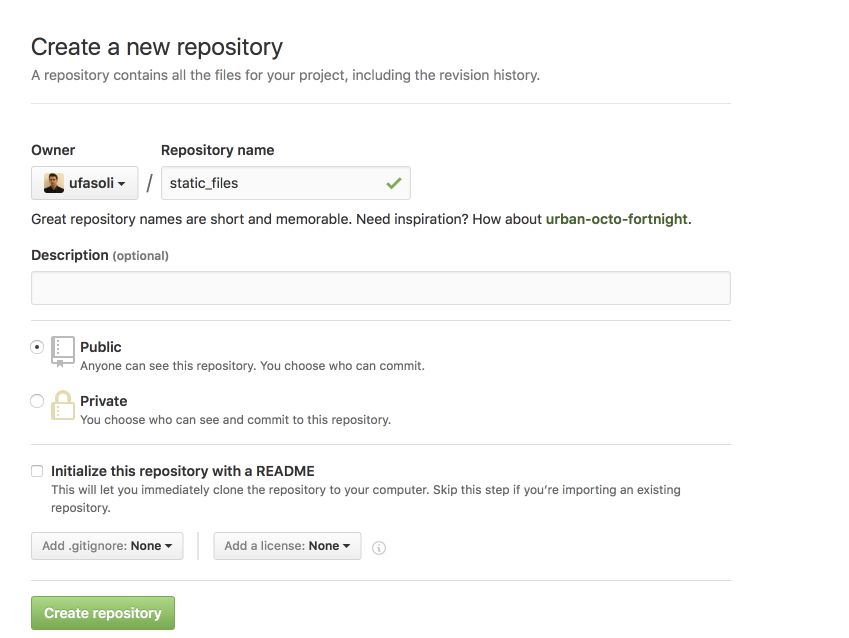
Provide a name for your repo (for example static_files) :

3.- Build repository structure

We will now create a folder structure for our repository in order for us to organise the files, for example :

  • css
  • js
  • img

So now go ahead and clone your git repository from either the command line or with your favorite tool

git clone https://github.com/xxxx/static_files.git

Once the repository is cloned; go ahead and create the 3 folders mentioned above

cd static_files
mkdir css
mkdir js
mkdir img

Ok so Git does not allow you to commit empty folders, so now in order to commit our folder structure we have to add at least 1 file to each one of the folders; at this point either :

  • copy your existing files to their respective folder based on their type (images, javascript, etc.)
  • create your content files in the respective folders (i.e. custom javascript, css etc.)
  • create placeholder files in each of the folders (for example: touch js/.gitkeep ; touch css/.gitkeep; touch img/.gitkeep)
git add *
git commit -a -m "initial commit"
git push
4.- Obtain files URLs and serve them

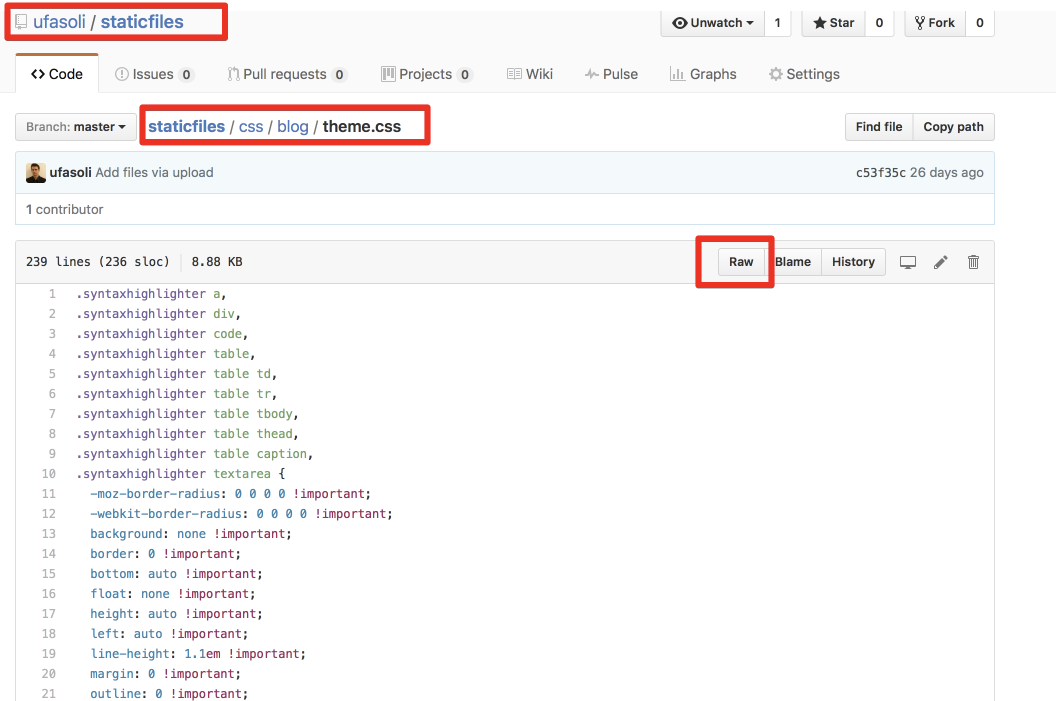
Go back to your GitHub account and open the repository then navigate to a file you want to serve, then click on the "raw" button:

After clicking on the raw button you should be redirected to a "raw" page

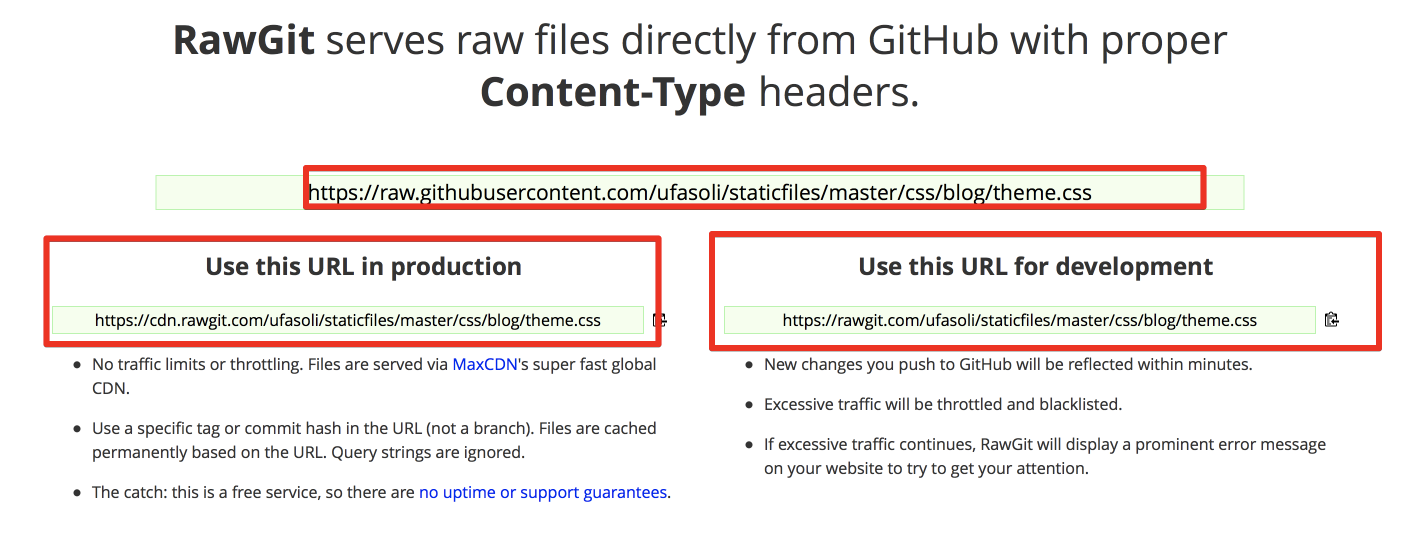
Copy the url in the browser (it should start with raw.githubusercontent.com) and head up to http://rawgit.com paste the url in the main input

Below you get 2 CDN urls that you can use either for production or development

5.- Include the files in your website

Repeat step 4 with all the files you want to serve and include them in your website


Finally please also note that as stated in their website that rawgit : is a free service, so there are no uptime or support guarantees.

OSX show used ports or listening applications with their PID

On OSX you can display applications listening on a given port using the lsof the commands described below will show listening application...