In this article I will be showing how to debug WebServices HTTPS/SSL requests by using a Man in the Middle proxy, this can especially be useful when dealing with WebServices errors since all request will go through the proxy we will be able to see all the content that is sent back and forward
There are several proxies out there that support HTTPS/SSL queries but my favorite by far is mitmproxy and this is the one I will be showing in this post.
The installation instructions detailed here for mitmproxy are for MacOSX but can easily be adapted to Linux distributions; please note that a lot of the instructions detailed here apply to Java applications
1. Install mitmproxy
Personally I use home-brew for my package management; so I assume you have it installed (otherwise you'll have to install mitmproxy manually)
Run the following command to install mitmproxy :
brew install mitmproxy
Your output should look something similar to this
==> Installing dependencies for mitmproxy: libpng, freetype, jpeg
==> Installing mitmproxy dependency: libpng
==> Downloading https://homebrew.bintray.com/bottles/libpng-1.6.21.el_capitan.bottle.tar.gz
######################################################################## 100,0%
==> Pouring libpng-1.6.21.el_capitan.bottle.tar.gz
🍺  /usr/local/Cellar/libpng/1.6.21: 25 files, 1.2M
==> Installing mitmproxy dependency: freetype
==> Downloading https://homebrew.bintray.com/bottles/freetype-2.6.3.el_capitan.bottle.tar.gz
######################################################################## 100,0%
==> Pouring freetype-2.6.3.el_capitan.bottle.tar.gz
🍺  /usr/local/Cellar/freetype/2.6.3: 61 files, 2.5M
==> Installing mitmproxy dependency: jpeg
==> Downloading https://homebrew.bintray.com/bottles/jpeg-8d.el_capitan.bottle.2.tar.gz
######################################################################## 100,0%
==> Pouring jpeg-8d.el_capitan.bottle.2.tar.gz
🍺  /usr/local/Cellar/jpeg/8d: 19 files, 713.7K
==> Installing mitmproxy
==> Downloading https://homebrew.bintray.com/bottles/mitmproxy-0.16.el_capitan.bottle.1.tar.gz
######################################################################## 100,0%
==> Pouring mitmproxy-0.16.el_capitan.bottle.1.tar.gz
🍺  /usr/local/Cellar/mitmproxy/0.16: 1,317 files, 19.8M
2. Add the appropriate SSL certificates to the keystore and truststore
Before anything you will need to add at least the 2 following certificates to your truststore and keystore :
- The SSL certificate of the site your invoking through your web service
- The mitmproxy certificate
Please note that I assume you already have a truststore and keystore already configured on your environment
Add the website certificate
   keytool -import -file mywebsite.com -alias mtimproxy -keystore truststore
   keytool -import -file mywebsite.com -alias mtimproxy -keystore keystore
When prompted provide the appropriate password
The mitmproxy certificate can be found under ~/.mitmproxy/ (if the folder does not exist yet it might be necessary to run once the mitmproxy so it will be created)
   keytool -import -file ~/.mitmproxy/mitmproxy-ca-cert.pem -alias mtimproxy -keystore truststore
   keytool -import -file ~/.mitmproxy/mitmproxy-ca-cert.pem -alias mtimproxy -keystore keystore
3. Start mitmproxy
Here I'm starting the proxy and making it listen on port 8080
mitmproxy --app-port 8080
Once the command executed you should see the console open on your terminal and you will start seeing the request going through the proxy
4. Configure Java proxy and keystore / truststore paths
        System.setProperty("javax.net.ssl.trustStore", "./truststore");
        System.setProperty("javax.net.ssl.trustStorePassword", "password");
        System.setProperty("javax.net.ssl.keystore", "./keystore");
        System.setProperty("javax.net.ssl.keyStorePassword", "password");
        System.getProperties().put("http.proxyHost", "localhost");
        System.getProperties().put("http.proxyPort", "8080");
        System.getProperties().put("https.proxyHost", "localhost");
        System.getProperties().put("https.proxyPort", "8080");
5. Check mitmproxy output
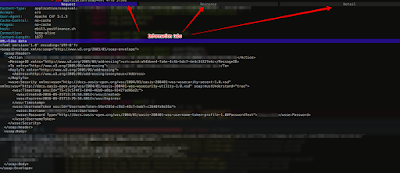
Once the request start going through the proxy you should be able to see them on the console and click on the ones you would like more detail
As you can see from the screenshots you have multiple tabs containing a lot of info


No comments:
Post a Comment