HSQLDB Query log - Output SQL statements to log file

It's sometimes useful (especially for debbuging) to be able to see all the SQL statements that the database runs

Lots of RDBMS have this very useful feature (MySQL for example calls it query log)

The HSQLDB is one of those and it can be accomplished in several ways, here I will show you how to do it within the db url and using a SQL statement :

1.- In the DB url

Just add the following parameter to your db url :


hsqldb.sqllog=3

For example :


jdbc:hsqldb:file:c:/dev/db/my_db;shutdown=true;hsqldb.sqllog=3

2.- Through a SQL statement

SET DATABASE EVENT LOG SQL LEVEL 3

Once this is done you will find a log file in the same folder as your database with the naming convention like ${dbname}.sql.log like so :


my_db.sql.log

More info here : hsqldb monitoring documentation

Content disposition duplicate headers solution for google chrome

Recently I had a problem while serving dynamic content in a Spring MVC application; (more details here) when attempting to open some of the dynamic content with Chrome I was having a weird error message :

Duplicate headers received from server The response from the server contained duplicate headers. This problem is generally the result of a misconfigured website or proxy. Only the website or proxy administrator can fix this issue. Error 349 (net::ERR_RESPONSE_HEADERS_MULTIPLE_CONTENT_DISPOSITION): Multiple distinct Content-Disposition headers received. This is disallowed to protect against HTTP response splitting attacks.

I wasn't sure why I was having this problem, since some dynamic content was working properly and I was setting only once the Content-Disposition header on my code

So after searching around a bit I stumbled upon the HTTP specs it turns out the Content-Disposition header should not contain a coma since it will be treated as a header separator

Multiple message-header fields with the same field-name MAY be present in a message if and only if the entire field-value for that header field is defined as a comma-separated list [i.e., #(values)]. It MUST be possible to combine the multiple header fields into one "field-name: field-value" pair, without changing the semantics of the message, by appending each subsequent field-value to the first, each separated by a comma.

Personally I decided to create slugs for all my file names using the Slugify library :


    com.github.slugify
    slugify
    2.1.3


  public String slugify(String originalFileName){

      String extension = FilenameUtils.getExtension(originalFileName);
      return new Slugify(true).slugify(FilenameUtils.removeExtension(originalFileName)) +"."+extension;;

  }

Spring mvc send binary content from controller

Sometimes binary files such as images, documents are stored in the database; these binary files need then to be served dynamically

Below I'll show a code snippet showing how to handle this easily with Spring MVC

Before we begin just in case this is the list of libraries I used when coding this example :

  • Spring 3+
  • Spring Data JPA
  • Eclipselink 2.4+
  • Apache Tika
  • Slugify


@Entity
public class Resouce{

    @Id @Column(name = "ID")
    @GeneratedValue(strategy = GenerationType.IDENTITY)
    private Long id;

    @Column(name = "FILE_NAME", length = 200)
    private String fileName;


   @Column(name = "FILE")
    @Lob
    private byte[] file;

   //SETTERS - GETTERS OMMITED
}


@ResponseStatus(value = HttpStatus.NOT_FOUND)
public class ResourceNotFoundException extends RuntimeException {

}


/**
 * @author ulf
 */
@Controller
@RequestMapping("/resource")
public class ResourceController{

    // a basic Spring data repository
    @Autowired
    private ResourceRepostiory resourceRepository;

    
    // simple tika instance for handling mimetype resolution
    @Autowired
    private Tika tika;

    @RequestMapping(method = RequestMethod.GET)
    public ResponseEntity resource(@RequestParam("resourceId") Long resourceId) throws IOException {

        byte[] binary = null;
        String fileName = "";


            Resouce resource= resourceRepository.findOne(resourceId);

            if (resource!= null  && section.getFile() !=null ) {
                binary = section.getFile();
                fileName = section.getFileName();
            }


        if (binary == null) {
            throw new ResourceNotFoundException();
        } else {

            String extension = FilenameUtils.getExtension(fileName);

            // slugify the fileName to handle the Google Chrome error complaining of duplicate content disposition headers whenever the file name contains a ,
            fileName = new Slugify(true).slugify(FilenameUtils.removeExtension(fileName)) +"."+extension;

            HttpHeaders headers = new HttpHeaders();
            headers.setContentType(MediaType.parseMediaType(mimetype(fileName)));
            headers.setContentDispositionFormData(fileName, fileName);
            headers.setCacheControl("must-revalidate, post-check=0, pre-check=0");
            ResponseEntity responseEntity = new ResponseEntity(binary, headers, HttpStatus.OK);
            return responseEntity;


        }


    }

    private String mimetype(String fileName) {
        return ConfigurableMimeFileTypeMap.getDefaultFileTypeMap().getContentType(fileName);
    }


}


And that's it you should now be able to serve resources dynamically based on their id

Jasper Reports PDF image quality (blurry and poor) solution

Recently I had to create a PDF Jasper Report that contained a lot of small images (I needed to represent checkboxes); however upon generating the PDF the image quality was really awful since for some reason they were been scaled (even though I had configured the report to show them in real size and the image was the same dimensions as its placeholder)

I spent quite some time searching for a solutions, one popular one was to add the following parameter either to the report as a property or in the jasperreports.properties in the CLASSPATH to be picked up by the engine but to no avail.

In the end after searching and reading different threads I found 2 solutions that work :

1. Convert your PNG to SVG

You can convert your PNGs to SVGs either by using something like Adobe Ilustrator or something similar or you can also head up to this website : PNG to SVG converter and follow the instructions

You can then place your SVGs in the appropriate folder in your application where you can pass the path of the image as a parameter when filling the report; you will also have to modify the source of your JRXML like so to use the SVG format in your report :


However this approach stopped working when I upgraded to JasperReports 5.6.1

2. Create a larger version of your PNG

This is the final solution I used since the previous one stopped working when I upgraded

This one is pretty straight-forward just create an image 400% larger than the image place-holder (hopping you have an original image that is bigger otherwise you'll end up loosing quality in the process).

For example if you take the example before where the image place holder dimensions where 15px - 15px I created an image whose dimensions where 60px - 60px and that was it.

Creating custom font icons

FontIcons have become really popular in the past few years and they have a lot of advantages such as :

  • They are vector based so no loss in quality when re-sizing
  • The ability to easily change their size/color/shade ; without involving an image editor (they are just fonts!)
  • The ability to combine font-icons or add text-decorations, gradients, textures (depending on browser support)

When creating FontIcons you have a few options, here I will discuss how to create them from PNG files

1. Converting your png to svg

Sorry I lied you cannot directly create a FontIcon from a PNG; you need to convert it first to a vectorial format SVG

Once again you have various options when it comes to converting a PNG; if you are lucky you might have an Adobe Illustrator licence where you can perform the conversion (or maybe another program I'm not aware of), otherwise you will have to use another approach, in my case I use PNG to SVG converter.

The site is pretty straightforward, just upload your PNG store somewhere the generated SVG for later use on the FontIcon website.

2. Uploading your SVG to the FontIcon generator

Head up to fontastic.me and create an account; and once the account created login.

We can now start creating our Font

Click on the "new font" button :

Once the pop-up opens provide a name for your font (whatever you like) :

With your new font selected click on "Add more Icons" and then on "Import Icons":

Upload your SVG(s) :

Once your SVG(s) are uploaded they will appear under the "Custom Icons" category; you can now select the icons you would like to include in your Font; you can create a mix between your custom icons and icons present in other well known fonts such as FontAwesome or Octicons to create your custom Font

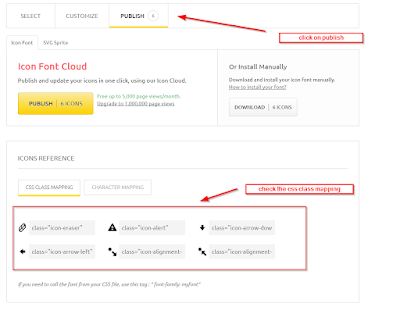
Finally you can either download your Font or publish it on the Font Cloud :

At the bottom of the page you can also see the CSS class mapping as well as the Character mapping

For this tutorial we will not publish the Font in the cloud but we will download the bundle by clicking on the "Download" button

3. Installing and using your Font and FontIcons

Once you clicked on the download button you should have a zip file containing all the fonts, and styles like so :

You can now add your FontIcons in 3 easy steps :

  1. Add the styles.css file to your HTML page(s)
  2. Copy the fontsfolder to a path accessible to your application
  3. Insert the icon class name into an HTML tag to add the corresponding icon (prefixed with 'icon-' if you chose the default options) e.g. icon-eraser and you're done

POI Excel : Making a read only final file prevent edit/select

Excel allows to make the sheet of a workbook to be read only, with the possibility to fine tune the locking options like for example :

  • Locking cell edition
  • Locking cell selection
  • Locking cell format
  • Locking cell insertion

You can get the list of locking options from the Excel security configuration dialog as you can see in the screenshot provided below :

You will then have to provide a password for the locking feature

You can also achieve this easily with POI in a few easy steps as shown in the code below :


private static void lockAll(Sheet s, String password){
   
    // cast the sheet to the appropriate type
    XSSFSheet sheet = ((XSSFSheet)s);

     //protect the sheet with a password
     sheet.protectSheet(password);
     //enable the locking features
     sheet.enableLocking();

     // fine tune the locking options (in this example we are blocking all operations on the cells: select, edit, etc.)
     sheet.lockSelectLockedCells(true);
     sheet.lockSelectUnlockedCells(true);
    

}

Better documentation with ascciidoc and asciidoctor

This article is just a link to a presentation I published on slideshare, you can check it out here :

Better documentation with ascciidoc and asciidoctor

Introspected tunnels to localhost

Have you ever found yourself in a situation when you are debbugging an application that runs on your localhost or using a remote API and where you need your application to be accessible from the outside, for example for a callback?

If like me you have; you soon realize that it's a pain!

Now there are a few ways you can deal with this but recently I found out about a great service Ngrok and I must say it works like a charm; just create an account (or not actually) then download the executable an run it!

Regarding the licence model, Ngrok is a pay-what-you-want service so depending on your needs you might have to pay for some features but not necessary.

The picture below (taken from ngrok website gives you an idea of how it works) :

One last cool thing about Ngrok is that you not only get the tunneling features but also a monitoring console and the ability to replay requests!

So go ahead and give it a try I must admit it's a great service

Extract information from a java process that is running

Sometimes you need to obtain information regarding a JAVA process and the different options used to run this process such as the encoding, the timezone, the classpath, etc.

Luckily there a tool bundled with the JDK that allows you to do so, you just need to provide it the PID of the concerned process; this can be done in different ways, personally I prefer to use another tool bundled with the JDK JPS however this might not work (in windows) for wrapped java applications such as tomcat service, so you can do it with the task manager or another tool

Once you have the PID is pretty straight-forward in its most basic form just provide the PID to the command line tool like so :

jinfo 6544

You should get some output similar to this :

Attaching to process ID 6544, please wait...
Debugger attached successfully.
Server compiler detected.
JVM version is 25.20-b23
Java System Properties:

java.vendor = Oracle Corporation
catalina.base = C:\dev\servers\tomcat8
sun.management.compiler = HotSpot 64-Bit Tiered Compilers
catalina.useNaming = true
os.name = Windows Server 2012
sun.boot.class.path = C:\Program Files\Java\jre1.8.0_20\lib\resources.jar;C:\Pro
gram Files\Java\jre1.8.0_20\lib\rt.jar;C:\Program Files\Java\jre1.8.0_20\lib\sun
rsasign.jar;C:\Program Files\Java\jre1.8.0_20\lib\jsse.jar;C:\Program Files\Java
\jre1.8.0_20\lib\jce.jar;C:\Program Files\Java\jre1.8.0_20\lib\charsets.jar;C:\P
rogram Files\Java\jre1.8.0_20\lib\jfr.jar;C:\Program Files\Java\jre1.8.0_20\clas
ses
java.util.logging.config.file = C:\dev\servers\tomcat8\c
onf\logging.properties
user.country.format = CH
sun.desktop = windows
java.vm.specification.vendor = Oracle Corporation
java.runtime.version = 1.8.0_20-b26
user.name = GERAS$
tomcat.util.scan.StandardJarScanFilter.jarsToScan = log4j-core*.jar,log4j-taglib
*.jar
shared.loader =
user.language.format = de
tomcat.util.buf.StringCache.byte.enabled = true
user.language = en
java.naming.factory.initial = org.apache.naming.java.javaURLContextFactory
sun.boot.library.path = C:\Program Files\Java\jre1.8.0_20\bin
PID = 6544
java.version = 1.8.0_20
java.util.logging.manager = org.apache.juli.ClassLoaderLogManager
user.timezone = Europe/Berlin
sun.arch.data.model = 64
java.endorsed.dirs = C:\dev\servers\tomcat8\endorsed
sun.cpu.isalist = amd64
sun.jnu.encoding = Cp1252
file.encoding.pkg = sun.io
package.access = sun.,org.apache.catalina.,org.apache.coyote.,org.apache.jasper.
,org.apache.tomcat.
file.separator = \
java.specification.name = Java Platform API Specification
java.class.version = 52.0
user.country = US
java.home = C:\Program Files\Java\jre1.8.0_20
java.vm.info = mixed mode
os.version = 6.2
path.separator = ;
java.vm.version = 25.20-b23
org.jboss.logging.provider = slf4j
user.variant =
jboss.i18n.generate-proxies = true
java.awt.printerjob = sun.awt.windows.WPrinterJob
sun.io.unicode.encoding = UnicodeLittle
awt.toolkit = sun.awt.windows.WToolkit
package.definition = sun.,java.,org.apache.catalina.,org.apache.coyote.,org.apac
he.jasper.,org.apache.naming.,org.apache.tomcat.
user.script =
java.naming.factory.url.pkgs = org.apache.naming
user.home = C:\Windows\system32\config\systemprofile
java.specification.vendor = Oracle Corporation
tomcat.util.scan.StandardJarScanFilter.jarsToSkip = bootstrap.jar,commons-daemon
.jar,tomcat-juli.jar,annotations-api.jar,el-api.jar,jsp-api.jar,servlet-api.jar,
websocket-api.jar,catalina.jar,catalina-ant.jar,catalina-ha.jar,catalina-storeco
nfig.jar,catalina-tribes.jar,jasper.jar,jasper-el.jar,ecj-*.jar,tomcat-api.jar,t
omcat-util.jar,tomcat-util-scan.jar,tomcat-coyote.jar,tomcat-dbcp.jar,tomcat-jni
.jar,tomcat-spdy.jar,tomcat-websocket.jar,tomcat-i18n-en.jar,tomcat-i18n-es.jar,
tomcat-i18n-fr.jar,tomcat-i18n-ja.jar,tomcat-juli-adapters.jar,catalina-jmx-remo
te.jar,catalina-ws.jar,tomcat-jdbc.jar,tools.jar,commons-beanutils*.jar,commons-
codec*.jar,commons-collections*.jar,commons-dbcp*.jar,commons-digester*.jar,comm
ons-fileupload*.jar,commons-httpclient*.jar,commons-io*.jar,commons-lang*.jar,co
mmons-logging*.jar,commons-math*.jar,commons-pool*.jar,jstl.jar,geronimo-spec-ja
xrpc*.jar,wsdl4j*.jar,ant.jar,ant-junit*.jar,aspectj*.jar,jmx.jar,h2*.jar,hibern
ate*.jar,httpclient*.jar,jmx-tools.jar,jta*.jar,log4j*.jar,mail*.jar,slf4j*.jar,
xercesImpl.jar,xmlParserAPIs.jar,xml-apis.jar,junit.jar,junit-*.jar,ant-launcher
.jar,cobertura-*.jar,asm-*.jar,dom4j-*.jar,icu4j-*.jar,jaxen-*.jar,jdom-*.jar,je
tty-*.jar,oro-*.jar,servlet-api-*.jar,tagsoup-*.jar,xmlParserAPIs-*.jar,xom-*.ja
r
java.library.path = C:\dev\servers\tomcat8\bin;C:\Window
s\Sun\Java\bin;C:\Windows\system32;C:\Windows;C:\ProgramData\Oracle\Java\javapat
h;C:\Windows\system32;C:\Windows;C:\Windows\System32\Wbem;C:\Windows\System32\Wi
ndowsPowerShell\v1.0\;C:\Program Files\Microsoft SQL Server\110\DTS\Binn\;C:\Pro
gram Files (x86)\Microsoft SQL Server\110\Tools\Binn\;C:\Program Files\Microsoft
 SQL Server\110\Tools\Binn\;C:\Program Files (x86)\Microsoft SQL Server\110\Tool
s\Binn\ManagementStudio\;C:\Program Files (x86)\Microsoft Visual Studio 10.0\Com
mon7\IDE\PrivateAssemblies\;C:\Program Files (x86)\Microsoft SQL Server\110\DTS\
Binn\;;.
java.vendor.url = http://java.oracle.com/
java.vm.vendor = Oracle Corporation
common.loader = "${catalina.base}/lib","${catalina.base}/lib/*.jar","${catalina.
home}/lib","${catalina.home}/lib/*.jar"
java.runtime.name = Java(TM) SE Runtime Environment
java.class.path = C:\dev\servers\tomcat8\bin\bootstrap.j
ar;C:\dev\servers\tomcat8\bin\tomcat-juli.jar
java.vm.specification.name = Java Virtual Machine Specification
java.vm.specification.version = 1.8
catalina.home = C:\dev\servers\tomcat8
sun.cpu.endian = little
sun.os.patch.level =
java.awt.headless = true
java.io.tmpdir = C:\dev\servers\tomcat8\temp
java.vendor.url.bug = http://bugreport.sun.com/bugreport/
server.loader =
os.arch = amd64
java.awt.graphicsenv = sun.awt.Win32GraphicsEnvironment
java.ext.dirs = C:\Program Files\Java\jre1.8.0_20\lib\ext;C:\Windows\Sun\Java\li
b\ext
user.dir = C:\dev\servers\tomcat8
line.separator =

java.vm.name = Java HotSpot(TM) 64-Bit Server VM
file.encoding = UTF-8
java.specification.version = 1.8

VM Flags:
Non-default VM flags: -XX:CICompilerCount=3 -XX:InitialHeapSize=4294967296 -XX:M
axHeapSize=4294967296 -XX:MaxNewSize=1431306240 -XX:MinHeapDeltaBytes=524288 -XX
:NewSize=1431306240 -XX:OldSize=2863661056 -XX:+UseCompressedClassPointers -XX:+
UseCompressedOops -XX:-UseLargePagesIndividualAllocation -XX:+UseParallelGC
Command line:  -Dcatalina.home=C:\dev\servers\tomcat8 -D
catalina.base=C:\dev\servers\tomcat8 -Djava.endorsed.dir
s=C:\dev\servers\tomcat8\endorsed -Djava.io.tmpdir=C:\Pr
ojects\Geras\Tomcat 8.0_Tomcat8_Geras_UAT\temp -Dfile.encoding=UTF-8 -Djava.util
.logging.manager=org.apache.juli.ClassLoaderLogManager -Djava.util.logging.confi
g.file=C:\dev\servers\tomcat8\conf\logging.properties ex
it -Xms4096m -Xmx4096m
Please note that these tools can be found in the BIN folder of your JDK so if you don't have that folder in your path you will need to either add it or run it from this folder in order for this to work

Edit tomcat service start-up options

There is an easy way to change a Tomcat configured as a service start-up options and configurations such as :

  • Memory options (xmx, xms, etc.)
  • Logging configuration
  • Miscellaneous Java configuration

This can be done through the tomcat binary.

1.-Head up to your tomcat's binary folder
    cd C:\dev\servers\tomcat8\bin>
2.- Launch the "Apache tomcat properties" window
tomcat8w.exe //ES//MyServiceName

Where MyServiceName is the name of the service you configured when installing tomcat as a service. This should open the following popup window :

3.- Edit your required properties

Edit the properties; save the configuration and start/restart the service and you are done

Scala : easily load an parse configuration files

There are a lot of ways to handle configuration files in a Scala program; my favorite one is to use TypeSafe's Config project

This library scans the CLASSPATH for a predefined set of configuration files in different formats

Using it it's pretty straightforward so let's get to it :

1.- Add your dependency to sbt
libraryDependencies += "com.typesafe" % "config" % "1.2.1"
2.- Loading the configuration file

//load the configuration file from the classpath
val conf = ConfigFactory.load

The convenience method ConfigFactory.load() loads the following (first-listed are higher priority):

  • system properties
  • application.conf (all resources on classpath with this name)
  • application.json (all resources on classpath with this name)
  • application.properties (all resources on classpath with this name)
  • reference.conf (all resources on classpath with this name)

The idea is that libraries and frameworks should ship with a reference.conf in their jar. Applications should provide an application.conf, or if they want to create multiple configurations in a single JVM, they could use ConfigFactory.load("myapp") to load their own myapp.conf. (Applications can provide a reference.conf also if they want, but you may not find it necessary to separate it from application.conf.)

3.- Reading the configuration file values
//retrieve configuration files values
val remoteIp = conf.getString("server.ip")
val remotePort = conf.getInt("server.port")

That's it for today; have fun!