FontIcons have become really popular in the past few years and they have a lot of advantages such as :
- They are vector based so no loss in quality when re-sizing
- The ability to easily change their size/color/shade ; without involving an image editor (they are just fonts!)
- The ability to combine font-icons or add text-decorations, gradients, textures (depending on browser support)
When creating FontIcons you have a few options, here I will discuss how to create them from PNG files
1. Converting your png to svg
Sorry I lied you cannot directly create a FontIcon from a PNG; you need to convert it first to a vectorial format SVG
Once again you have various options when it comes to converting a PNG; if you are lucky you might have an Adobe Illustrator licence where you can perform the conversion (or maybe another program I'm not aware of), otherwise you will have to use another approach, in my case I use PNG to SVG converter.
The site is pretty straightforward, just upload your PNG store somewhere the generated SVG for later use on the FontIcon website.
2. Uploading your SVG to the FontIcon generator
Head up to fontastic.me and create an account; and once the account created login.
We can now start creating our Font
Click on the "new font" button :
Once the pop-up opens provide a name for your font (whatever you like) :
With your new font selected click on "Add more Icons" and then on "Import Icons":
Upload your SVG(s) :
Once your SVG(s) are uploaded they will appear under the "Custom Icons" category; you can now select the icons you would like to include in your Font; you can create a mix between your custom icons and icons present in other well known fonts such as FontAwesome or Octicons to create your custom Font
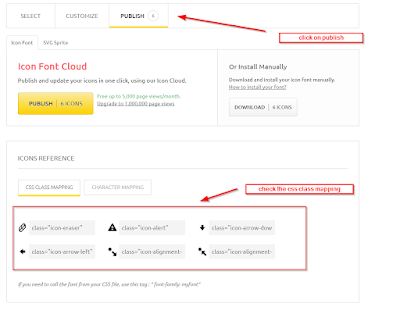
Finally you can either download your Font or publish it on the Font Cloud :
At the bottom of the page you can also see the CSS class mapping as well as the Character mapping
For this tutorial we will not publish the Font in the cloud but we will download the bundle by clicking on the "Download" button
3. Installing and using your Font and FontIcons
Once you clicked on the download button you should have a zip file containing all the fonts, and styles like so :
You can now add your FontIcons in 3 easy steps :
- Add the styles.css file to your HTML page(s)
- Copy the fontsfolder to a path accessible to your application
- Insert the icon class name into an HTML tag to add the corresponding icon (prefixed with 'icon-' if you chose the default options) e.g. icon-eraser and you're done


No comments:
Post a Comment