Access jasper reports with URL authentication and remove jasper decoration for better integration

To give you some context recently while working on a new small project I needed to include a few Jasper Reports that where hosted in a Jasper Serverrepository. The main requirement was to include these reports in a lightweight application without the JAVA stack but using only HTML+JavaScript

To my knowledge there are 3 ways to accomplish this :

  1. Allow anonymous access to a given URL pattern (I had some troubles working with this approach)
  2. Use Jasper's REST APIand authenticate through it (probably the cleaner way)
  3. Provide credentials in the URL (quick and dirty) :)

For reasons outside the scope of this article I had to use the 3rd option and provide the credentials in the URL.

Note : This is not a clean way to access the repository (especially as you may see the username and password are clear text) but sometimes there no way around it

Jasper server uses spring under the hood to provide authentication/authorization so you can use the standard Java authentication mechanism, which basically consists in providing the following parameters in the URL :

  • j_username
  • j_password
  • j_acegi_security_check (this one is optional depending on the Jasper Server version)

If your Jasper Server is configured using an organization you will need to provide it as long with your credentials using the special syntax j_username=myUsername|myOrganization

So for example if the base url for your report is the following :

http://my-jasperserver/flow.html?_flowId=viewReportFlow&standAlone=true&_flowId=viewReportFlow&ParentFolderUri=%2Freports%2Fsamples&reportUnit=%2Freports%2Fsamples%2FStandardChartsEyeCandyReport

And your credentials are :

  • username : jasperadmin
  • organization : myOrg
  • password: jasperadmin

Your URL will become :

http://my-jasperserver/flow.html?_flowId=viewReportFlow&standAlone=true&_flowId=viewReportFlow&ParentFolderUri=%2Freports%2Fsamples&reportUnit=%2Freports%2Fsamples%2FStandardChartsEyeCandyReport&j_acegi_security_check&j_username=jasperadmin|myOrg&j_password=jasperadmin

One last thing.By default when showing a report you will get all of Jasper Server decoration around it (menubars, links, etc.) you can get rid of this by appending the one of following parameters to the URL (please note that parameters are not the same depending on which version of Jasper you are using : Community or Corporate)

  • Remove jasper decoration in community version : &decorate=no
  • Remove jasper decoration in corporate version : &theme=embed&viewAsDashboardFrame=true

Create a runnable war with embedded tomcat or run a maven tomcat war project without maven and a tomcat installation

I know the title of this post is a bit of a contradiction, running a maven tomcat webapp without maven and a tomcat installation WTF?.

So before we begin let me clarify what I mean. You will need maven on your development environment and you will be using the tomcat7 maven plugin to deploy and run your application-.

When delivering a small to medium sized java web application it could be nice to have it as a self contained application allowing you to just drop-it anywhere and just run it without having to install/upgrade Maven, Apache Tomcat, etc. (of course you'll still need java :p )

What I would like to accomplish is to develop a web application using my usual tools and stack and then deliver the application in it's most simple way, without having to install and configure tomcat and maven on the target system.

Running a WAR project without a Tomcat installation is not very complicated you just use the maven tomcat plugin and run the appropriate goal (ex: tomcat7:run).

But running the app on a given system will require to have a local maven installation. Now this can avoid this by writing your own runner using the tomcat API(especially Tomcat Runner cli ) and including the appropriate tomcat JARs in your CLASSPATH.

Luckily, as often, there's an app plugin for that which honestly does pretty much all the job.

I'm talking of the tomcat7 maven plugin which you probably already use in some of your projects.Well as it turns out it has a very useful mojo that allows you to accomplish the task at hand.

The process of generating the runnable WAR is pretty simple (thank you Apache):

1. Add the tomcat plugin to your maven configuration


   com.ufasoli
    runnable-war
    1.0-SNAPSHOT
     war
...
   
     ...

     
        runnable-war


                    org.apache.tomcat.maven
                    tomcat7-maven-plugin
                    2.1
                    
                        
                            tomcat-run
                            
                                exec-war-only
                            
                            package
                            
                                /                               
                                exec-war
                                jar


Here I'm configuring the generation of the runnable war inside a maven profile. If you do not want to do this just extract the build part of my runnable-war maven profile into your main maven configuration


2. Build your maven project with the optional profiles

Run the maven command in order to build your war and runnable JAR

  mvn clean package -Prunnable-war

This will generate 3 extra files on your target folder (additionally to your packaged war file) :

  • ${yourapp-version-war-exec}.jar : A runnable JAR file that contains the tomcat embedded runtime/li>
  • war.exec.manifest : a manifest file containing the main class to run
  • war-exec.properties : a properties file containing some tomcat config options and info

3. Run your WAR file

Once the project is packaged, you can go inside the target folder and run the following command to start the tomcat server


 java -jar ${yourapp-version-war-exec}.jar

I find this approach pretty useful as you can control your server environment and configuration directly from your app, but of course it's not applicable to all projects.

As usual you can find the code source for this project over at github

Multi-hop ssh tunnel - howto : Creating a SSH tunnel with port forwarding between multiple hosts

How to create a multi-hop ssh tunnel or how to chain multiple ssh tunnels. (or SSH inception)

For security reasons sometimes you need to jump through hoops in order to connect to a server in SSH and from that server SSH to another server and so on

Consider the following scenario :

  • An application is deployed on a tomcat server on the host3 and listens on the port 8080
  • From my local machine I need to access the tomcat server on the machine host3 but it's not reachable from my machine
  • I need to carry out some tests that need a graphical browser (Firefox, Chrome, etc.)
  • host3 is only accessible from host2which is only accessible from host1

SSH tunneling can help you in this scenario; you can find more information regarding here by forwarding requests on a given port to another port on another machine all through a (or in our case multiple)SSH connection(s)

Below is a graphical representation of what I'm trying to accomplish :

So without anymore delay let's get to it :

All of the following commands are issued from a single terminal, prompt, shell or whatever you want to call it, that needs to remain open to keep alive the tunnels.

1.Connect the local machine to host1 (create the first tunnel)

[ufasoli@local]> ssh -L38080:localhost:38080 ufasoli@host1

2.Connect to host2 from host1 (create the second tunnel)

[ufasoli@host1]>ssh -L38080:localhost:38080 ufasoli@host2

3.Connect to host3 from host2 (create the third and last tunnel)

[ufasoli@host2]>ssh -L38080:localhost:8080 ufasoli@host3

4.Checking the result

Now if everything went as expected you should be able to see your tomcat application by firing your favorite browser with the and entering the target remote URL as a localhost URL with the 38080 port, like for example http://localhost:38080/mywebapp

5.Bonus points

If you prefer you can do all of the above steps in one giant SSH command using the -t flag to chain commands( I also added the -v flag for a more verbose output)

[ufasoli@local]> ssh -v -L38080:localhost:38080 ufasoli@host1  -t ssh -v -L38080:localhost:38080 ufasoli@host2 -t ssh -v -L38080:localhost:8080 ufasoli@host3

Devops mode - first steps using puppet to automate environment configuration and installation

So it has been some time since I was at the DevoxxFR 2 years ago and had the chance to assist a few presentations regarding this "obscure movement" called DevOps and even tough I'm always interested in new stuff to play around with, coming out of the conference my feeling was "meh, I'll try it out sometime later"... and I never did...

But recently I got a task assigned : "install and configure a development and integration server"

The requirements were the following :

  • Java JDK7
  • Apache MAVEN
  • Apache ANT
  • GIT
  • Subversion (SVN)
  • Jenkins with the following plugins :
    1. Git plugin
    2. Apache MAVEN plugin
    3. Apache ANT plugin
  • Jenkins should run on a custom port namely port 9999

Now I've done this several times and there's nothing really complicated about it. But usually when I do something more than a few times I try to find a way to automate things (apparently we developers are lazy by nature)

As I'm no sysadmin or Linux expert and installing and configuring these tools may be slightly different from one Linux distribution to another, I was looking for an abstraction layer that will handle all these specifics for me.

It has been some time now that I've been hearing about DevOps and tools such as Puppet or Chef but never had the chance to use them.

So this time it was the perfect occasion for a Hello world in the DevOps universe, since this was a fairly small and simple configuration

After Googling a bit I decided to use Puppet instead of Chef this is a personal preference since I find it's JSON syntax easier to read, plus somewhere I read that there were more Puppet Forge modules than Chef recipes (these are pre-configured "plugins" for easier install) out there, but once again this criteria may depend on what you are attempting to install

After following the getting started tutorial available here I must say I was surprised on how easy some things can be done (granted this is a pretty basic tutorial, but we must begin somewhere) I encourage you to read it before checking the rest of the post.

There are 2 puppet versions the Free and the Enterprise version as well as a client-server or standalone approach

With the enterprise version you get a few nice things like a GUI console, a repository where you can manage your scripts, but I prefer the self-contained standalone approach and this is what I will be showing here.

Please note that this blog ticket is not meant to be an introduction to Puppet nor a fully configured production integration server but rather a simple use case based on a personal experience to get things started in the DevOps universe.

Below are the steps that I followed to achieve the task that was given to me :

1. Install Puppet

rpm -ivh http://yum.puppetlabs.com/el/6/products/i386/puppetlabs-release-6-7.noarch.rpm
yum install puppet

This step is distribution specific (I'm using CentOS)if you are not go check the install instructions for your Linux distribution

2. Install Puppet modules

2.1 Java

 puppet module install puppetlabs/java

2.2 Maven

puppet module install maestrodev/maven

2.3 Ant

 puppet module install maestrodev/ant

2.4 Git

 puppet module install puppetlabs/git

2.5 SVN

puppet module install maestrodev/svn

2.5 Jenkins

puppet module install rtyler/jenkins

3. Write your puppet script

include java
include maven
include ant
include git
include svn
include jenkins
jenkins::plugin{ "git" : ;}
jenkins::plugin{"ant": ;}

file_line{'jenkins_port':
        path => '/etc/sysconfig/jenkins',
        line => 'JENKINS_PORT="9999"',
        match => '^JENKINS_PORT=.*$',
        ensure => present
}

These pretty simple puppet script will install the different tools by including each one of the plugins we previously installed and in the end it will change the default Jenkins to the one required by using a puppet function file_line to manipulate a file and replace a line that matches the regular expression

So there you go I had some fun playing a bit with Puppet and will surely use it again in a similar situation..

Intellij change default encoding for properties and message bundle files to utf-8

By default IntelliJ IDEA encodes Properties and Message bundle files using the System's default encoding (e.g. ISO-8859-1)

In my experience this is problematic since most frameworks out there use UTF-8 and most of the time you work in multi-platform environments.

If you are not careful and start writing say your i18n files with the default setting you'll be in hell when you realize that you have to save your files in UTF-8 for your favorite framework all your Properties files will probably become corrupt during the file-encoding conversion process.

This setting can be change either on the project level (this will affect only the current project) or on the IDE level (this will affect all new projects)

To change this setting on the IDE level just follow these easy steps :

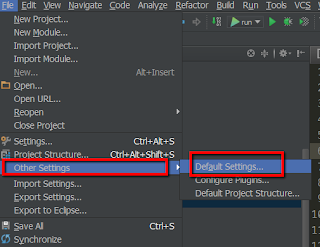
File --> Other Settings --> Default Settings --> File Encodings 
Change the value of Default encoding for properties file to UTF-8 (or another one of your choice)
Now the default encoding for all your Properties and Message bundle files in every new project will be set to the one of your choice

Intellij scala and SBT dependencies - enhancing the development experience

I'm the happy owner of an Intellij Idea licence which I love, and as stated on a recent article I started learning Scala not long ago and I'm having some trouble to feel the SBT love

While playing a bit with Scala/SBT and IntelliJ I realized that the support for it is not great there are a few plugins bundled such as the SBT executor which adds some functionality, but no syntax highlighting for the .sbt files and more importantly no dependency management inside the IDE which for me is a deal breaker (Albeit since I'm pretty new to the Scala world I might be doing it wrong...)

Luckily a few day ago I found this sbt plugin nightly builds which is a new IntelliJ plugin that will add some sugar to your Scala/SBT development such as dependency management.

You will find all the installation instructions in the link above as well as information on the plugin features

Now as stated on the website this plugin is still Alpha so there are still some rough edges and quircks. I for example had the

Error occurred during initialization of VM
Could not reserve enough space for object heap
Error: Could not create the Java Virtual Machine.
Error: A fatal exception has occurred. Program will exit.


Consult IDE log for more details (Help | Show Log)

Which can easily be solved by following the instructions over at Intellij's support website

Maven build number, versioning your projects builds automatically

By default all maven projects have a version number that you increase upon releases whether it's a minor or major release.

When you are in a scenario in which you continuously deliver application (for example on a staging server) it's probably a good idea to have some unique build identifier so as to know the exact version that is deployed on the server

Luckily the guys over at codehaus have an app plugin just for that .

I'm talking about the buildnumber-maven-plugin

This plugins will generate a build identifier each time you compile your maven project and make this identifier available through a maven variable ${buildNumber}

The plugin can generate build numbers in 3 ways :

  • SCM (my personal favorite)
  • Sequential build number
  • Timestamp

Personally I prefer the SCM approach since it's coupled with your commits, and I will here I will be showing how to do that

First you will have to configure the maven scm plugin with your details, otherwise you'll end up with error messages like :

 Failed to execute goal org.codehaus.mojo:buildnumber-maven-plugin:1.2:create (default) on project simple-webapp: Execution default of goal org.codehaus.mojo:buildnumber-maven-plugin:1.2:create failed: The scm url cannot be null. -> [Help 1]


    com.ufasoli.tutorial
    swagger-spring-mvc
    1.0-SNAPSHOT
     
     
           scm:git:https://github.com/ufasoli/spring-mvc-swagger-tutorial.git
           https://github.com/ufasoli/spring-mvc-swagger-tutorial.git
     

 ...

Here I'm using a github repository as SCM

Once your SCM details are set you can configure the build number plugin :


   ...
     
         org.codehaus.mojo
         buildnumber-maven-plugin
         1.2
         
           
              validate
              
                create


            false
            false
            5


Here I'm configuring the plugin with 3 worth noting options

  • doCheck : Check for locally modified files. If true build will fail if local modifications have not been commited
  • doUpdate : Update the local copy of your repo. If true the plugin will update your local files with the remote modifications before building
  • shortRevisionLength : shortens the git revision to the number of characters specified in the tag (5 in our case)

Once everything is configured you will be able to access the ${buildNumber} variable in your pom (even though your IDE might complain that the variable cannot be resolved don't worry it will be there when you package your project)


${project.artifactId}${project.version}_${buildNumber}


Maven filtering test resources

When running tests in maven it's common usage to have configuration files that should be filtered.

When filtering "normal" resources the syntax is the following :


...


        ${project.basedir}/src/main/resources
        true


...

Whereas when filtering test resources the syntax is following :


 ...


              ${project.basedir}/src/test/resources
              true
          
      
  ...
  

Otherwise your test resources will not be filtered

Scala sbt and np plugin type error in expression

I started learning scala a month or so ago, and I must say SBT is a bit of a pain to use to me ( Maven I miss you!!).

I know you can use Maven to build your scala projects instead of SBT but I was trying to do it the "scala" way

While trying to get started with a simple Hello World and I was having some issues while getting started using SBT

When using SBT apparently it's a defacto standard to use the sbt np plugin to create a scala project skeleton. But after following the instructions on how to set-up SBT and the NP plugin I stumbled upon the following error when running sbt np:

/home/ufasoli/.sbt/0.13/_settings.sbt:1: error: not found: value npSettings
seq(npSettings:_*)
    ^
[error] Type error in expression

From what I could read there were changes introduced in the sbt version 0.13 that changed the way plugins are configured. SBT's global configuration is now versioned which, from my understading means than instead of putting your global config files under ${user_home}/.sbt/settings.sbt you will need to put it under ${user_home}/.sbt/${sbt_version}settings.sbt (0.13 in our case)


/home/ufasoli/.sbt/0.13/settings.sbt

seq(npSettings:_*)

You will then need to put your np plugin configuration under the plugins folder in my case /home/ufasoli/.sbt/0.13/plugins/np.sbt

 addSbtPlugin("me.lessis" % "np" % "0.2.0")

mkdir hello-world
sbt np

This sample project can be found at my github account here

Just clone and execute sbt run on the command prompt to see the Hello World message

Debugging a maven failsaife selenium build in intellij

Recently I had to debug a set of Selenium tests using the failsafe plugin and the embedded tomcat7 plugin using Intellij Idea

Usually you can just click on IDE's the debug button and Intellij will take care to launch the build and attach a debugger to the appropriate debug port:

However this time it wasn't working I had 2 issues with my build :

  1. My breakpoints where completely ignored
  2. The maven build just kept waiting without exiting the project even once the integration tests where finished

So I looked into the possible XML configuration tags for the failsafe plugin and thought that the <debugForkedProcess>true</debugForkedProcess> would be my salvation however I was wrong...

So what's happening here ?

By default, maven runs your tests in a separate ("forked") process. So when you set this property to true, the tests will automatically pause and await a remote debugger on port 5005

However this was not going happen since when you click on the IDE's debug button Intellij will execute a java debugging command similar to this :

java -agentlib:jdwp=transport=dt_socket,address=127.0.0.1:63093,suspend=y,server=n -Dmaven.home=C:\dev\bin\maven -Dclassworlds.conf=C:\dev\bin\maven\bin\m2.conf -Dfile.encoding=UTF-8 -classpath "C:\dev\bin\maven\boot\plexus-classworlds-2.4.2.jar;C:\dev\ide\intellij\lib\idea_rt.jar" org.codehaus.classworlds.Launcher --errors --fail-fast --strict-checksums clean verify -P selenium
Connected to the target VM, address: '127.0.0.1:63093', transport: 'socket'

Then the failsafe process will start and pause the tests waiting for a debbuger to attach to the 5005


-------------------------------------------------------
 T E S T S
-------------------------------------------------------
Listening for transport dt_socket at address: 5005

But as mentioned earlier this will not happen, because Intellij is listening on another port

Upon reading the plugin documentation over here I realized that you can change all of these configuration properties. However I kept reading the plugin documentation and found another promising configuration option <forkMode>true</forkMode>

According to the documentation the forkMode is an option to specify the forking mode. Can be "never", "once" or "always". "none" and "pertest" are also accepted for backwards compatibility. "always" forks for each test-class.

Since in our case we need to attach a debugger to a single thread in order to have our debugger to be called when hitting a break-point we will set this option to never

Now hit again the debug button in your IDE and normally Intellij should be summoned when your break-point is reached

Below is a sample maven configuration excerpt with the configuration for the failsafe plugin


...
  
    org.apache.maven.plugins
    maven-failsafe-plugin
    2.9
    
      
         integration-test
            
                integration-test


        verify
        
           verify


        never
     

...

as usual the full code for this application can be found over at my github account

the tests get executed when running the following maven goal :

mvn clean verify -Pselenium

a few tips for the road :

  • Remember to use the suffix IT on your selenium test classes (e.g: MyTestIT.java) otherwise you will have to configure the surefire plugin to ignore them
  • If like me you're running your selenium tests in a self contained mode (i.e : starting the application server, deploying the app, running the tests, stopping the server) remember to configure your server to fork to another process, otherwise the server running process will be started in a blocking mode

Glassfish Cluster SSH - Tutorial : How to create and configure a glassfish cluster with SSH (Part 2)

3. Glassfish cluster configuration

With our pre-requirements covered it's time to start configuring our cluster

A. Enabling remote access on the glassfish servers

By default the remote administration feature is disabled on the GlassFishServer This is to reduce your exposure to an attack from elsewhere in the network.

So if you attempt to administer the server remotely you will get a 403 - Forbidden HTTP status as the response. This is true regardless of whether you use the asadmin command, an IDE, or the REST interface.

You will need to start up the glassfish server on each one of your servers by executing the following command

$GFISH_HOME/bin/asadmin start-domain domain1

Once the servers are up you can turn remote administration on running the following command locally in each one of the servers (please ensure the glassfish instance is running when you execute the command) and when prompted enter the appropriate user/password :

$GFISH_HOME/bin/asadmin enable-secure-admin

This commands actually accomplishes 2 things it enables remote administration and encrypts all admin traffic.

In order for your modifications to be taken into account you will need to restart the glassfish server by running the following commands :

$GFISH_HOME/bin/asadmin stop-domain domain1

Once the sever is stopped you need to start it again so it can pick-up the remote admin parameter

You can now stop the running servers on all the nodes (except server1) by executing the above stop-domaincommand

Note : From this point forward all the operations should be executed on the server hosting the DAS(Domain Admin Server) in our case server1 so make sure it's running.


Tip : To avoid having to type your glassfish user/password when you run each command you can check my other post regarding the asadmin login command here that will prompt you once your your credentials and store them in an encrypted file under /home/gfish/.asadminpass


B. Creating the cluster nodes

A node represents a host on which the GlassFish Server software is installed.

A node must exist for every host on which GlassFish Server instances reside. A node's configuration contains information about the host such as the name of the host and the location where the GlassFish Server is installed on the host. For more info regarding glassfish nodes click here

The node for server1 is automatically created when you create your domain so we will create a node for each of the remaining servers (server2 & server3).

Creating the node2 on server2

[server1]$ $GFISH_HOME/bin/asadmin create-node-ssh --nodehost=server2 node2
Enter admin user name>  admin
Enter admin password for user "admin">
Command create-node-ssh executed successfully.

Creating the node3 on server3

[server1] $GFISH_HOME/bin/asadmin create-node-ssh --nodehost=server3 node3
Enter admin user name>  admin
Enter admin password for user "admin">
Command create-node-ssh executed successfully.

Note : If you followed my tip regarding the credentials storage your output might be slightly different (no user/password prompt)

C. Creating the cluster

Once the nodes created it's time for us to create our cluster


[server1]$ $GFISH_HOME/bin/asadmin create-cluster myCluster
Enter admin user name>  admin
Enter admin password for user "admin">
Command create-cluster executed successfully.

D. Creating the cluster instances

Now that we have the nodes and the cluster configured, we need to create the instances that will be part of the cluster.

a. Creating the local instance (instance that will be running on the same server as the DAS)

[server1]$ $GFISH_HOME/bin/asadmin create-local-instance --cluster myCluster --node localhost i_1
Command _create-instance-filesystem executed successfully.
Port Assignments for server instance i_1:
JMX_SYSTEM_CONNECTOR_PORT=28686
JMS_PROVIDER_PORT=27676
HTTP_LISTENER_PORT=28081
ASADMIN_LISTENER_PORT=24848
JAVA_DEBUGGER_PORT=29009
IIOP_SSL_LISTENER_PORT=23820
IIOP_LISTENER_PORT=23700
OSGI_SHELL_TELNET_PORT=26666
HTTP_SSL_LISTENER_PORT=28181
IIOP_SSL_MUTUALAUTH_PORT=23920
The instance, i_1, was created on host localhost
Command create-instance executed successfully.
b. Creating the remote instances

node2 --> i_2

[server1]$GFISH_HOME/bin/asadmin create-instance --cluster myCluster --node node2 i_2

node3 --> i_3

[server1]$GFISH_HOME/bin/asadmin create-instance --cluster myCluster --node node3 i_3
The message output should be similar to the one shown in the first code snippet (omitted for readability).

E. Working with the cluster

This section show a few useful commands when managing clusters

a. Showing clusters status
[server1]$GFISH_HOME/bin/asadmin list-clusters
myCluster running
b. Instance status

[server1]$ $GFISH_HOME/bin/asadmin list-instances
i_1   running
i_2   running
i_3   running
Command list-instances executed successfully.
c. Starting the cluster
/data/glassfish/bin/asadmin start-cluster myCluster
d. Stopping the cluster
$GFISH_HOME/bin/asadmin stop-cluster myCluster
d. Starting an instance
$GFISH_HOME/bin/asadmin start-instance i_1
d. Stopping an instance
$GFISH_HOME/bin/asadmin stop-instance i_1
e. Deploying a war to the cluster
$GFISH_HOME/bin/asadmin deploy --enabled=true --name=myApp:1.0 --target myCluster myApp.war

4. Configuring the glassfish as a daemon/service

In a production environment you will probably want your cluster to startup automatically (as a daemon/service) when your operating system boots

In this section I will show you how to create 2 possible scripts for starting/stopping a glassfish server under a Linux CentOS distribution (please note that depending on your Linux distribution this might not be the same)

In our cluster configuration there are mainly 2 types of instances :

  • DAS(Domain Admin Server) instance : This is our main instance it will handle the cluster configuration and propagate it to the cluster instances
  • Clustered instance : A clustered instance inherits its configuration from the cluster to which the instance belongs and shares its configuration with other instances in the cluster.

Please note that due to this difference the startup scripts for each instance type will be slightly different.

Whether we are configuring a clustered instance or DAS instance the script will be under :

/etc/init.d/glassfish
A. Creating the service script for the DAS (server1)

The following is an example start-up script for managing a glassfish DAS instance. It assumes the glassfish password is already stored in the .asadminpass file as show before.

#!/bin/bash
#
# chkconfig: 3 80 05
# description: Startup script for Glassfish
GLASSFISH_HOME=/opt/glassfish/bin;
GLASSFISH_OWNER=gfish;
GLASSFISH_DOMAIN=gfish;
CLUSTER_NAME=mycluster
export GLASSFISH_HOME GLASSFISH_OWNER GLASSFISH_DOMAIN CLUSTER_NAME
start() {
        echo -n "Starting Glassfish: "
        su $GLASSFISH_OWNER -c "$GLASSFISH_HOME/asadmin start-domain $GLASSFISH_DOMAIN"
        su $GLASSFISH_OWNER -c "$GLASSFISH_HOME/asadmin start-cluster $CLUSTER_NAME"
        echo "done"
}
stop() {
        echo -n "Stopping Glassfish: "
        su $GLASSFISH_OWNER -c "$GLASSFISH_HOME/asadmin stop-cluster $CLUSTER_NAME"
        su $GLASSFISH_OWNER -c "$GLASSFISH_HOME/asadmin stop-domain $GLASSFISH_DOMAIN"
        echo "done"
}
stop_cluster(){
     echo -n "Stopping glassfish cluster $CLUSTER_NAME"
     su $GLASSFISH_OWNER -c "$GLASSFISH_HOME/asadmin stop-cluster $CLUSTER_NAME"
     echo "glassfish cluster stopped"

}

start_cluster(){
     echo -n "Starting glassfish cluster $CLUSTER_NAME"
     su $GLASSFISH_OWNER -c "$GLASSFISH_HOME/asadmin start-cluster $CLUSTER_NAME"
     echo "Glassfish cluster started"
}
case "$1" in
        start)
                start
                ;;
        stop)
                stop
                ;;
        stop-cluster)
               stop_cluster
                ;;
       start-cluster)
              start_cluster
              ;;
        restart)
                stop
                start
                ;;
        *)
                echo $"Usage: Glassfish {start|stop|restart|start-cluster|stop-cluster}"
                exit
esac
B. Creating the service script for the cluster instances (server2,server3)

Below is an exemple script for configuring a glassfish cluster instance

#!/bin/bash
#
# chkconfig: 3 80 05
# description: Startup script for Glassfish
GLASSFISH_HOME=/opt/glassfish/bin;
GLASSFISH_OWNER=gfish;
NODE=n2
INSTANCE=i2

export GLASSFISH_HOME GLASSFISH_OWNER NODE INSTANCE
start() {
        echo -n "Starting Glassfish: "
        su $GLASSFISH_OWNER -c "$GLASSFISH_HOME/asadmin --user $GLASSFISH_ADMIN --passwordfile $GLASSFISH_PASSWORD  start-local-instance --node $NODE --sync normal $INSTANCE"
        echo "done"
}
stop() {
        echo -n "Stopping Glassfish: "
        su $GLASSFISH_OWNER -c "$GLASSFISH_HOME/asadmin stop-local-instance --node $NODE $INSTANCE"
        echo "done"
}
case "$1" in
        start)
                start
                ;;
        stop)
                stop
                ;;
        restart)
                stop
                start
                ;;
        *)
                echo $"Usage: Glassfish {start|stop|restart}"
                exit
esac

Warning : Since clustered instances cannot exist outside a cluster it's important that the local glassfish server is not started using the asadmin start-domain.If you do so you will probably loose all your cluster configuration for that instance.

You should always start the clustered instances with the command shown above

7. Troubleshooting & additional resources

I'm getting the message 'remote failure ...'


remote failure: Warning: some parameters appear to be invalid.
SSH node not created. To force creation of the node with these parameters rerun the command using the --force option.
Could not connect to host arte-epg-api1.sdv.fr using SSH.
The subsystem request failed.
The server denied the request.
Command create-node-ssh failed.

This is probably because the SFTP subsystem is not enabled on the target node. Please ensure that the following line is uncommented in the sshd_config file

Subsystem       sftp    /usr/libexec/openssh/sftp-server

Where can I find the glassfish startup/shutdown scripts ?

You can find these scripts over at my github account

Glassfish Cluster SSH - Tutorial : How to create and configure a glassfish cluster with SSH (Part 1)

0. Presentation

A cluster is a named collection of GlassFish Server instances that share the same applications, resources, and configuration information.

GlassFish Server enables you to administer all the instances in a cluster as a single unit from a single host, regardless of whether the instances reside on the same host or different hosts. You can perform the same operations on a cluster that you can perform on an unclustered instance, for example, deploying applications and creating resources.

In this we will configure a 3 node Glassfish cluster using SSH and using only the command-line util asadmin.

Below is a global picture of the target cluster structure :

The following are the conventions/assumptions that will be used throughout this tutorial

  • linux user : gfish
  • glassfish domain : domain1
  • glassfish cluster name : myCluster

1. Pre-requirements

A. SSH key configuration (Optional but used in this tutorial)

In order for the different instances of glassfish to communicate easily with each other it's a good idea to generate ssh keys for each of the users running the glassfish process (ideally the same user/password combination in each machine).

We will be generating the keys for the same user that runs the glassfish process. For this tutorial it will be assumed the user is gfish

a. Generating the ssh keys

On each of the machines (sever1, sever2, sever3) execute the following command, and leave the default options

[server] ssh-keygen -t rsa

Your output should be similar to the one below :

generating public/private rsa key pair.
Enter file in which to save the key (/home/gfish/.ssh/id_rsa):
Enter passphrase (empty for no passphrase):
Enter same passphrase again:
Your identification has been saved in /home/gfish/.ssh/id_rsa.
Your public key has been saved in /home/gfish/.ssh/id_rsa.pub.
The key fingerprint is:
00:6a:ef:30:65:45:7a:15:1f:f0:65:6d:81:03:cd:1d gfish@server1
The key's randomart image is:
+--[ RSA 2048]----+
|    ..o +oo+o+Eo |
|   . + . o += +  |
|  o + o   o  o   |
| . + . .         |
|  o .   S        |
|   +             |
|    .            |
|                 |
|                 |
+-----------------+
b. Copying the ssh keys to the servers

Once your key is generated you will need to copy your each one of the generated server keys between the different servers allowing you to connect without entering a password.

For that you will need to execute the following command on each one of the servers by slightly modifying it to reflect the target server


[server1] cat /home/gfish/.ssh/id_rsa.pub | ssh gfish@server2 'cat >> .ssh/authorized_keys'

In this example we are copying the ssh key belonging to the server1 to the server2 authorized_keys file this will allow the user gfish to connect to the api1 server without using a password.

As stated before this operation needs to be repeated for each one of the servers by by adapting the syntax to your case

In the end your key distribution should be similar to :

server1 key
server2
server3
server2 key
server1
server3(optional)
server3 key
server1
server2(optional)
c. Authorized_keys2 (optional)

Depending on the ssh version you are using you will probably make a copy of the authorized_keys file and name it authorized_keys2.

This can be done by executing the following command (again on each one of your servers :

cp authorized_keys authorized_keys2

Once the previous steps are completed you should be able to log from one server to another through SSH without the need for a password.

Execute the following command to confirm it:

[server1]ssh gfish@server2

If you are prompted to enter a password when executing the previous command then something went wrong so you should recheck your config.

B. SSH Subsytem

When deploying applications on a cluster they are deployed to the cluster nodes using SFTP. You will need to ensure that the SFTP SSH subsytem is enabled in all of the machines that will be hosting the glassfish instances

To do this please ensure that your sshd_config file (probably under /etc/ssh/sshd_config) has the following line and that it's not commented :

Subsystem       sftp    /usr/libexec/openssh/sftp-server

Otherwise you may run into this kind of message errors when creating the ssh nodes (see troubleshooting)

Fix Did not receive a signal within 15.000000 seconds. Exiting... error message

I have installed in my macbook pro OSXFuse with the NTFS-3G add-on and up until the MacOS Lion update I had no particular issues with it

With the Lion update I started getting the following error when mounting NTFS drives :

Did not receive a signal within 15.000000 seconds. Exiting...

This is a known issue and the NTFS drive was properly mounted and working despite the error message, but I found the error message pretty annoying.. luckily there's a solution to it.

Head over to bfleischer's github fuse wait repo and follow the instructions to either install the patch manually (you'll need XCode to build the source file) or via a script that he has provided

ViewResolver vs MessageConverter Spring MVC when to use

Spring has lots of ways of handling view and content resolution, which is probably a good thing since it gives you flexibility but sometimes it can be a bit problematic.

Full disclosure here I must admit I had never given much attention to all of the ways views could be resolved, usually I went with a ViewResolver for handling my views and that was it; until recently though...

For one of my projects I needed some custom JSON handling so I had defined a custom ViewResolver by extending spring's org.springframework.web.servlet.view.json.MappingJackson2JsonView and defined as the default implementation for handling JSON views like so :


Everything was working as expected until I had to annotate some methods with @ResponseBody and now every method with this annotation was not being processed by my custom ViewResolver and I couldn't understand why..

As it turns out it's pretty simple (once you read the documentation again) when you annotate a method @ResponseBody spring will delegate the rendering of the view to a HttpMessageConverter and not a ViewResolver.

So to sum up :

Handler When to use
ViewResolvers when you are trying to resolve a view or the content you are trying to serve is in elsewhere(e.g. a controller method that returns the string "index" that will be mapped to the index.xhtml page)
HttpMessageConverters when you use the @ResponseBody annotations for returning the response directly from the method without mapping to an external file

MongoDB spring data $elemMatch in field projection

Sometimes when querying a MongoDB document what you will actually need is an item of a given document's embedded collections

The issue with MongoDB is that mongo will filter out only first level documents that correspond to your query but it will not filter out embedded documents that do not correspond to your query criteria (i.e. If you are trying to find a specific book in a book saga) you will get the complete 'parent' documents with the entire sub collection you were trying to filter

So what can you do when you wish to filter a sub-collection to extract 1 subdocument ?

Enter the $elementMatch operator. Introduced in the 2.1 version the $elemMatch projection operator limits the contents of an array field that is included in the query results to contain only the array element that matches the predicate expressed by the operator.

Let's say I have a model like the following :

   {
     "id": "1",
     "series": "A song of ice and Fire",
     "author" : "George R.R. Martin",
     "books" : [
           {
               "title" : "A Game of Thrones",
               "pubYear" : 1996,
               "seriesNumber" : 1
           },
           {
               "title" : "A Clash of Kings",
               "pubYear" : 1998,
               "seriesNumber" : 2
           },
           {
               "title" : "A Storm of Swords",
               "pubYear" : 2000,
               "seriesNumber" : 3
           },
           {
               "title" : "A Feast for Crows",
               "pubYear" : 2005,
               "seriesNumber" : 4
           },
           {
               "title" : "A Dance with Dragons",
               "pubYear" : 2011,
               "seriesNumber" : 5
           },           
           {
               "title" : "The Winds of Winter",
               "pubYear" : 2014,
               "seriesNumber" : 6
           },           
           {
               "title" : "A Dream of Spring",
               "pubYear" : 2100,
               "seriesNumber" : 7
           }

      ]
}

Now let's say for example that I'm interested only in the 5th book of a given book series (A Song of ice and fire for example)

This can be accomplished in a number of different ways :

  • MapReduce functions : Supported by Spring data but maybe a bit cumbersome for what we are trying to accomplish (I will write in the future a tutorial on how to use MongoDB MapReduce functions with Spring Data and making those functions "templatable"
  • Mongo's aggregation framework : Version 2.1 introduced the aggregation framework that lets you do a lot of stuff (more info here ) however the aggregation framework is not currently supported by Spring Data
  • the $elemMatch operator

But what is the $elemMatch operator, and how do you use it?

Well You could say $elemMatch is a multi-purpose operator as it can be used either as part of the query but also as part of the fields object, where it acts as a simplified MapReduce kind-of :)

But as always there is a caveat though when using $elemMatch operator, and that is that if more than 1 embedded document matches your criteria, only the first one will be returned as stated MongoDB documentation

Now when using spring data with mongodb you can relatively easily do field projection using the fields() object exposed by the Query class like so :


  Query query = Query.query(Criteria.where("series").is("A song of ice and Fire"));
  query.fields().include("books");

However the Query class, even though is very easy to use and manipulate, doesn't give you access to some of Mongo's more powerful mechanisms like for example the $elemMatch as a projection operator.

In order for you to use the $elemMatch operator as a projection constraint you need to use a subclass of org.springframework.data.mongodb.core.query.Query i.e. org.springframework.data.mongodb.core.query.BasicQuery

So let's get down to business with an example.

Let's say we are interested only in the 4th book out of George R.R. Martin's saga a Song of ice and fire

Now if you were using the traditional Query class you will probably end up writing a 2 step logic that would look something like this (unless you were using a MapReduce function)

1. Retrieve the parent Book document that correspond to your search criteria


/**
*Returns the parent book corresponding to the sagaName criteria with the unfiltered child collection books
*/
public Book findBookNumberInSaga(String sagaName, Integer bookNumber){

   Query query = Query.query(Criteria.where("series").is(sagaName).and("books.seriesNumber").is(bookNumber));

   MongoTemplate template = getMongoTemplate();
   
   return template.find(query);

}


2. From the parent document iterate through the books collection (or use LambdaJ :p ) to recover the book you a really interested in


public class WithoutElememMatch{

public static void main(String[] args){

     Book saga = findBookNumberInSaga("A song of ice and Fire", 4);
     Book numberFor = null;
      
    Iterator<Book> books = saga.getBooks();

        while (books.hasNext()){
            Book  currentBook= books.next();

             if(book.getSeriesNumber() == 4){
                numberFor = currentBook;
             }           
        }
 
 }
//...
}


Even though the previous example is certantly not the best way to implement this logic, it works fine and it serves it purpose

Now let's implement the same thing but this time we will make the database work for us :

1. Fetch the book corresponding to the requested criteria but make the database do the work for you

Here we ask MongoDB to filter the elements in the sub-collection books to the one matching our criteria (i.e. the number 4 in the series)


/**
* Returns the parent book corresponding to the sagaName criteria with a size 1 collection 'children' collection whose seriesNumber
* property corresponds to the value of the seriesNumber argument
*/
public Book findBookNumberInSaga(String sagaName, Integer bookNumber){
        
        // the query object
        Criteria findSeriesCriteria = Criteria.where("title").is(title);
        // the field object
        Criteria findSagaNumberCriteria = Criteria.where("books").elemMatch(Criteria.where("seriesNumber").is(seriesNumber));
        BasicQuery query = new BasicQuery(findSeriesCriteria.getCriteriaObject(), findSagaNumberCriteria.getCriteriaObject());

        return  mongoOperations.find(query, Book.class);

}

 // omitted mongo template initialization


As you can see this time I didn't use the org.springframework.data.mongodb.core.query.Query class to build my query but instead I used the org.springframework.data.mongodb.core.query.BasicQuery class; because as I stated before you can only do projection in the field object by using these class

You will notice that the syntax for this class is a bit different as it takes 2 DbObjects (which are basically HashMaps) 1 for the query object and one for the field object. Much like the the mongo shell client syntax :

db.collection.find( ,  )

So now our method is implemented we can finally call it and check the results :


public class WithElememMatch{

public static void main(String[] args){

    // get the parent book
     Book parentBook = findBookNumberInSaga("A song of ice and Fire", 4);
      Book numberFor;
   
   // null checks
     if(book != null && CollectionUtils.isNotEmpty(book.getBooks()){
  // get the only book we are interested in
    numberFor = parentBook.getBooks().get(0);
  
  }
     
}
//...
 
}

So there you go hope this was useful to you, as usual you can find the code of this tutorial over at my github account here

Note : for this tutorial you will only find the 2 java classes mentioned earlier, there's no Spring / Spring data configuration (that's for another tutorial)

Glassfish changing master password and saving it to a file

Saving the master password when creating a domain is pretty straight forward just pass the --savemasterpassword flag when executing the create-domain command

${glassfish_install}/bin/asadmin create-domain --savemasterpassword mydomain
Enter admin user name [Enter to accept default "admin" / no password]> admin
Enter the admin password [Enter to accept default of no password]>
Enter the admin password again>
Enter the master password [Enter to accept default password "changeit"]>
Enter the master password again>
Default port 4848 for Admin is in use. Using 55187
Default port 8080 for HTTP Instance is in use. Using 55188
Default port 7676 for JMS is in use. Using 55189
Default port 3700 for IIOP is in use. Using 55190
Default port 8181 for HTTP_SSL is in use. Using 55191
Using default port 3820 for IIOP_SSL.
Using default port 3920 for IIOP_MUTUALAUTH.
Default port 8686 for JMX_ADMIN is in use. Using 55192
Using default port 6666 for OSGI_SHELL.
Using default port 9009 for JAVA_DEBUGGER.
Distinguished Name of the self-signed X.509 Server Certificate is:
[CN=mymachine,OU=GlassFish,O=Oracle Corporation,L=Santa Clara,ST=California,C=US]
Distinguished Name of the self-signed X.509 Server Certificate is:
[CN=mymachine,OU=GlassFish,O=Oracle Corporation,L=Santa Clara,ST=California,C=US]
No domain initializers found, bypassing customization step
Domain mydomain created.
Domain mydomain admin port is 55187.
Domain mydomain admin user is "admin".
Command create-domain executed successfully.

This will create a master-password file under

${glassfish_install}/glassfish/domains/mydomain/master-password

If you forgot to pass the --savemasterpassword flag when creating your domain you can still ask glassfish to generate this file for you by using the change-master-password command more info here

Just run the following command and enter the appropriate passwords when prompted. For this command to work the glassfish instance must be stopped

${glassfish_install}/bin/asadmin change-master-password --savemasterpassword 
Enter the new master password>
Enter the new master password again>
Command change-master-password executed successfully.
Note: If you did not specify a master password when you created your domain, the asadmin tool will use the default glassfish password : changeit

Glassfish asadmin without password

If like me you hate having to type your user/password combination every-time that you run the asadmin utility command you have 2 options

  1. Creating a password file and then using the --user --passwordfile options everytime you execute an asadmin command (ugh...)
  2. Using the asadmin login command and never think about your password again

Here's how you could implement both solutions :

1.- Creating the password file

First you will need to create a file following the directives that can be found here

AS_ADMIN_MASTERPASSWORD=mypassword
AS_ADMIN_USERPASSWORD=mypassword
AS_ADMIN_ALIASPASSWORD=mypassword
${glassfish_install}/glassfish/bin/asadmin  --user admin --passwordfile ${glassfish_install}/glassfish-password.txt list-applications mydomain

Now even though this works perfectly I find it a bit of a nag to have to write all this every-time I want to execute an asadmin command and sure I could write a bash script that wraps the underlying asadmin tool with the --user and --passwordfile options pre-generated but I just don't want to

2.- Using the asadmin login command

The one I prefer though is using the asadmin login command.

Basically what this command does is it prompts you for your glassfish credentials and then stores them in an encrypted file (.asadminpass) under the user's home folder

Here is how to use it :


${glassfish_install}/glassfish/bin/asadmin login 
Enter admin user name [default: admin]> admin
Enter admin password>
Login information relevant to admin user name [admin]
for host [localhost] and admin port [4848] stored at
[/home/user/.asadminpass] successfully.
Make sure that this file remains protected.

Once this is done you will be able to execute asadmin commands without being prompted for a password

${glassfish_install}/glassfish/bin/asadmin list-applications
Nothing to list.
Command list-applications executed successfully.

You can even store remote glassfish instances password by using the --host flag with the login command

[arte@arte-epg-api2 .ssh]$ /data/glassfish/bin/asadmin login --host myremotehost.com
Enter admin user name [default: admin]> admin
Enter admin password>
Login information relevant to admin user name [admin]
for host [myremotehost.com] and admin port [4848] stored at
[/home/user/.asadminpass] successfully.
Make sure that this file remains protected.

Glassfish cluster ssh node. Subsystem request failed error when creating a ssh node

Recently I stumbled upon a nasty and obscure error while configuring a glassfish 3.x cluster

I had all my ssh configuration properly in place with all my ssh keys between my nodes I could connect with no issues between the different machines by executing the ssh command :

[user@das~]$ssh machine1.com 

Even when I executed the asadmin command to setup the ssh configuration on the remote server everything comes up normally :

[user@das~]$ ./asadmin setup-ssh machine1.com
Successfully connected to user@achine1.com using keyfile /home/user/.ssh/id_rsa
SSH public key authentication is already configured for user@achine1.com
Command setup-ssh executed successfully.

But every-time I wanted to add a ssh node either by using the asadmin tool or the glassfish administration console I kept getting the following error message :

[user@das~]$ asadmin create-node-ssh --nodehost=machine1.com node1
remote failure: Warning: some parameters appear to be invalid.
SSH node not created. To force creation of the node with these parameters rerun the command using the --force option.
Could not connect to host machine1.com using SSH.
The subsystem request failed.
The server denied the request.
Command create-node-ssh failed.
Side-note: If you use the --force parameter as suggested by the asadmin tool, the create-ssh-node command will end successfully but problems will arise later

After searching for a bit I realized that the problem was with SSH configuration and not a really a glassfish error

As it turns out my hosting provider had disabled SFTP on the target machine's ssh configuration. Once found the solution was pretty simple, just un-comment or add the following line to your ssh_config file


Subsystem       sftp    /usr/libexec/openssh/sftp-server

You will probably need to restart sshd on the target machine

Once the sshd restarted head back to the DAS machine and try to create the ssh node again, if everything goes as planned you should get a similar output to this :

[das]asadmin create-node-ssh --nodehost=machine1.com node1
Command create-node-ssh executed successfully.

Context menu disappears in Intellij idea when right clicking and using eclipse keymap

As a former user of Eclipse I switched to the Eclipse keymap (the mac version can be found here) on Intellij Idea, but there was a bug that was pretty annoying, every-time i right clicked somewhere the context menu will quickly disappear unless I moved the mouse while clicking...

This was actually caused by a bug that was filled sometime ago and the workaround is pretty easy as stated in the bug page just remove the 'button3' mouse shortcut from the "show context menu" action in your IDE preferences

I made the small change to the XML file and filled a pull request with the author, so if it gets accepted it should take care of the bug

In any case you can either download the xml file once the pull request gets accepted or do it yourself from your IDE preferences as explained in the bug page :


Open Settings | Keymap, press Copy button to create an editable copy of the Eclipse keymap, in the copy find "Show Context Menu" action in the Other group, it has multiple shortcuts defined, delete "Button3 Click" from the list of shortcuts, press Apply. Context menu will no longer disappear after right click.

Redeploying to a remote glassfish with cargo (previous blog post follow up) - Solving the "application already registered error"

Sometimes right after you spent a whole day working on something (and blogging about it) you realize that there's actually an easier and faster way to accomplish the something.. d'oh (thank you very much brain

In my previous post here I was talking about an issue that I was having while trying to redeploy different versions of my application on the same glassfish context

To sum things up, the first time I deployed the application everything will work as expected but subsequent deployments will throw an error telling me that an application already exists for that context root (see message below) :

 Caused by: org.codehaus.cargo.util.CargoException: Deployment has failed: Action failed Deploying application to target server failed; Error occurred during deployment: Application with name myapp-1.4.8 is already registered. Either specify that redeployment must be forced, or redeploy the application. Or if this is a new deployment, pick a different name. Please see server.log for more details.

As it turns out you can use the cargo maven plugin to redeploy your application to your glassfish server as long as you still use the glassfish application versioning system described in my previous post, you can find more info on the versionning system here but basically glassfish will handle multiple versions of your application for a given context but having only 1 active at a given moment

You can exploit the versioning system by either using the naming convention {app-name}:{appVersion}.war or specifying the version in the glassfish deployment descriptor /WEB-INF/glassfish-web.xml

For some mysterious reason the I couldn't get the deployment working with the naming convention approach so I will be showing how to accomplish the remote redeployments using the deployment descriptor :

1.- Create deployment description (if necessary) and add the application version


    /myapp
    ${project.version}

2.- Configure your pom.xml

Once your deployment descriptor is configured you need to configure your pom.xml file to :

  1. Configure the maven war plugin to filter your deployment descriptor
  2. Configure your cargo plugin with the appropriate options corresponding to your environment


   4.0.0
   
      spring-mongodb:${project.version}
      
         ...
         
            org.apache.maven.plugins
            maven-war-plugin
            2.1.1
            
               false
               true
               
                  
                     ${basedir}/src/main/webapp/WEB-INF
                     true
                     WEB-INF
                     
                        **/glassfish-web.xml


            org.codehaus.cargo
            cargo-maven2-plugin
            1.1.2
            
               
                  glassfish3x
                  remote
               
               
                  runtime
                  
                     my-remote-glassfish.com
                     admin
                     mypass


                  org.glassfish.deployment
                  deployment-client
                  3.1.1


         ...


3.- (Re)Deploy your application

Once you have your configuration files "configured" go to your command line (or configure a run goal in your favorite IDE) and run the following maven command (with your server started) :

   mvn clean package cargo:redeploy

If everything works as expected you should get the following output for your maven command

[INFO] --- cargo-maven2-plugin:1.1.2:redeploy (default-cli) @ spring-mongodb ---
[INFO] ------------------------------------------------------------------------
[INFO] BUILD SUCCESS
[INFO] ------------------------------------------------------------------------
[INFO] Total time: 9.208s
[INFO] Finished at: Thu Jul 04 20:35:06 CEST 2013
[INFO] Final Memory: 18M/221M
[INFO] ------------------------------------------------------------------------

Process finished with exit code 0
Note: Please be aware that every-time that you redeploy an app glassfish will enable the latest one (one enabled application per context) so if you don't want to keep older versions don't forget to periodically remove them with the asadmin command

Glassfish remote redeploy with maven and the mojo exec plugin

So a few days ago I run into a bug that took me almost a whole day to sort out..

I usually use cargo when I want to deploy an app to a running container but today I've spent several hours trying to make my app redeploy on a remote glassfish web profile server while working within my development/integration environment.

Just to give you some context in this environment I needed to continually deploy the same application on the same server but with different versions.

The first time I deployed the application everything will work as expected but subsequent deployments will throw an error telling me that an application already exists for that context root (see message below) :

 Caused by: org.codehaus.cargo.util.CargoException: Deployment has failed: Action failed Deploying application to target server failed; Error occurred during deployment: Application with name myapp-1.4.8 is already registered. Either specify that redeployment must be forced, or redeploy the application. Or if this is a new deployment, pick a different name. Please see server.log for more details.

Now the asadmin utility tool allows forcing a redeployment by using the --force=true option on the command line but it doesn't work if the WAR file name has changed as glassfish supports only one app per context root unless you use it in conjunction with Glassfish application versioning system but more on that later (see here)

I would argue that the "--force" param should deploy the WAR for a given context and overwrite the existing app regardless if you are using the versioning system or not but that's only my point of view

Side note : While doing some research on my problem I stumbled upon a forum post stating that when using the cargo:redeploy goal the --force=true parameter is used, at the moment I cannot find that blog post so I'm sorry..

So now let's get down to business, in this tutorial I will be showing how to use the codehaus maven exec plugin

Below are the steps that you should follow :

0.- Prerequisites

a. Glassfish versionning system naming conventions

Before beginning with this tutorial you must know that in order for it to work you need to use glassfish's versionning system with your applications otherwise it will always fail when trying to deploy an app for a given context but with a different war name (e.g. myapp-1.0.war -> myapp-1.1.war)

You can find more info on the versionning system here and here but basically glassfish will handle multiple versions of your application for a given context but allowing only 1 version of the application to be active at a given moment

For the versioning system to work you need to define a version for your WAR either in the glassfish-web.xml file or with the -name argument

In this tutorial we will be using the latest (the --name) argument

Please note that you need to respect a WAR file naming convention when versioning your applications (the value for the --name parameter), that convention is :

  {applicationName}:{applicationVersion}.war --> myapp:1.0.war
b. Access rights to Glassfish install path

You will also need to install(unzip) a glassfish instance in a place accessible to the the machine that will be executing the maven goal

c. Enabling asadmin secure admin feature

Lastly Glassfish's secure admin feature needs to be enabled in order to be allowed to do remote deploys; otherwise you will get an error message

[exec] HTTP connection failed with code 403, message

You can enable the secure admin feature by running the following command on your prompt (glassfish instance must be running)

  asadmin --host [host] --port [port] enable-secure-admin

Please note that you have to restart the glassfish instance in order for this functionality to be enabled.

1.- Installing a local glassfish instance

Go to the glassfish download website and download and unzip the appropriate glassfish version (ideally the same that the one of the remote server where you are trying to deploy your app) in a directory of your choice : e.g. /var/glassfish

2.- Defining the password file

You will then need to provide the asadmin tool with a password file since it's no longer supported as a command line argument

So go ahead and create a password file (let's name it glassfish.password) in the folder of your chice (e.g. /var/glassfish/). The file should be a properties files containing the following keys with the passwords values corresponding to your environment:

AS_ADMIN_MASTERPASSWORD=myPassword
AS_ADMIN_PASSWORD=myPassword
AS_ADMIN_USERPASSWORD=myPassword

Note: For this example the password will not be encrypted (you should encrypt it in your production environment). You can find more info on securing your master password in the glassfish documentation here here

3.- Configuring the exec plugin

Head up to your pom.xml file fire up your favorite editor and edit the POM file so it looks something like :


...

 /var/glassfish/bin/asadmin
  admin
  /var/glassfish/glassfish.password
  arte-epg-apipreprod.sdv.fr


....


   myapp
   
      
         org.codehaus.mojo
         exec-maven-plugin
         1.2.1
         
            ${glassfish.asadmin.executable}
            
               --user
               ${glassfish.user}
               --passwordfile
               ${glassfish.password.file}
               --host
               ${glassfish.remote.host}
               deploy
               --force=true
               --name=${project.build.finalName}:${project.version}
               --enabled=true
               ${project.build.directory}/${project.build.finalName}.war


                  exec
               
               verify


...


Please ensure that the value of the --name argument respects glassfish's application versioning naming conventions {appName}:{appVersion}.war

 mvn clean verify
Note: Here we are binding the execution of the goal to the verify phase but you can freely change that or use instead one of the plugin's goals directly from the command line.

4.- Sum-up and final thoughts

Firstly let me tell you that this method is probably not the cleanest way to get things done but for the time being, it will suffice... (at least to me :p)

Secondly, this is not a silver bullet, as sometimes I did encounter problems for example : if the database was not up and the application was marked as not enabled in the glassfish server, or the first time that I switched from deploying without glassfish versioning system to using glassfish's versioning system

Finally, I really don't like the fact that I need a local glassfish instance to deploy on a remote server, and I wonder if it's possible to achieve something similar using the glassfish deployment-client as a maven dependency and invoking the java classes inside the dependency or somehow extend the plugin to take into account force redeploys. So if I have some free time in the near future I will explore the possibility of accomplishing the same thing without needing a glassfish installed locally

Enabling reading stats on kobo devices with side loaded epubs

I'm a big fan of ereaders and I've own several of them, I currently own a Kobo Aura HD and I'm really happy with it, but there was something missing, something from the Kindle world that I really liked the "time remaining" feature

Kobo firmware 2.3 introduced some nice utilities, similar to what amazon brought with their Kindle Paperwhite, to enhance the reading experience, among them chapter pagination and "remaining time" for book and chapter

The issue with these features is that by default they are only available for EPUBs that you bought directly from Kobo since these are actually no longer EPUBs but KEPUBs (Kobo epubs) so that they can add these new gimmicks

But as usual Calibre comes to the rescue since someone has developed a plugin (which is actually an extended Kobo driver for calibre) that enables the Kobo specific stuff to side-loaded epubs

You can find it here and the mobileread thread where you can get more infos regarding this plugin

The plugin developer states that it should work with the Kobo Aura but that is "officially untested". Well I did test it with my Kobo Aura HD, and I can say (at least for the moment) that I had 0 issues with it and all works as expected ! (once I upgraded my Calibre version that was actually pretty stale)

Maven resource filtering not working on spring configuration xml file

I recently run on a weird problem while running property filtering on tutorial project that I'm writing.

One of my configuration files (spring XML config files) was being partially filtered (only the first 2 variables were properly "filtered" while the rest was left as they were )

Below is my configuration file. Only the first 2 variables where filtered (mongo.host & mongo.port) :


I've tried a few things and realized that if I moved them around then suddenly it would work but I couldn't put my finger on what was causing the problem

So I decided to remove line by line from the bottom up and check if something will fix the problem

As it turns out what was causing the problem was the '@' in my comment right before the repository configuration.

This actually was a maven bug in the maven-resources-plugin but fear not the bug was corrected in the 2.6 version

So if you come up by this behavior check your pom.xml configuration as by default my maven was using the 2.4.1 version and change it in the build section of your POM to use the more recent version


...

...
    
            
                org.apache.maven.plugins
                maven-resources-plugin
                2.6
            
   
...


...

Spring MVC and Swagger. Generating documentation for your RESTful web services - PART 2

Automating your RESTful web services documentation Using Spring MVC with Swagger for generating it


Part 2 - Implementing some business logic and configuring Swagger


1.- Configuring swagger and swagger-ui

1.1.- What is swagger ?

Swagger is a specification and complete framework implementation for describing, producing, consuming, and visualizing RESTful web services as stated by their official website

Personally I find Swagger to be a pretty nice way to generate my web services documentation instead of having to rewrite everything again (I already comment my code so it should be enough!)

However at the moment swagger does not support Spring MVC natively but there is an implementation over at github here

As stated by the developer not all the Swagger annotations are currently supported but the implementation works mainly with the Spring MVC annotations(@Controller, @RequestMapping , etc.) which I just what I needed.

1.2.- Integrating swagger into spring

First thing to do is to create a configuration file needed by the swagger-spring-mvc implementation. So go ahead and create a swagger.properties files under src/main/resources/config


#this is the base url for your applications (basically the root url for all your webservices)
documentation.services.basePath=http://localhost:9090/spring-mvc-swagger-tutorial
documentation.services.version=1.0

head up to your spring-web.xml configuration file and add the following lines :


1.3.- Swagger UI

In order to display the web services documentation swaggers it's necessary to download and add the swagger-ui libraries to your project

To my knowledge the Swagger UI dependency cannot be found in the maven repository, so you need to downloaded manually from here :
swagger-ui download

Once you've downloaded it unzip it in your maven webbap folder. you should end up with a tree similar to this one :


Note : It's equally possible to clone the GIT repository instead of downloading the files if you prefer

You will now need to edit the index.html file and change the discoveryUrl parameter to reflect your application

From :
   "discoveryUrl": "http://petstore.swagger.wordnik.com/api/api-docs.json",  
To your application base url (eg : http://localhost:9090/spring-mvc-swagger-tutorial/api-docs.json) :
   "discoveryUrl":"http://localhost:9090/spring-mvc-swagger-tutorial/api-docs.json", 

2.- Writing the business logic

The future controller will be using a simple DAO implementation to recover data from the database

Below is the DAO interface that will be used by the controller. To save some space I will not be posting the DAO implementation here but you can get it from GitHub here

package com.ufasoli.tutorial.swagger.springmvc.core.dao;

import com.ufasoli.tutorial.swagger.springmvc.core.status.OperationResult;
import java.util.List;

public interface DAO<T, U> {

    public OperationResult create(T object);  
    public OperationResult<T> update(U id, T object);  
    public OperationResult delete(U id);  
    public T findOne(U id);  
    public List<T> findAll();
}

I realize the interface and the implementation are far from perfect there is no proper exception handling but since that is not the main goal of this tutorial please bear with me :)

3.- Writing the Spring controllers and swagger "magic"

Finally we are almost there one last thing before we can begin writing some spring controllers and adding some swagger "magic"

There are a few swagger annotations allowing you to customize what it will be printed out by the swagger-ui interface. We'll be using the following :

  • @ApiOperation : describes an API operation or method
  • @ApiParam : describes an api method parameter and it's eventual constraints (ie : required)
  • @ApiError : describes a possible error (HTTP Status) and the error's cause

Bellow is a sample spring controller annotated with the appropriate swagger annotations

package com.ufasoli.tutorial.swagger.springmvc.web.services;
import com.ufasoli.tutorial.swagger.springmvc.core.dao.DAO;
import com.ufasoli.tutorial.swagger.springmvc.core.model.Book;
import com.ufasoli.tutorial.swagger.springmvc.core.status.OperationResult;
import com.wordnik.swagger.annotations.ApiOperation;
import com.wordnik.swagger.annotations.ApiParam;
import org.springframework.beans.factory.annotation.Autowired;
import org.springframework.http.MediaType;
import org.springframework.stereotype.Controller;
import org.springframework.web.bind.annotation.*;
import java.util.List;


@Controller
@RequestMapping(value = "/books", produces = MediaType.APPLICATION_JSON_VALUE)
public class BookService {

    @Autowired
    private DAO<Book, String> bookDAO;


    @ApiOperation(value = "Creates a Book")
    @RequestMapping(method = RequestMethod.POST)
    public  @ResponseBody void create(@ApiParam(required = true, name = "book", value = "The book object that needs to be created")@RequestBody Book book){

        return bookDAO.create(book);
    }

    
    @ApiOperation(value = "Method to update a book")
    @RequestMapping(method = RequestMethod.PUT, value = "/{bookId}")
    public  @ResponseBody OperationResult<Book> update(
            @ApiParam(required = true, value = "The id of the book that should be updated", name = "bookId")@PathVariable("bookId") String bookId,
                    @ApiParam(required = true, name = "book", value = "The book object that needs to be updated")@RequestBody Book book){

        return bookDAO.update(bookId, book);
    }

    
    @RequestMapping(method = RequestMethod.GET)
    @ApiOperation(value = "Lists all the books in the database")
    public  @ResponseBody List<Book> list(){
        return bookDAO.findAll();
    }

    
    @ApiOperation(value = "Retrieves a book based on their id")
    @ApiErrors(value = {@ApiError(code=404, reason = "No book corresponding to the id was found")})
    @RequestMapping(method = RequestMethod.GET, value = "/{bookId}")
    public  @ResponseBody Book view(@ApiParam(name = "bookId" , required = true, value = "The id of the book that needs to be retrieved")@PathVariable("bookId") String bookId){
         
      Book book =  bookDAO.findOne(bookId);

        if(book == null){

            response.setStatus(404);
        }
        return book;
    }

    
    @ApiOperation(value = "Deletes a book based on their id")
    @RequestMapping(method = RequestMethod.DELETE, value = "/{bookId}")
    public  @ResponseBody OperationResult delete(@ApiParam(name = "bookId", value = "The id of the book to be deleted", required = true)@PathVariable("bookId") String bookId){
      return bookDAO.delete(bookId);

    }

}

4.- Time to check-out the generated documentation

Once again fire up your Jetty server by running the maven goal

  mvn jetty:run

Once your server is started head up to the following URL using your inseparable favorite browser :

http://localhost:9090/spring-mvc-swagger-tutorial/

If Murphy's law has not applied here we should see swagger-ui's homepage

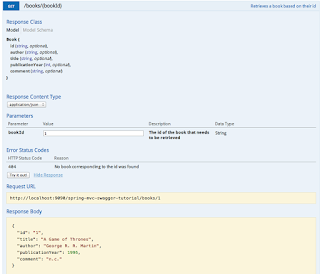
Go ahead and click on the show/hide link right next to the books element. You should see a pretty nice ui show you the different api operations available along with the required params and HTTP methods :

What's even better swagger-ui offers you a light REST client allowing you to directly test your API operations by simply selecting an operation and filling the required parameters.

You can play with the different annotations and options and observe the different results that they produce

5.- Wrapping things up

So that's it, I hope this tutorial was useful to you, even though you will no longer have any excuse to not having nice up-to-date documentation for your RESTful applications.

You can find this sample application over at github :

Swagger - Spring MVC tutorial sample application code